VAVS Home Touch Panel Guides 142-111
142-111
- Aboriginal and Torres Strait Islander in Marine Science
- Courses
- Future Students
- Current Students
- Research and Teaching
- Partners and Community
- About JCU
- Reputation and Experience
- Celebrating 50 Years
- Academy
- Anthropological Laboratory for Tropical Audiovisual Research (ALTAR)
- Anton Breinl Research Centre
- Agriculture Technology and Adoption Centre (AgTAC)
- Living on Campus
- How to apply
- Advanced Analytical Centre
- Alumni
- AMHHEC
- Aquaculture Solutions
- AusAsian Mental Health Research Group
- ARCSTA
- Area 61
- Association of Australian University Secretaries
- Australian Lions Stinger Research
- Australian Tropical Herbarium
- Australian Quantum & Classical Transport Physics Group
- Boating and Diving
- JCU-CSIRO Partnership
- Employability Edge
- Clinical Psychedelic Research Lab
- Centre for Tropical Biosecurity
- Career Ready Plan
- Careers at JCU
- Careers and Employability
- Chancellery
- Centre for Tropical Bioinformatics and Molecular Biology
- CITBA
- CMT
- CASE
- College of Business, Law and Governance
- College of Healthcare Sciences
- College of Medicine and Dentistry
- College of Science and Engineering
- CPHMVS
- Centre for Disaster Solutions
- CSTFA
- Cyber Security Hub
- Cyclone Testing Station
- The Centre for Disaster Studies
- Daintree Rainforest Observatory
- Defence
- Discover Nature at JCU
- Research Division
- Services and Resources Division
- Education Division
- Elite Athletes
- eResearch
- Environmental Research Complex [ERC]
- Estate
- Fletcherview
- Foundation for Australian Literary Studies
- Gender Equity Action and Research
- General Practice and Rural Medicine
- JCU Orientation
- Give to JCU
- Governance
- Art of Academic Writing
- Art of Academic Editing
- Graduate Research School
- Graduation
- Indigenous Education and Research Centre
- Indigenous Engagement
- Indigenous Legal Needs Project
- Inherent Requirements
- IsoTropics Geochemistry Lab
- IT Services
- International Students
- Research and Innovation Services
- JCU Eduquarium
- JCU Heroes Programs
- JCU Webinars
- JCU Events
- JCU Global Experience
- JCU Ideas Lab
- JCU Job Ready
- JCU Motorsports
- JCU Prizes
- JCU Sport
- JCU Turtle Health Research
- Language and Culture Research Centre
- CEE
- LearnJCU
- Library
- Mabo Decision: 30 years on
- MARF
- Marine Geophysics Laboratory
- New students
- Off-Campus Students
- Office of the Vice Chancellor and President
- Virtual Open Day
- Orpheus
- Open Day
- Outstanding Alumni
- Parents and Partners
- Pathways to university
- Pharmacy Full Scope
- Planning for your future
- Placements
- Policy
- PAHL
- Publications
- Professional Experience Placement
- Queensland Research Centre for Peripheral Vascular Disease
- Rapid Assessment Unit
- RDIM
- Researcher Development Portal
- Roderick Centre for Australian Literature and Creative Writing
- Safety and Wellbeing
- Scholarships
- Contextual Science for Tropical Coastal Ecosystems
- Staff
- State of the Tropics
- Strategic Procurement
- Student Equity and Wellbeing
- Student profiles
- SWIRLnet
- TARL
- TESS
- TREAD
- TropEco for Staff and Students
- TQ Maths Hub
- TUDLab
- Unicare Centre and Unicampus Kids
- UAV
- VAVS Home
- Work Health and Safety
- WHOCC for Vector-borne & NTDs
- Media
- Copyright and Terms of Use
- Australian Institute of Tropical Health & Medicine
- Pay review
Equipment
- 2x projectors
- 2x comfort monitors
- Touch panel for all AV control
- Video conference codec
- Desktop PC
- 3x Document cameras
- Wireless presenter
- Audience camera
- Presenter camera
- Wall mounted speakers
- Lectern microphone
- Wireless microphone (wireless hand held and lapel) - recommended for use with Panopto lecture capture recordings
- HDMI cable with adaptors for connecting a laptop to the AV system
- Infrared hearing assist device
- Lecture capture recording device (Panopto)
Touch the screen to activate the Audio Visual system
Local Presentation Mode
Operation
- Left Screen - show presentation on the left projector screen
- Right Screen - show presentation on the right projector screen
- Preview - view media on the preview monitor
- Audio - adjust volume
- Video Conference - set the system in video conference mode, prerequisite for all video calls including Zoom
- Exit - turn system off
- Lights - adjust the room lighting for optimum projector screen contrast.
- Blinds - control the window blinds for best lighting conditions in the theatre.
Show Presentation
The presentation can be the same or different on the two projector screens (left and right).
- Off (No Image) - show nothing.
- Computer - show the desktop PC.
- Laptop - show a laptop connected by the HDMI cable to the AV system.
- Wireless Collaborator - show the instructions for how to connect a BYOD (wireless laptop, tablet, smart phone) to the AV system.
Take note of the Room Name (IP address) and Code shown. Peruse this guide for instructions on how to connect. - Left Document Camera - show the left document camera.
- Right Document Camera - show the right document camera.
- Demo Camera - show the red lady bug document camera.
- Television - not available
- Presenter Camera - adjust and show the presenter camera.
- Audience Camera - adjust and show the audience camera.
The preview is particularly useful to adjust a document camera view prior to pushing it to the projector screen.
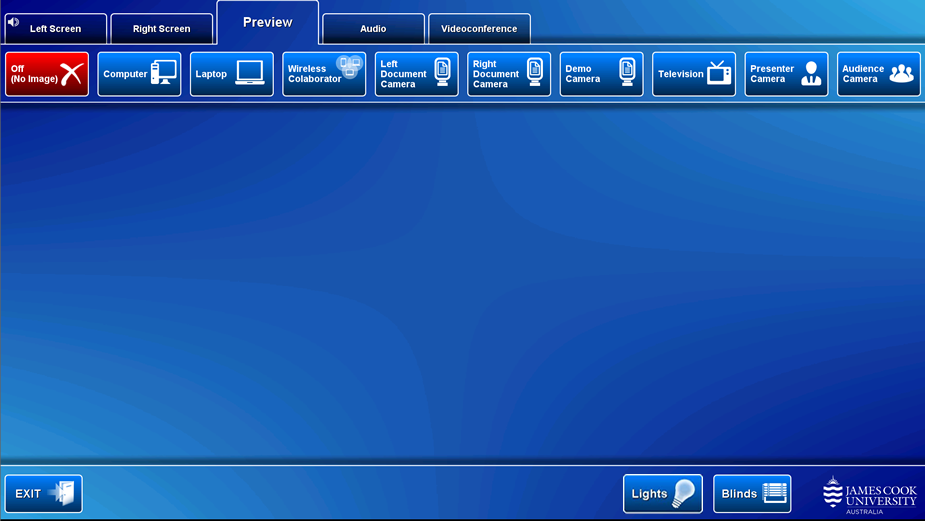
Touch the Preview tab and a media button to view it on the touch panel.
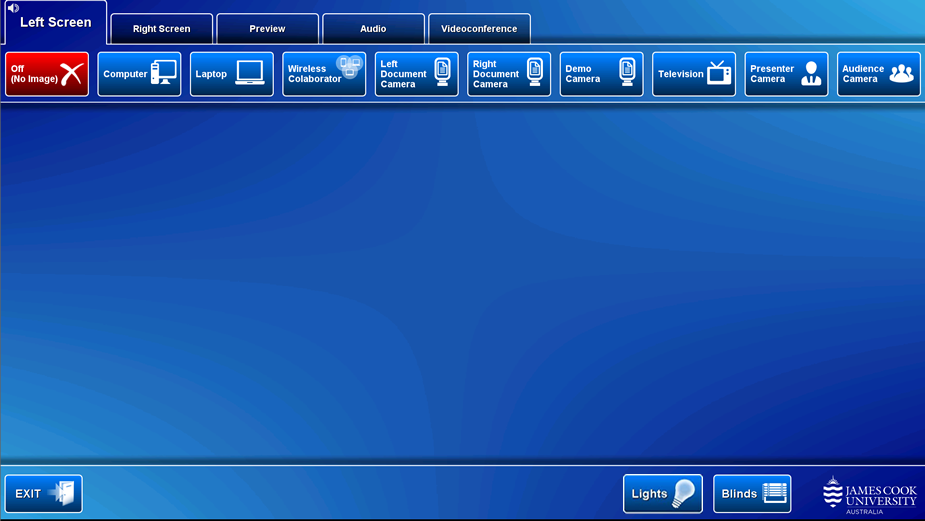
- Touch the Presenter Camera button - the current camera angle is shown on the touch panel.
- Adjust the camera to ensure you are visible at all time irrespective of movements.
- Clip on the wireless microphone (body pack & lapel)
- Turn on the wireless microphone
- Touch the Left Screen tab and the media button for device to be used for presentation
Only media shown on the left screen is recorded. - The recording light turns green on the hour indicating the recording has started
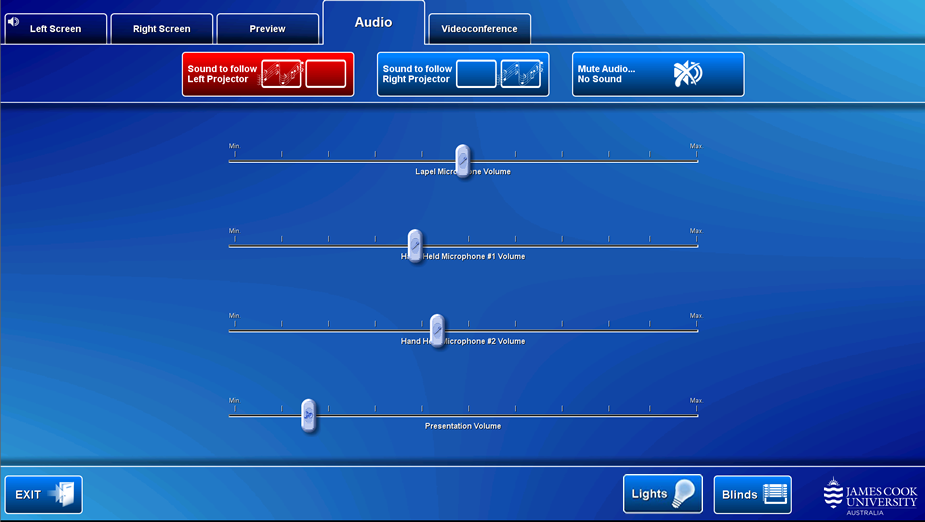
Presentation audio must be routed to the screen where the presentation is shown.
- Sound to follow Left Projector - route the audio to the left projector.
- Sound to follow Right Projector - route the audio to the right projector.
- Mute Audio... No Sound - turn off the presentation sound.
Volume control
- Lapel Microphone Volume - touch and slide to adjust the lapel microphone room voice reinforcement.
- Hand Held microphone #1 Volume - touch and slide to adjust the #1 handheld microphone voice room reinforcement.
- Hand Held microphone #2 Volume - touch and slide to adjust the #2 handheld microphone voice room reinforcement.
- Program Volume - touch and slide to adjust the playback volume of the desktop PC and laptop.
- Presentation Volume - touch and slide to adjust the playback volume of the PC and laptop
Videconference mode is a prerequisite for all video calls including Zoom.
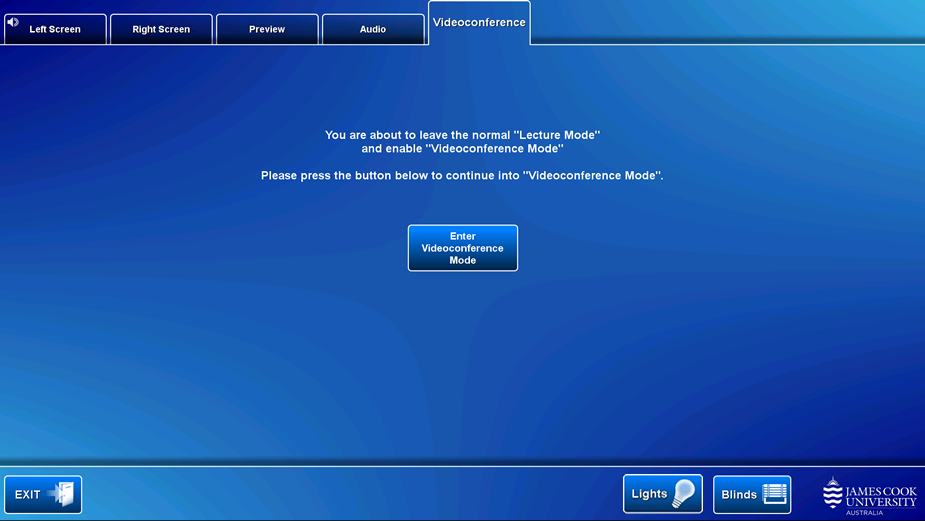
Touch the Videoconference tab and the Enter Videconference Mode button
Touch the Exit button and Yes button to turn off the AV system.
Videoconference Mode
In videoconference mode the system is capable of sending both a camera feed and presentation to the far end as well as receiving camera feeds from the participating far end rooms or zoom participants and sending and receiving audio.
The presenter camera is selected by default.

Operation
- VC Main Image - select the presenter camera or audience camera as the primary video stream (presenter) and make adjustments
- VC Presentation - touch a media button to select the second media stream (presentation)
- VC Control - connect a video call manually
- Audio - adjust microphone room reinforcement level and PC/laptop playback volume
- Exit - turn off the AV system
- Hangup - disconnect the video call
- Mute - turn off the microphones
- Layout - change the camera and presentation projector screen composition
Touch the VC Presentation tab and a media source button to show the presentation
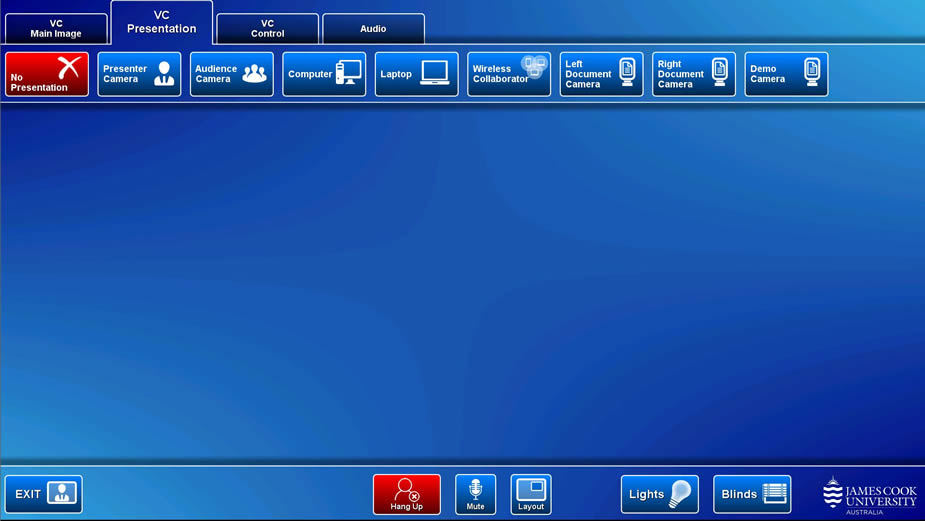
Show Presentation
- No Presentation - show no presentation
- Computer - show the AIO Desktop PC
- Laptop - show a laptop connected to the AV system by the provided HDMI cable
- Wireless Collaborator - show the instructions for how to connect a BYOD (wireless laptop, tablet, smart phone) to the AV system..
Take note of the Room Name (IP address) and Code shown. Peruse this guide for instructions on how to connect. - Left Document Camera - show the left flat bed document camera
- Right Document Camera - show the right flat bed document camera
- Demo Camera - show the lady bug document camera
- Touch the Presenter Camera button - the current camera angle is shown on the touch panel.
- Adjust the camera to ensure you are visible at all time regardless of movements.
- Clip on the wireless microphone (body pack & lapel)
- Turn on the wireless microphone
- Video call connecting
- Touch the VC Presentation tab and the media button for the presentation to be shown.
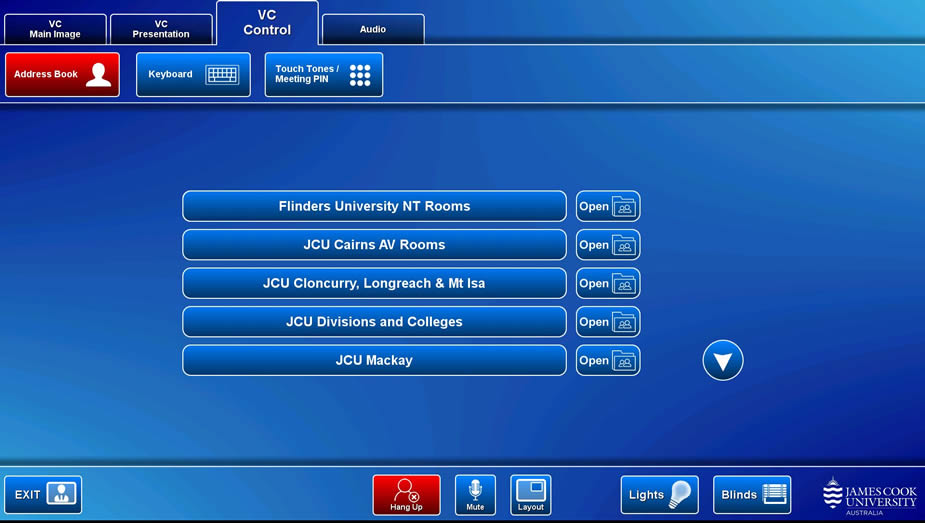
Manually connect video call
- Address Book - open a phone book folder, locate the endpoint and touch the Call button.
- Keyboard - connect a video call manually by dialling an IP address or SIP URI
- Touch tones/Meeting PIN - enter meeting ID and passcode manually.
Connect to Zoom
- Touch the Address Book button
- Locate and open the Zoom meeting folder
- Touch the Zoom Meeting Bridge (SIP) entry
- Touch the Call button
- Touch the Touch tones/Meeting PIN button (appears once the call has connected to the Zoom Bridge)
- Enter the Zoom meeting ID followed by the #-key
- Enter the passcode followed by the #-key
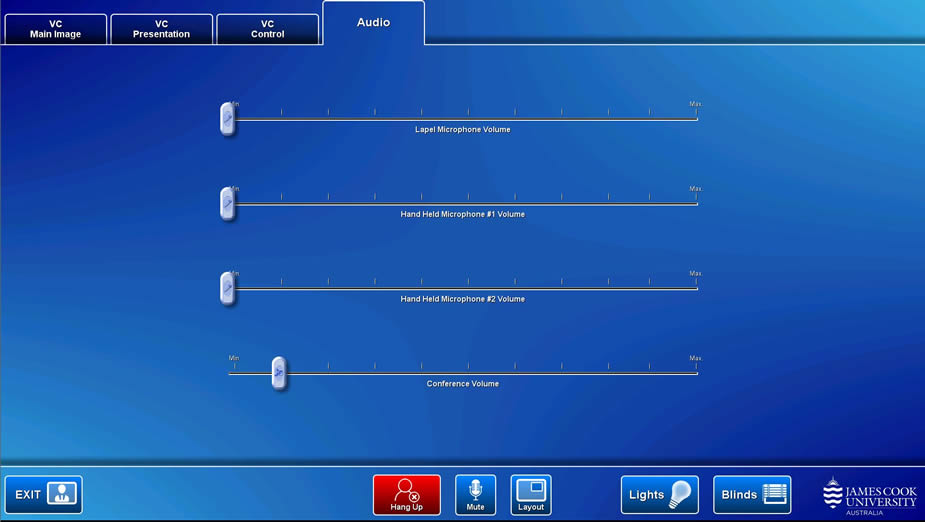
- Lapel Microphone Volume - adjust the room voice reinforcement of the lapel microphone.
- Hand Held Microphone #1 volume - adjust the room voice reinforcement of the Hand Held Mic 1.
- Hand Held Microphone #2 volume - adjust the room voice reinforcement of the Hand Held Mic 2.
- Conference Volume - adjust the far end room(s) volume and playback volume of the PC and laptop..
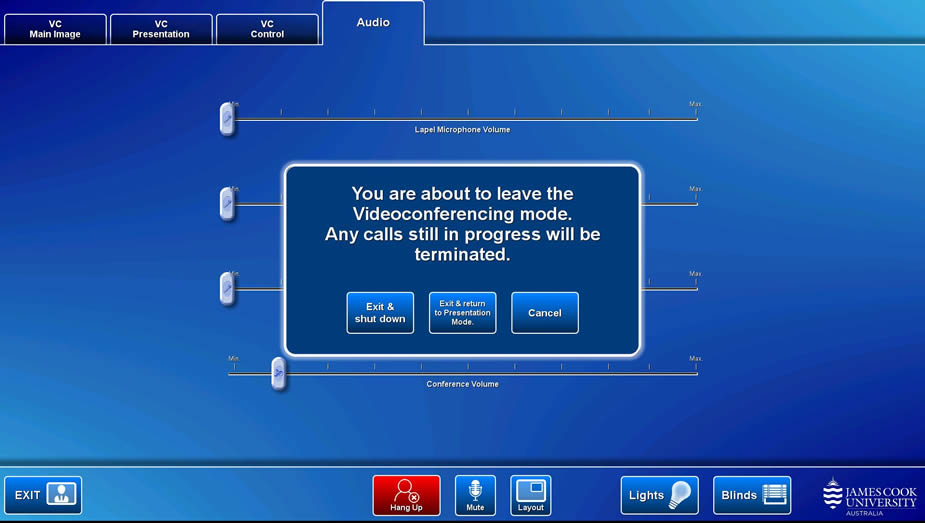
- Exit & Shut down - turn off the AV system.
- Exit & Return to Presentation Mode - proceed to local presentation mode.
- Cancel - continue in video conference mode.