VAVS Home Touch Panel Guides
Touch Panel Guides
- MRCMHR
- Future Students
- JCU Global Experience
- International Students
- Student experience
- Open Day
- How to apply
- Pathways to university
- Living on Campus
- Courses
- Publications
- Mature students
- Scholarships
- Entry options
- JCU Families
- JCU Heroes Programs
- Aboriginal and Torres Strait Islander in Marine Science
- Elite Athletes
- Defence
- Capability.Co
- AI@JCU
- AALL
- Current Students
- Student Ambassador Program
- New students
- JCU Orientation
- LearnJCU
- Placements
- EDQS
- Unicare Centre and Unicampus Kids
- Graduation
- Off-Campus Students
- JCU Job Ready
- Safety and Wellbeing
- JCU Prizes
- Professional Experience Placement
- Employability Edge
- Art of Academic Writing
- Art of Academic Editing
- Careers and Employability
- Health, Wellbeing and Belonging
- Career Ready Plan
- Careers at JCU
- Partners and Community
- School Outreach and Widening Participation
- Alumni
- International partnerships
- About JCU
- Reputation and Experience
- Chancellery
- Governance
- Celebrating 50 Years
- Academy
- Indigenous Engagement
- Education Division
- Research Festival
- Graduate Research School
- Research Division
- Research and Innovation Services
- CASE
- College of Business, Law and Governance
- College of Healthcare Sciences
- College of Medicine and Dentistry
- College of Science and Engineering
- MPE
- Anthropological Laboratory for Tropical Audiovisual Research (ALTAR)
- Rural Remote and Tropical Health Systems
- Agriculture Technology and Adoption Centre (AgTAC)
- Advanced Analytical Centre
- AMHHEC
- Aquaculture Solutions
- AMHRA
- JCU Digital Wellbeing Group
- ARCSTA
- Lions Marine Research Trust
- Australian Tropical Herbarium
- Australian Quantum & Classical Transport Physics Group
- Boating and Diving
- Clinical Psychedelic Research Lab
- Centre for Tropical Biosecurity
- Centre for Tropical Bioinformatics and Molecular Biology
- CITBA
- CMT
- Centre for Disaster Solutions
- CSTFA
- Cyclone Testing Station
- The Centre for Disaster Studies
- Daintree Rainforest Observatory
- Fletcherview
- JCU Eduquarium
- JCU Turtle Health Research
- MARFU
- Orpheus
- TESS
- JCU Ideas Lab
- CADSI
- CNL
- TARL
- eResearch
- Indigenous Education and Research Centre
- Past Course and Subject Handbooks
- Estate
- Work Health and Safety
- Staff
- Discover Nature at JCU
- Cyber Security Hub
- Association of Australian University Secretaries
- Services Division
- Environmental Research Complex [ERC]
- Foundation for Australian Literary Studies
- Gender Equity at JCU
- Give to JCU
- Indigenous Legal Needs Project
- Inherent Requirements
- IsoTropics Lab
- IT Services
- JCU Webinars
- JCU Events
- JCU Motorsports
- JCU Sport
- Library
- Mabo Decision: 30 years on
- Marine Geophysics Laboratory
- Office of the Vice Chancellor and President
- Outstanding Alumni
- Policy
- PAHL
- Queensland Research Centre for Peripheral Vascular Disease
- Rapid Assessment Unit
- RDIM
- Researcher Development Portal
- Roderick Centre for Australian Literature and Creative Writing
- Contextual Science for Tropical Coastal Ecosystems
- State of the Tropics
- Strategic Procurement
- Student profiles
- SWIRLnet
- TREAD
- TropEco for Staff and Students
- TUDLab
- VAVS Home
- WHOCC for Vector-borne & NTDs
- Media
- Copyright and Terms of Use
- Australian Institute of Tropical Health & Medicine
- JCU Respect
- Pay review
- Research
A touch panel provides an interctive user control mechanism for the audio visual (AV) equipment in many of our teaching spaces.
More complex system provide a video conference mode which is required for all video calls including Zoom.
Select a campus and room, from the dropdowns below, to see an in depth guide on how to use a room's AV Touch Panel.
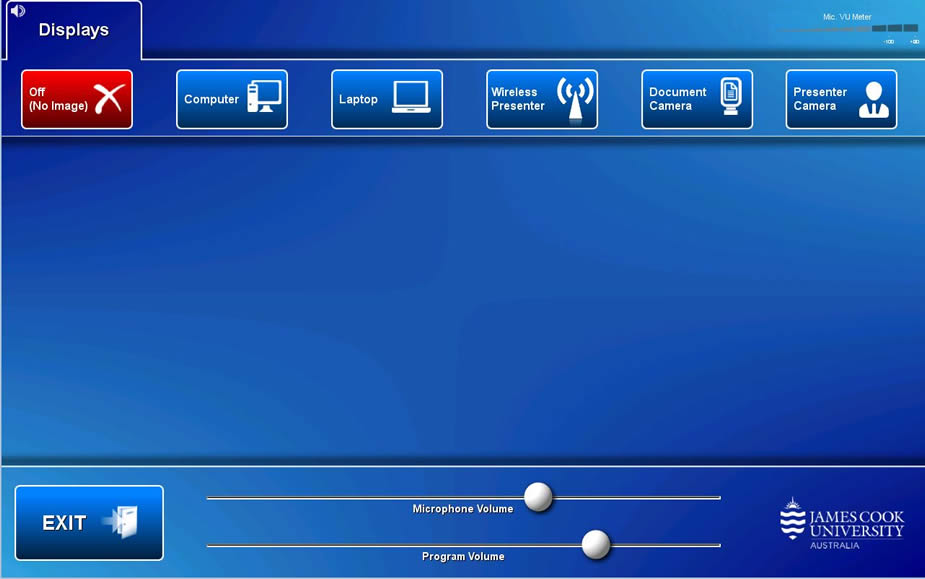
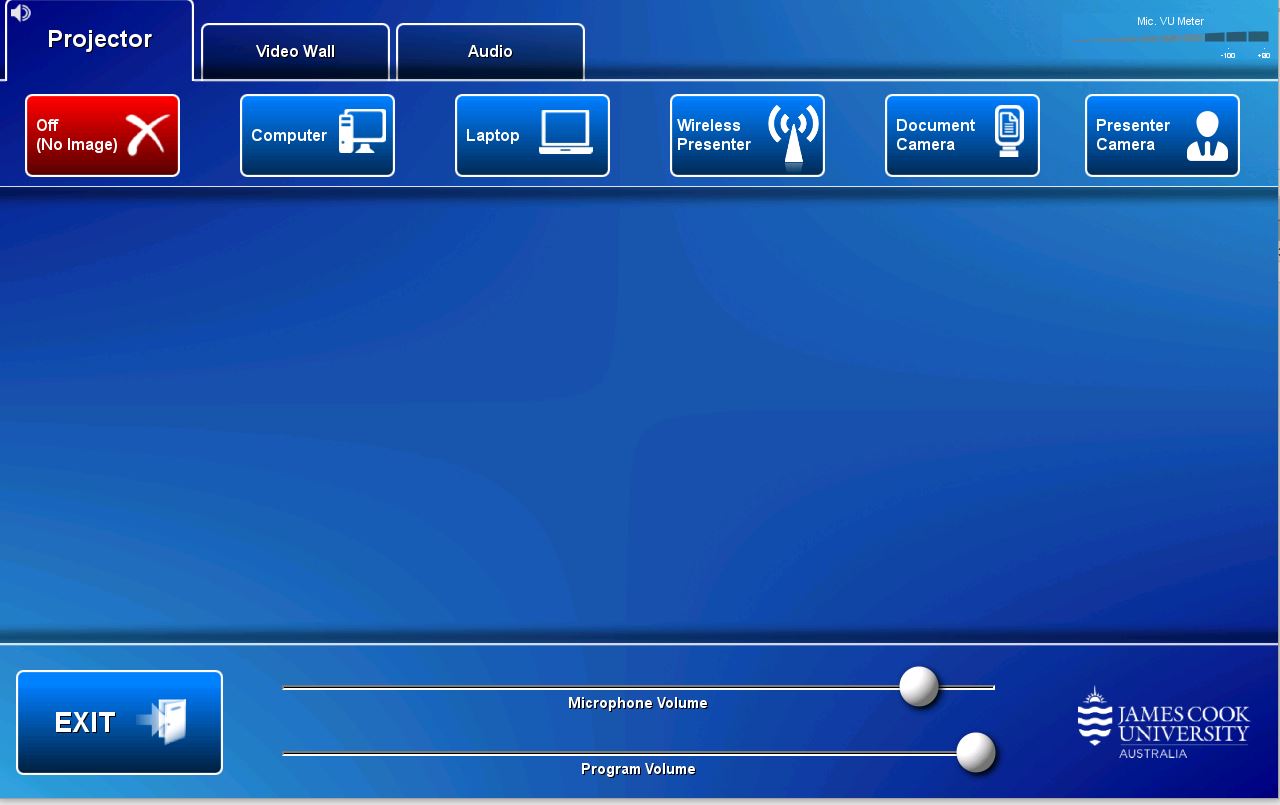
Room A1-014 Touch Panel
Touch panel operation
Equipment
- Projector
- Touch panel for all AV control
- AIO Desktop PC
- Document Camera
- Wireless Presenter
- Wall mounted speakers
Operation
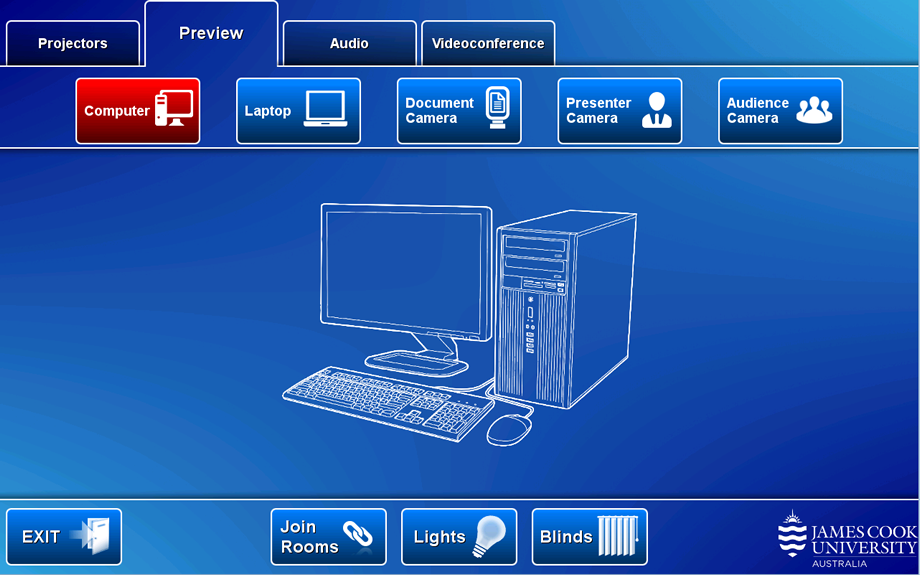
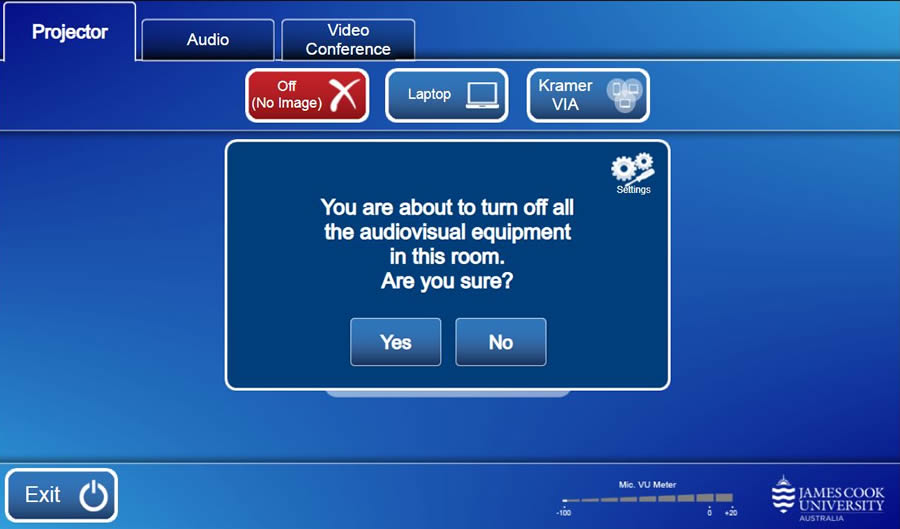
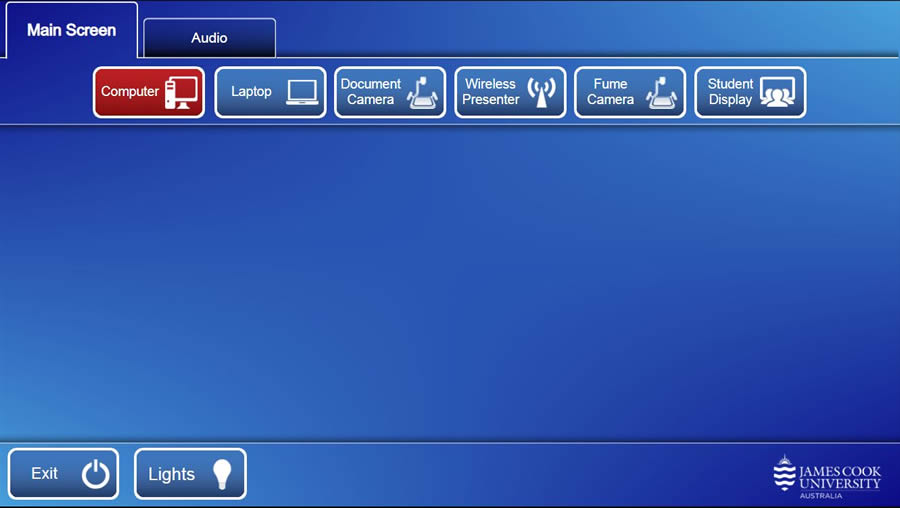
- Main Screen - show presentation on display system
- Exit - turn off the AV system
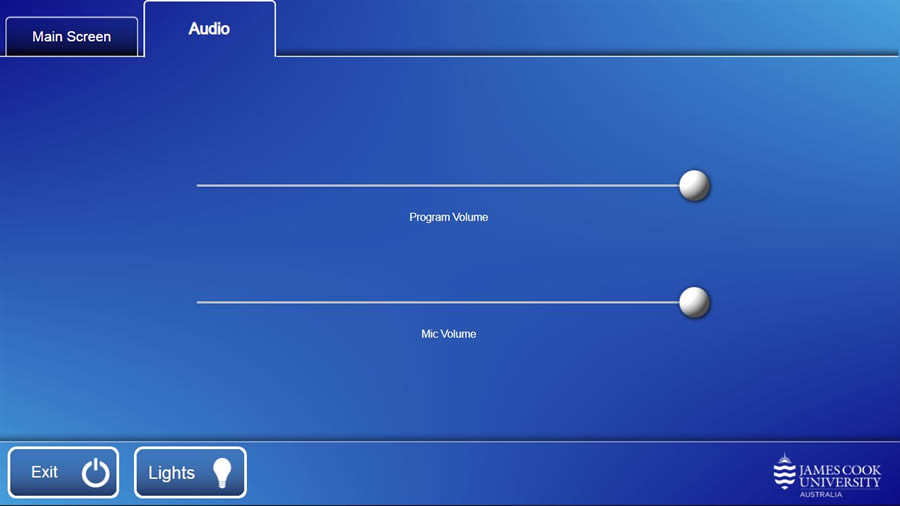
- Volume - touch and slide the Volume button to adjust the playback volume of the PC and laptop
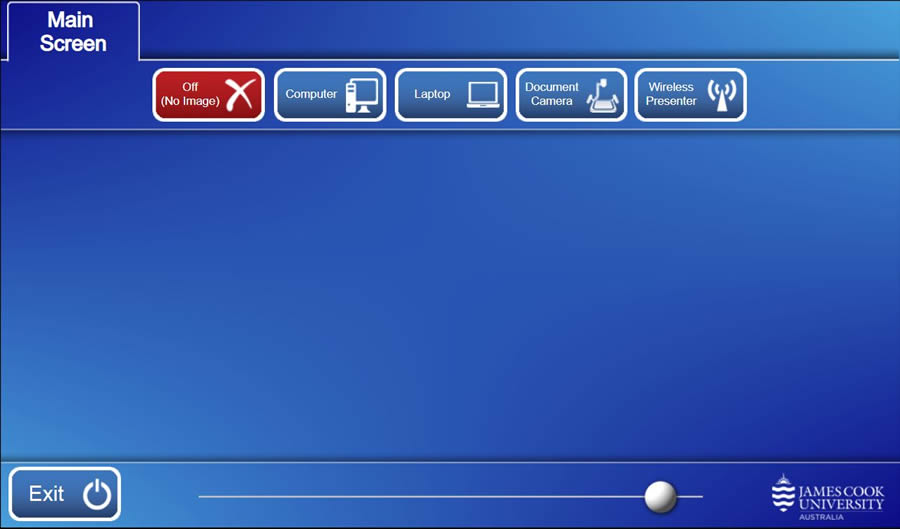
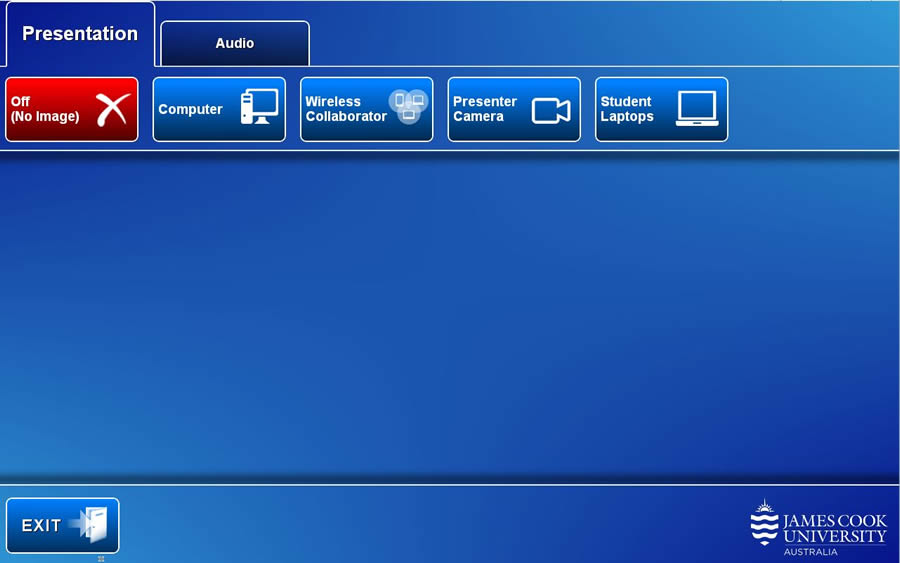
Presentation
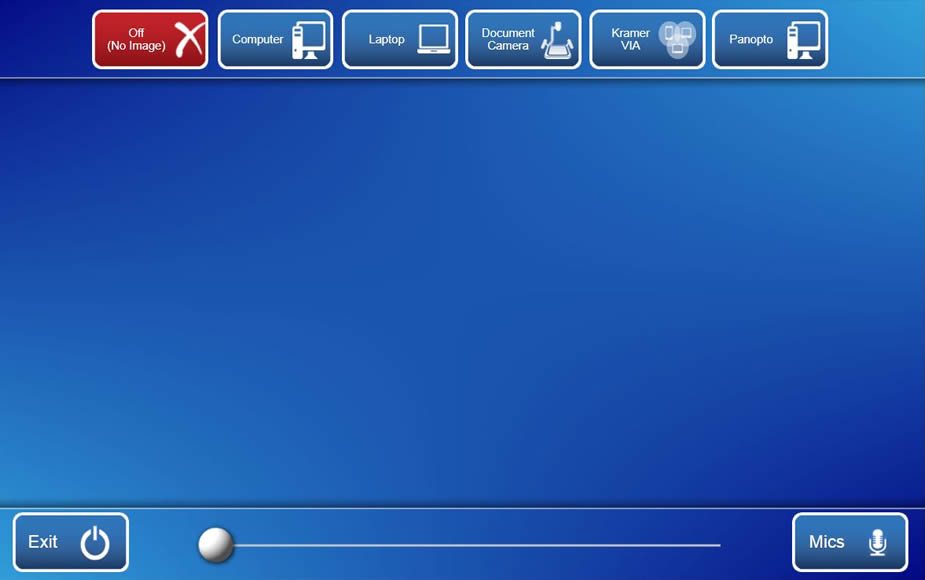
- Off (No image) - show nothing on the display system.
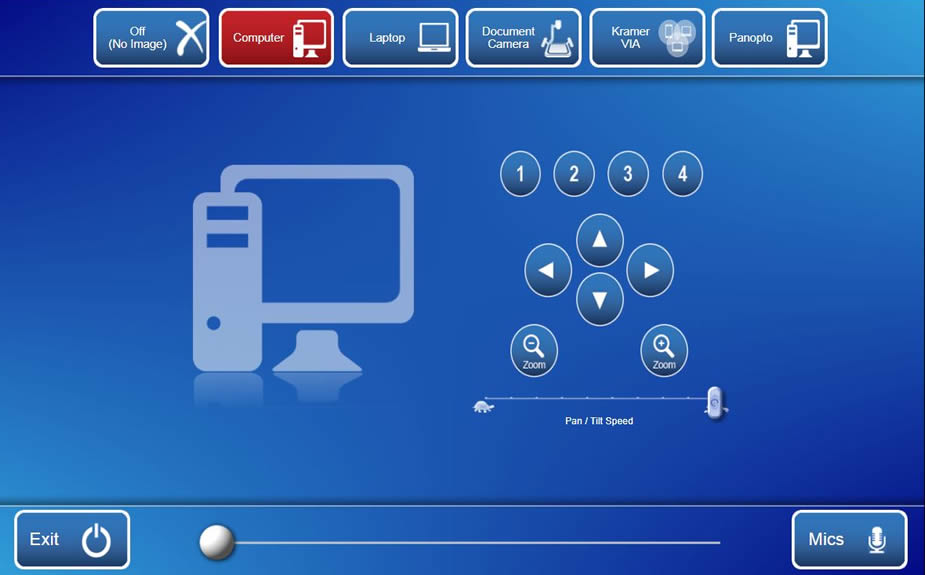
- Computer - show the desktop PC.
- Laptop - show a laptop connected to the AV system by the HDMI cable.
- Document Camera - show the document camera.
- Wireless Presenter - show the instructions for how to connect a BYOD (wireless laptop, tablet, smart phone) to the AV system. Take note of the Room Name (IP address) and Code shown. Peruse this guide for instructions on how to connect.
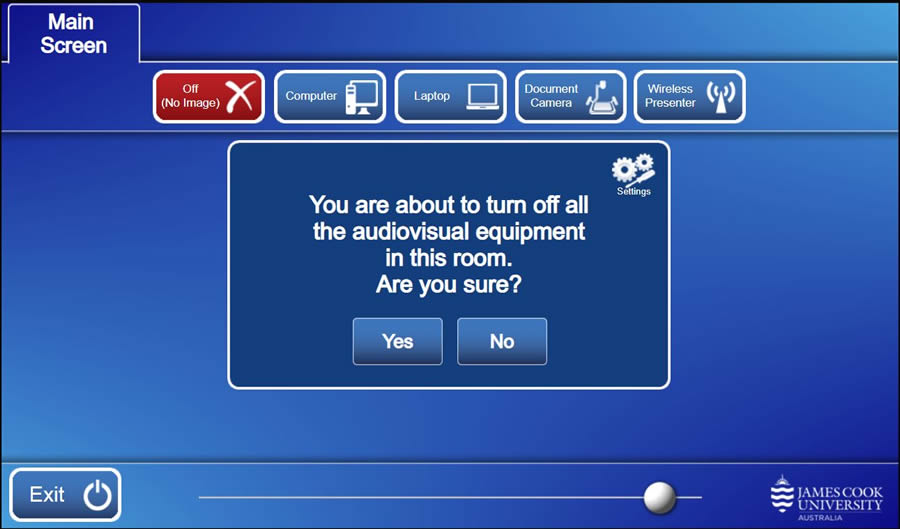
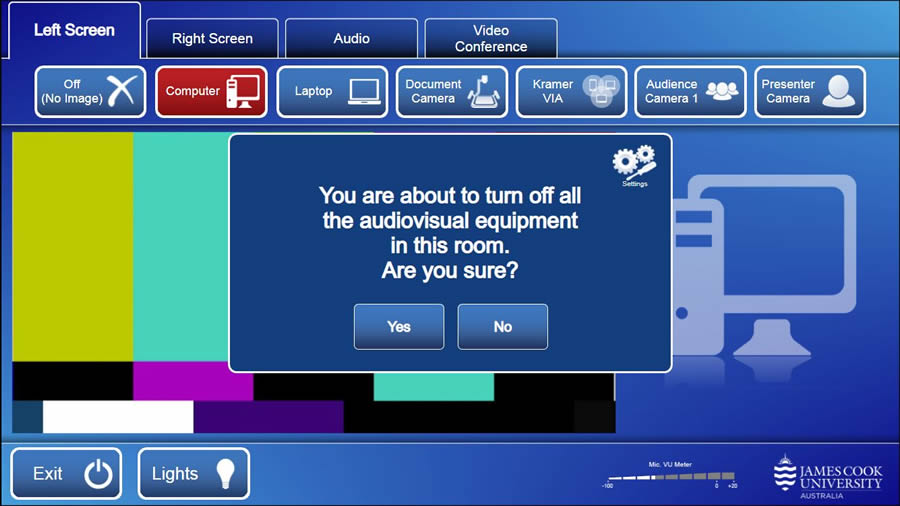
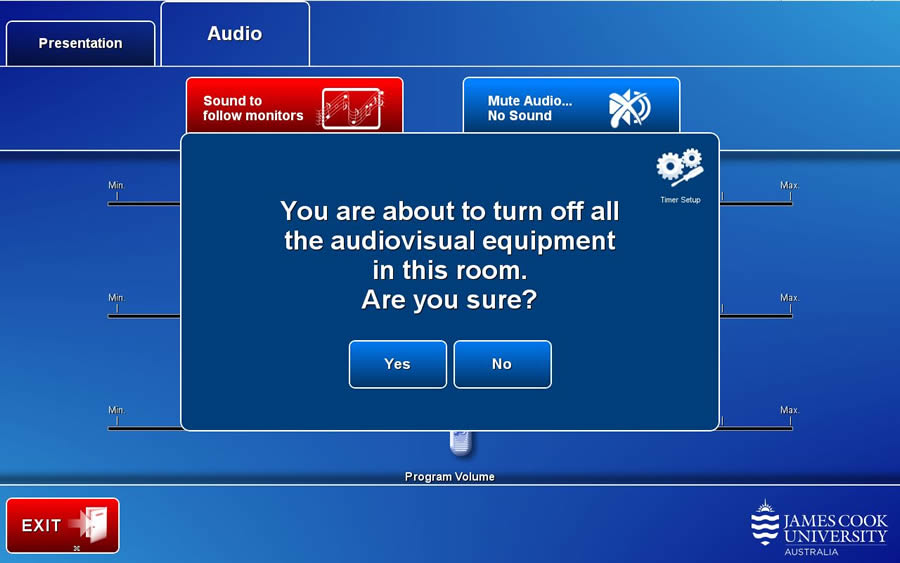
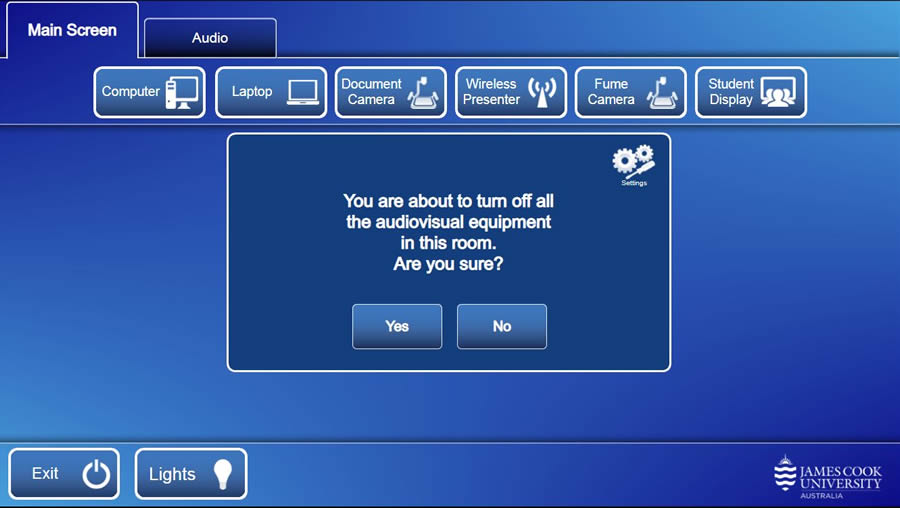
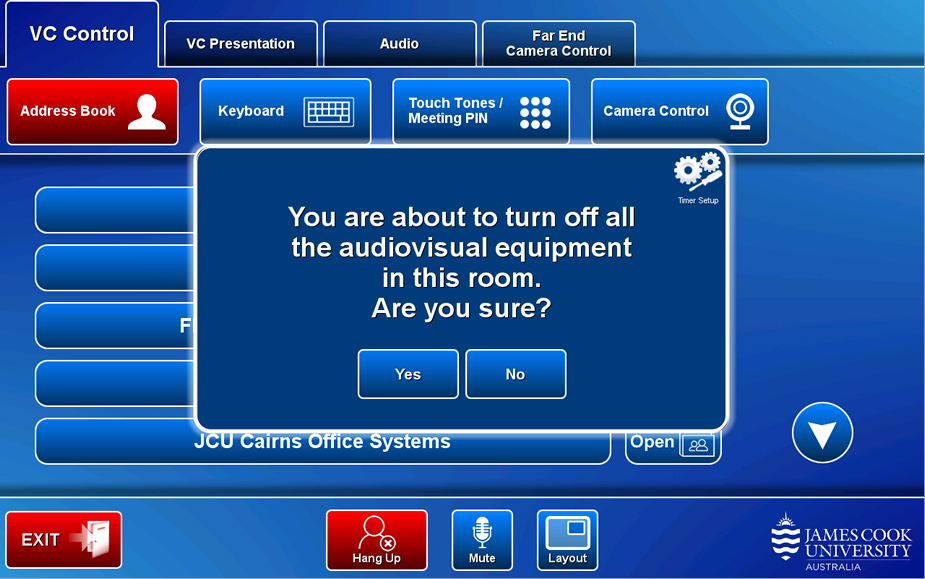
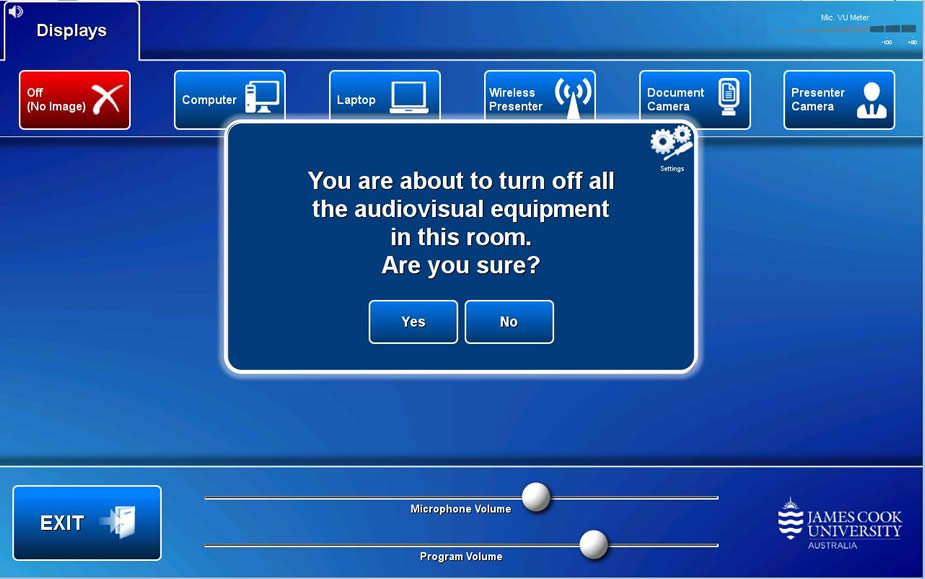
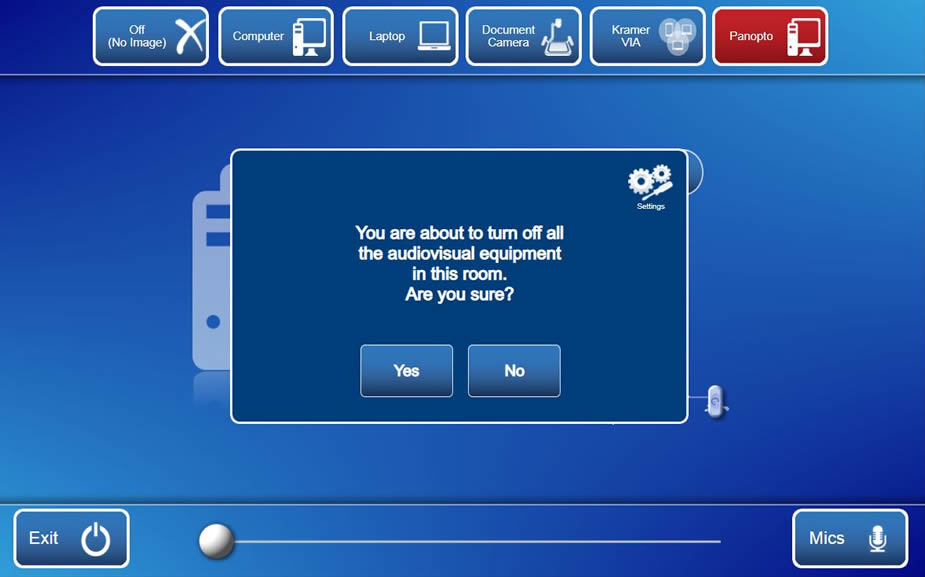
Touch the Exit button and Yes button to turn off the AV system or the No button to cancel exit.
Touch panel operation
Equipment
- 1x projector
- Touch panel for all AV control
- AIO Desktop PC
- Preview monitor
- Document camera
- Presenter camera for lecture capture recordings
- Lectern microphone
- Wireless microphone (hand held and lapel) - recommended for use with Panopto lecture capture recordings
- HDMI cable with adaptors for connecting a laptop to the AV system
- Lecture capture recording device (Panopto)
- Infrared hearing assist device
- Wall mounted speakers
Touch the screen to activate the Audio Visual system.
Operation
- Projector - show presentation on the projector screen
- Preview - view media source on preview monitor
- Exit - turn system off
- Volume - touch and slide the Volume button to adjust the playback volume of the PC and laptop.
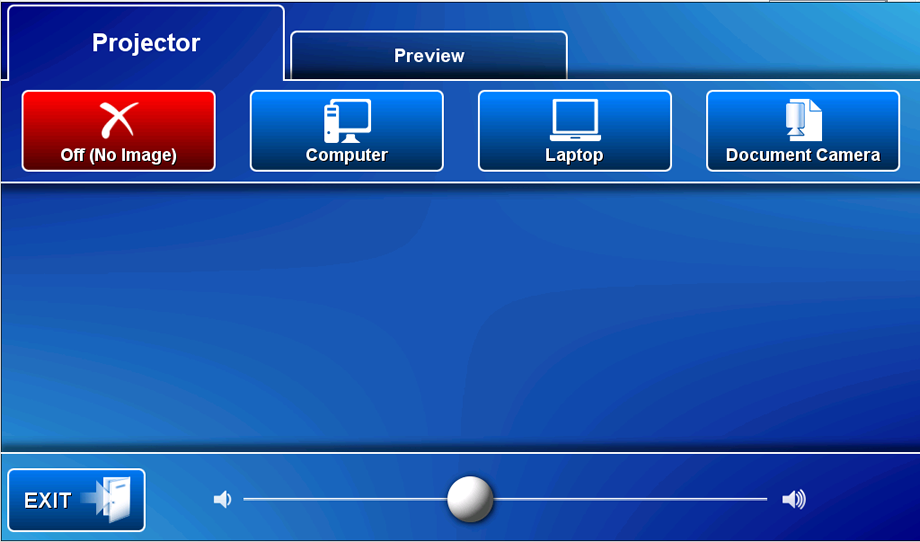
Show Presentation
- Off (No Image) - show nothing.
- Computer - show the desktop PC.
- Laptop - show a laptop connected by the HDMI cable to the AV system.
- Document Camera - show the document camera.
The preview is mainly used to adjust the document camera before pushing it to the projector screen.
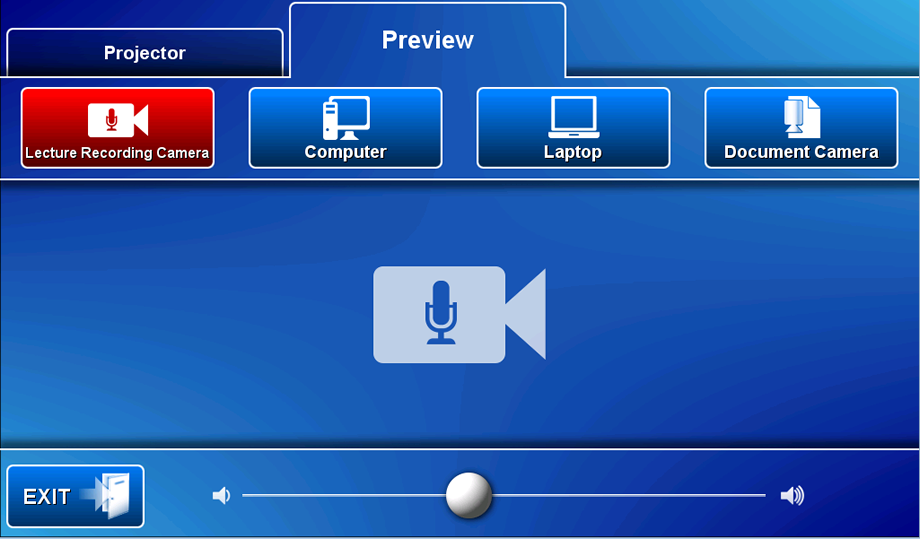
Preview selection
- Lecture Recording Camera - camera angle is static
- Computer - desktop PC
- Laptop
- Document Camera - view and adjust prior to showing on projector screen
The Presenter Camera is not adjustable and can be previewed on the preview monitor.
- Clip on the wireless microphone (body pack & lapel)
- Turn on the wireless microphone
- Touch the media button for device to be used for showing a presentation
- The recording light turns green on the hour indicating the recording has started
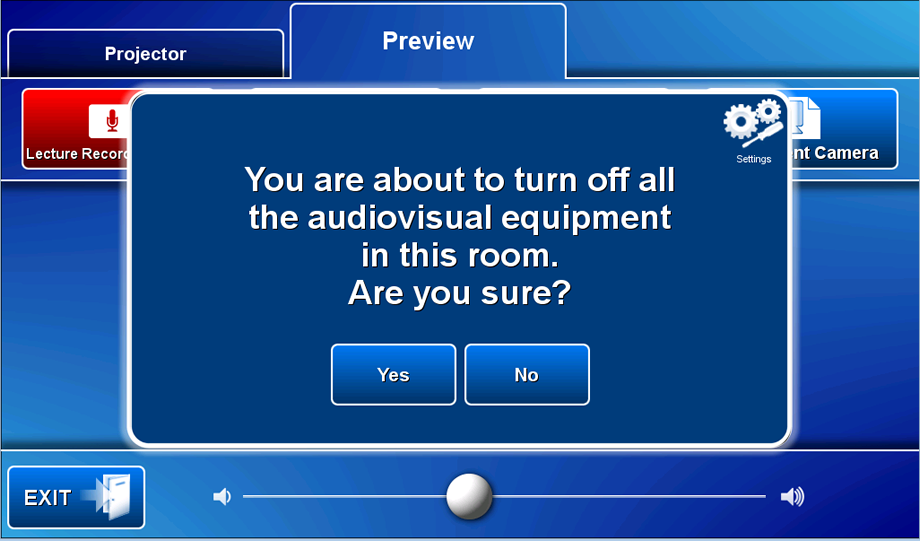
Touch the EXIT button and the Yes button or the No button to cancel the exit.
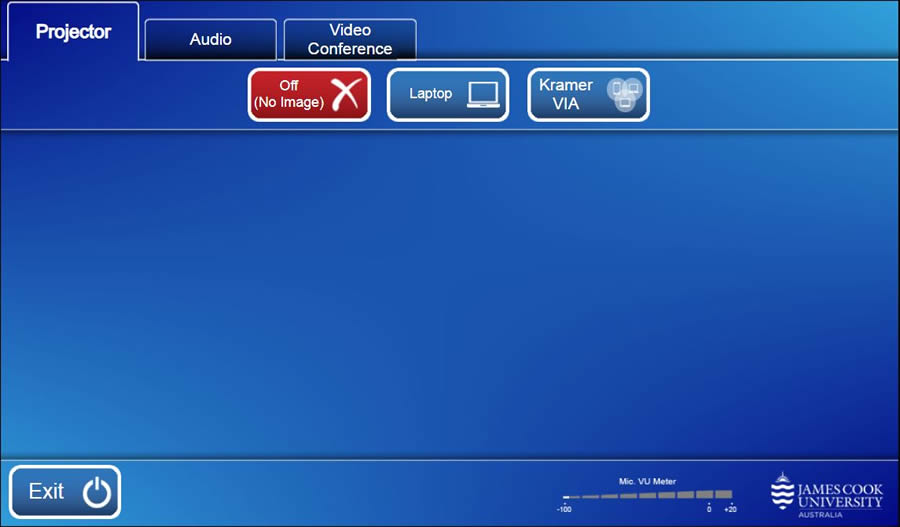
Equipment
- 2x projectors
- Touch panel for all AV control
- Video conference codec
- AIO Desktop PC
- Document camera
- Wireless presenter (Kramer VIA)
- Audience camera
- Presenter camera
- Wall mounted speakers
- Lectern microphone
- Wireless microphone (wireless hand held and lapel) - recommended for use with Panopto lecture capture recordings
- HDMI cable with adaptors for connecting a laptop to the AV system
- Infrared hearing assist device
- Lecture capture recording device (Panopto - not available in 145-030)
- Wall mounted speakers
Touch the screen to activate the Audio Visual system.
Local Presentation Mode
 Watch a video on recommended touch panel interaction in local presentation mode.
Operation
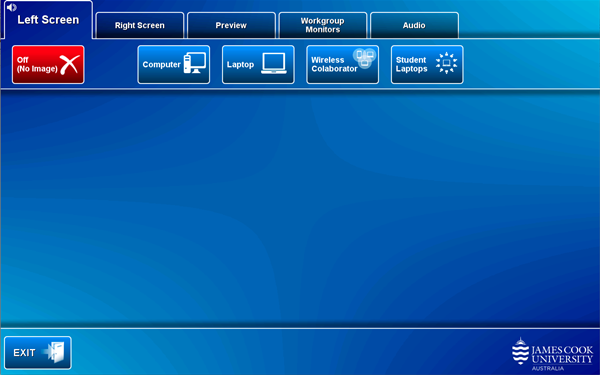
- Left Screen - show presentation on the left projector screen
- Right Screen - show presentation on the right projector screen
- Audio - adjust volume
- Video Conference - set the system in video conference mode, prerequisite for all video calls including Zoom
- Mic VU meter - bar movement confirms microphone is active
- Exit - turn system off
- Lights - adjust room lighting (not available in all rooms)

Show Presentation
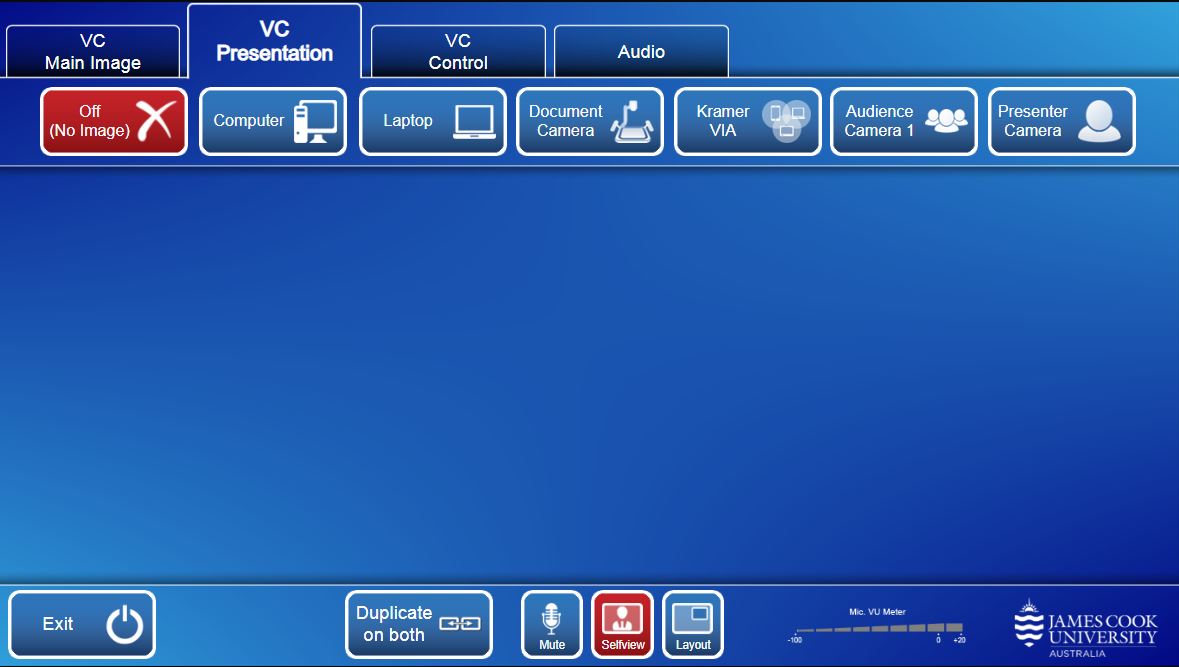
Select a source for the presentation by touching one of the media buttons.
You can show the same or different or different media on the two projector screens.
- Off (No Image) - show nothing.
- Computer - show the desktop PC.
- Laptop - show a laptop connected by the HDMI cable to the AV system.
- Document Camera - show the document camera.
- Kramer VIA - show the instructions for how to connect a BYOD (laptop, tablet, smart phone) wirelessly to the AV system. Take note of the Room Name (IP address) and Code shown. Peruse this guide for instructions on how to connect.
- Audience Camera 1 - show the audience camera.
- Presenter Camera - show the presenter camera.
- Touch the Presenter Camera button - the current camera angle is shown on the touch panel.
- Adjust the camera to ensure you are visible at all time regardless of movements.
- Clip on the wireless microphone (body pack & lapel)
- Turn on the wireless microphone
- Touch the Left Screen tab and touch the media button for device to be used for presentation
Only media shown on the left screen is recorded. - The recording light turns green on the hour indicating the recording has started
Presentation audio must be routed to the screen where the presentation is shown.
- Sound to follow Left Projector - route the audio to the left projector.
- Sound to follow Right Projector - route the audio to the right projector.
- Mute Audio... No Sound - turn off the presentation sound.
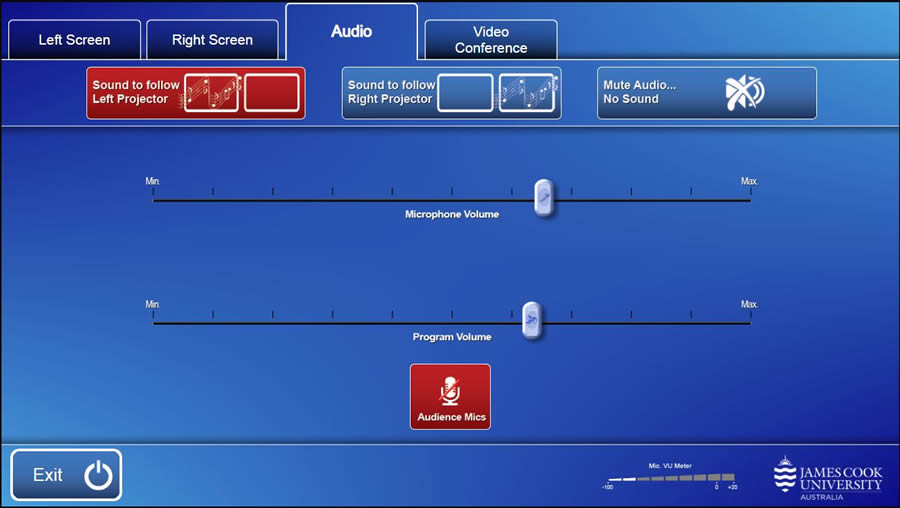
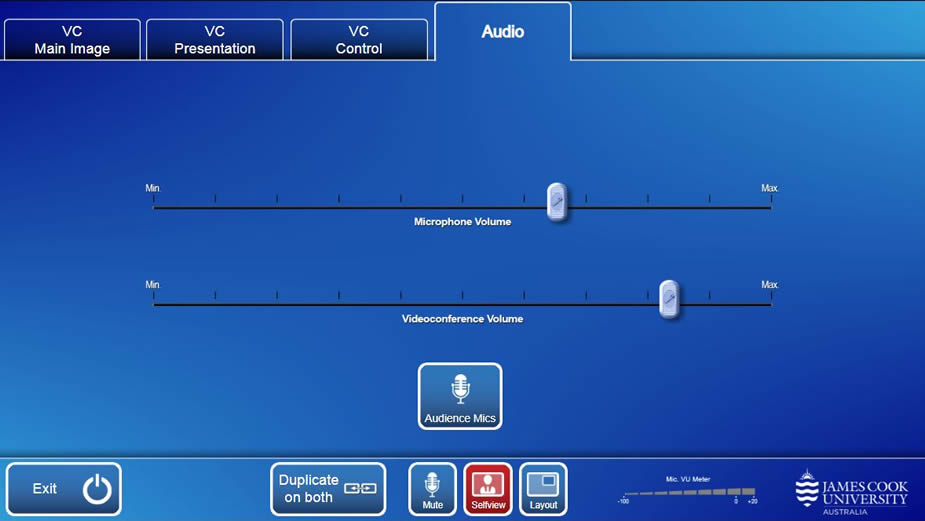
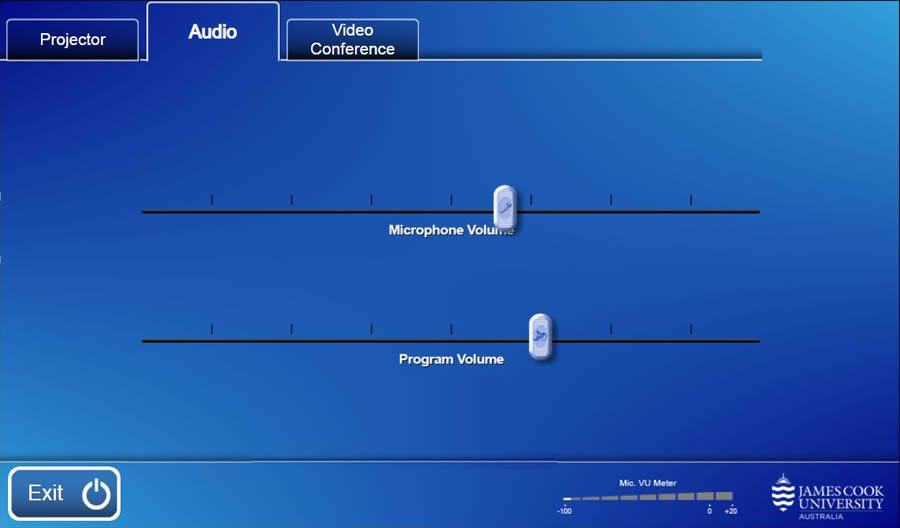
Volume control
- Microphone Volume - touch and slide the Microphone Volume button to adjust the room voice reinforcement.
- Program Volume - touch and slide the Program Volume button to adjust the playback volume of the desktop PC and laptop.
- Audience Mics - turn the audience microphones off/on (not available in all rooms)
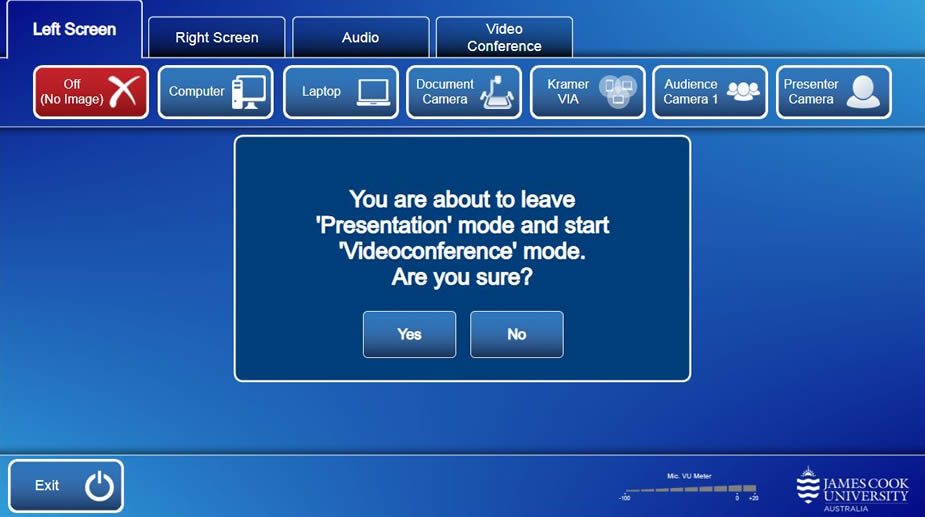
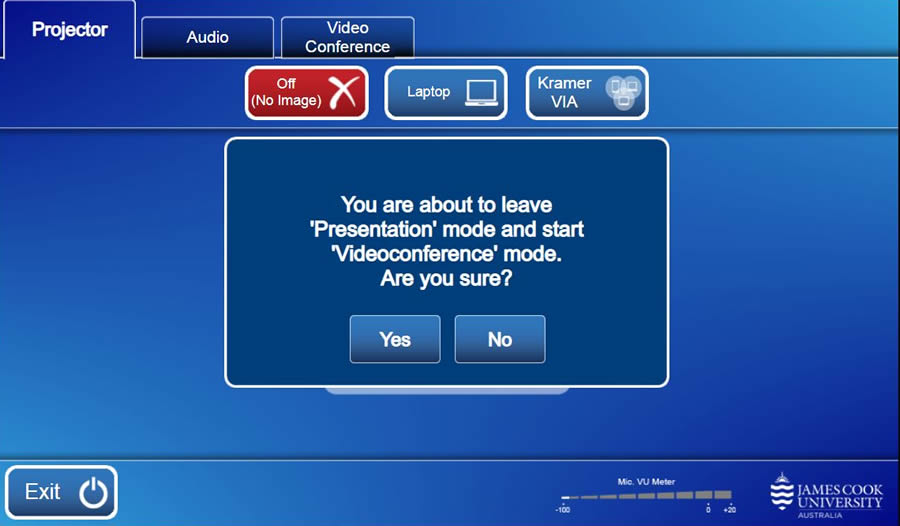
Touch the Video Conference tab and the Yes button to proceed to videoconference mode, prerequisite for all video calls including Zoom
Touch the Exit button and the Yes button to turn off the AV system.
Video Conferencing Mode
Watch a video on recommended touch panel interaction in video conference mode.
In videoconference mode the system is capable of sending both a camera feed and presentation to the far end as well as receiving camera feeds from the participating far end rooms or zoom participants and sending and receiving audio.
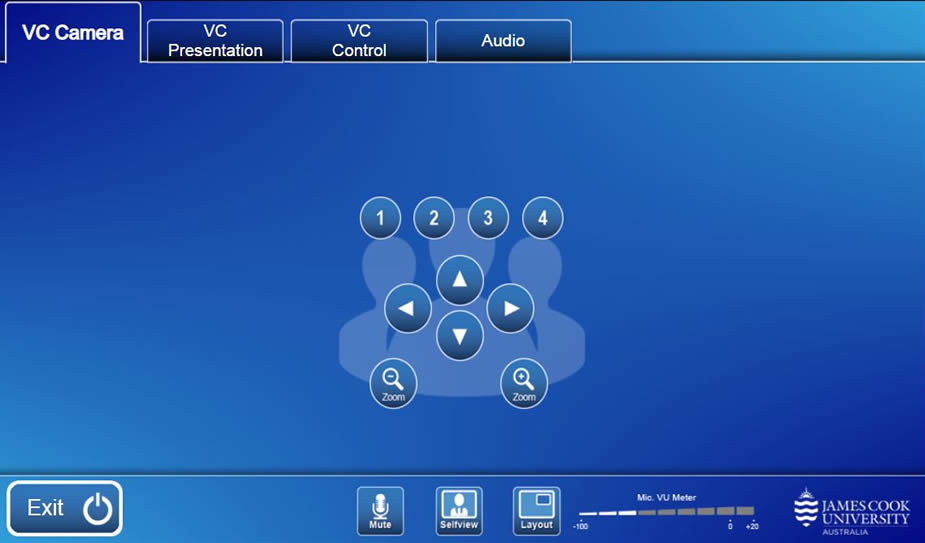
The Presenter Camera is selected by default.
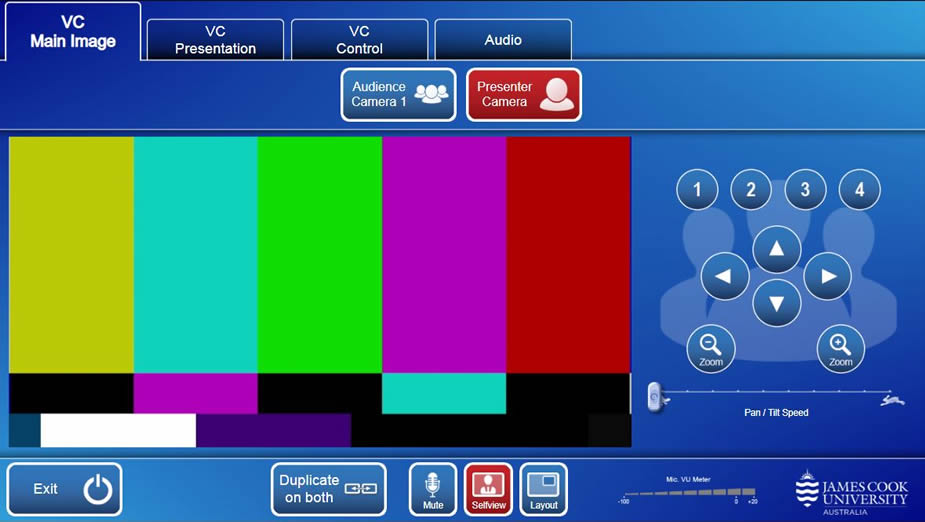
Operation
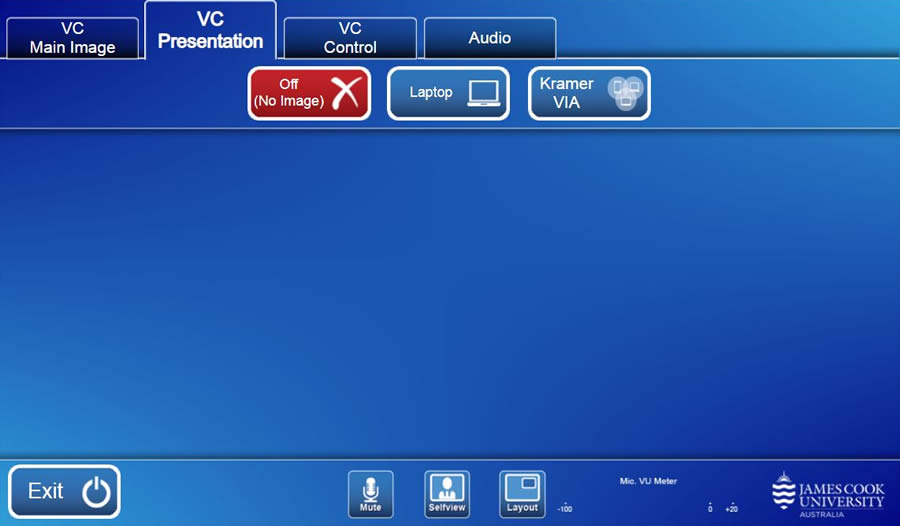
- VC Main Image - select and adjust the camera to be used.
Adjust the presenter camera to ensure you are visible rirrespective of movements.
Camera controls - select preset camera angles from buttons 1, 2, 3 and 4 or adjust PTZ (pan, tilt and zoom) manually. - VC Presentation - select media to be shown as presentation
- VC Control - connect video calls manually
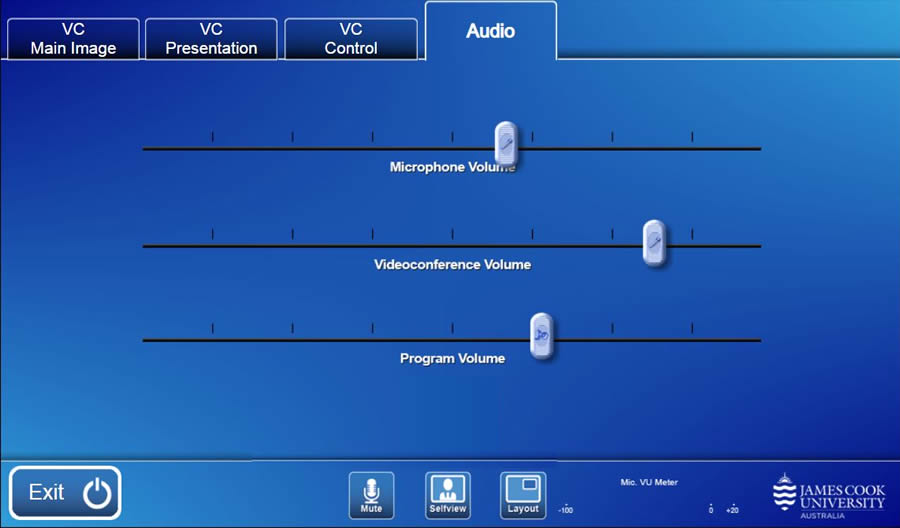
- Audio - adjust microphone room reinforcement and video conference volume
- Exit - turn the system off.
- Duplicate on both - show the presentation on both projector screens.
- Mute - turn off microphone.
- Selfview - touch to view the current camera angle on the touch panel.
- Layout - change the video and presentation screen composition.
- Mic VU meter - bar is moving when microphone is active.
- The media buttons are greyed out until the video call has been connected.
- Once the video call is connected, select a source for the presentation.
Display option
- Duplicate on both - show the presentation on both projector screens
- Touch the Presenter Camera button - the current camera angle is shown on the touch panel.
- Adjust the camera to ensure you are visible at all time regardless of movements.
- Clip on the wireless microphone (body pack & lapel)
- Turn on the wireless microphone
- Video call connecting
- Touch the VC Presentation tab and the media button for the presentation to be shown.
Microphone Volume
- Touch and slide the Microphone Volume button to adjust the room voice reinforcement
Videoconference Volume
- Touch and slide to adjust the Videoconference Volume button to adjust the volume of the far end and the media presentation volume
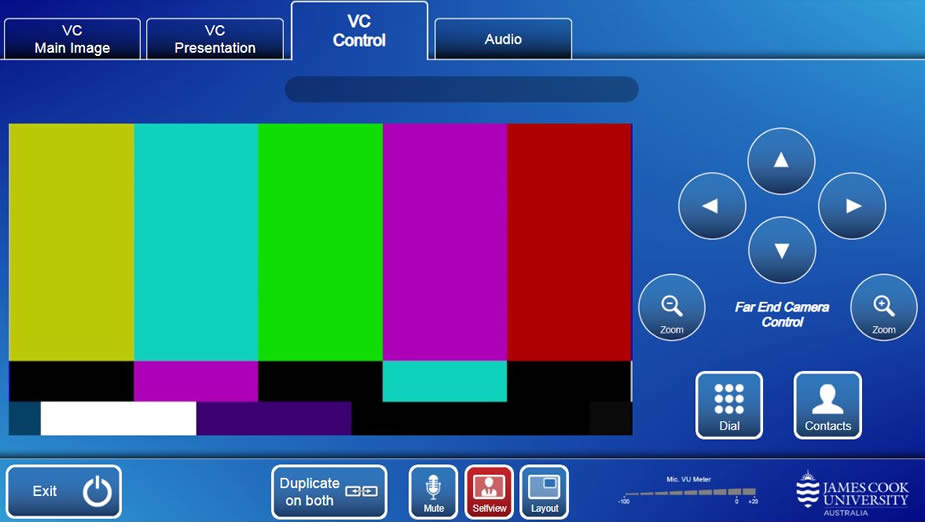
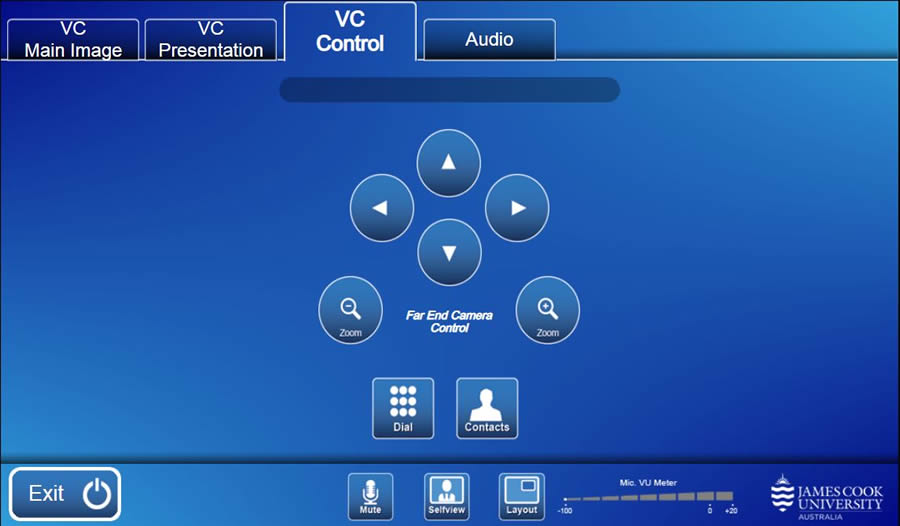
Manually connect video call
- Dial - connect a video call manually by dialling an IP address or SIP URI
- Contacts - locate an endpoint and touch the Call button.
Connect to Zoom
- Touch the Contacts button
- Locate and touch the Zoom meeting entry
- Touch the Zoom Meeting Bridge (SIP) entry
- Touch the Call button
- Touch the Keypad button (appears once the call has connected to the Zoom Bridge)
- Enter the Zoom meeting ID followed by the #-key
- Enter the passcode followed by the #-key
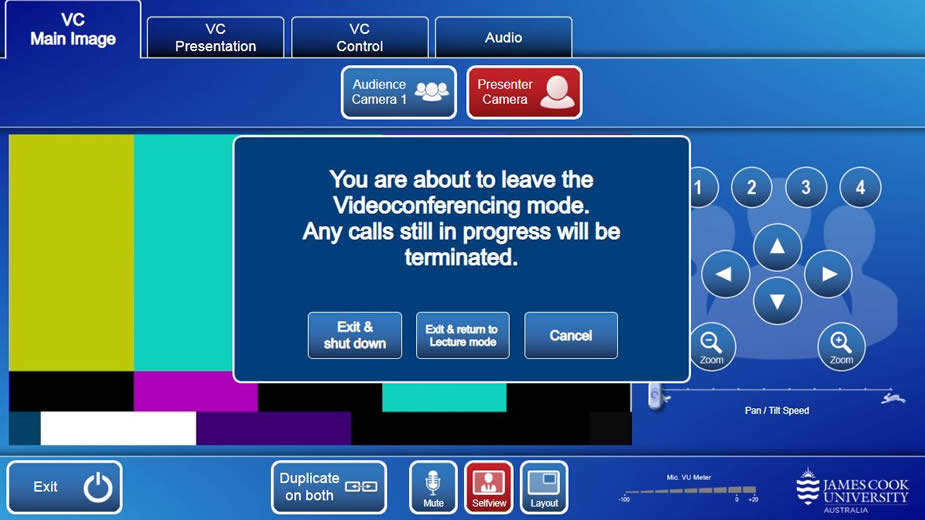
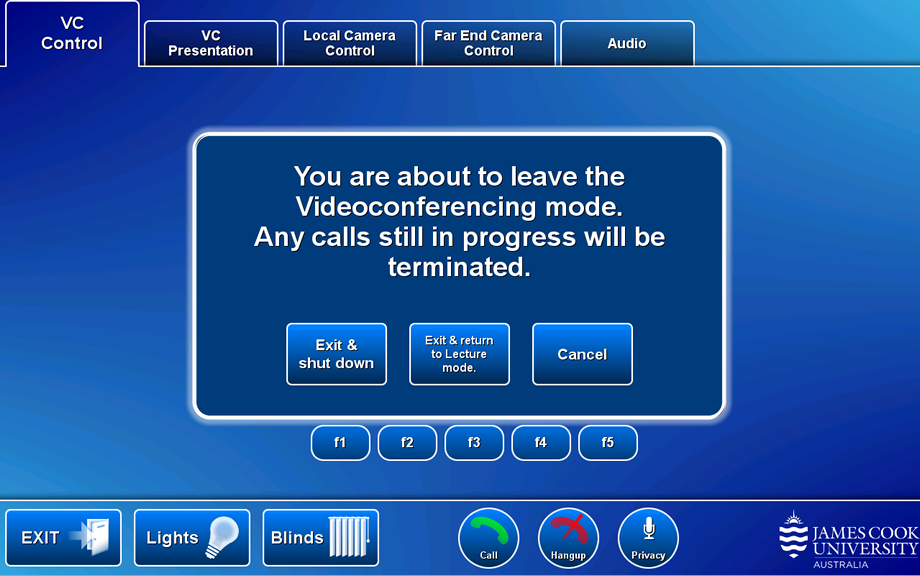
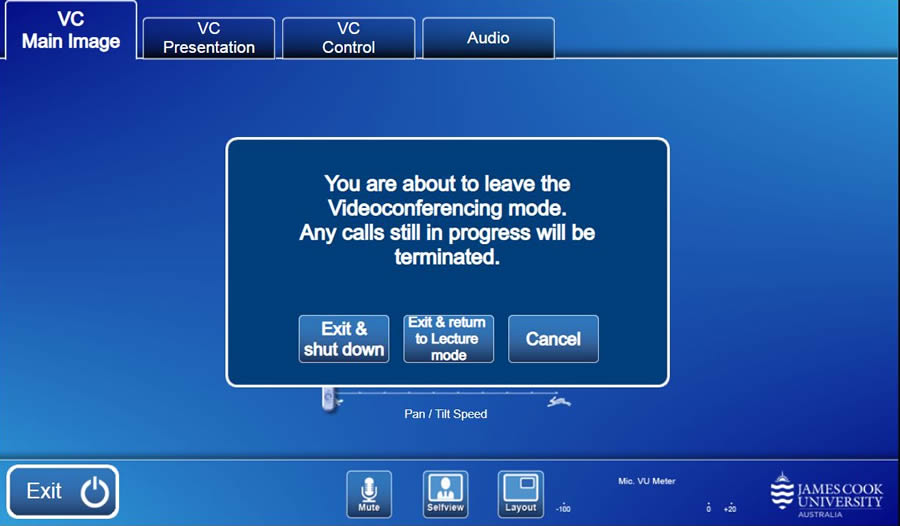
- Exit & Shut down - turn off the AV system.
- Exit & Return to Lecture Mode - proceed to local presentation mode.
- Cancel - continue in video conference mode.
Cinema Mode
A Cinema Quality projector suitable for high definition film/video screenings etc. is available in:
- Cairns (Smithfield) D003-054
- Townsville (Douglas) 045-002
System is off

Equipment
- 2x projectors
- 2x flat panel displays
- 2x Touch panel for all AV control (inner and outer table)
- Video conference codec
- Desktop PC
- 4x video cameras
- 2x Ceiling mounted microphones
- Panopto lecture capture
Touch the screen to activate the Audio Visual system.
System is on
Operation
- Recording Camera - select and adjust the camera to be used for a recording
- Video Conference - set the system in video conference mode, prerequisite for all video calls including Zoom
- Exit - turn system off
- Audio
- Presentation Volume (slider) - adjust the playback volume of the Local PC and laptop
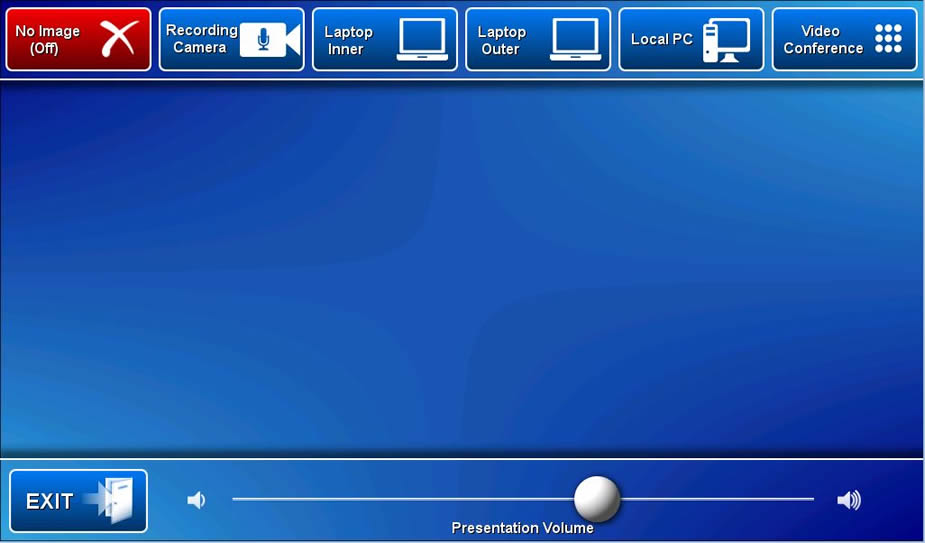
Source Selection
- No Image (Off) - show nothing.
- Laptop Inner - show a laptop connected by the HDMI cable at the inner table to the AV system.
- Laptop Outer - show a laptop connected by the HDMI cable at the outer table to the AV system.
- Local PC - show the desktop PC.
Recording camera
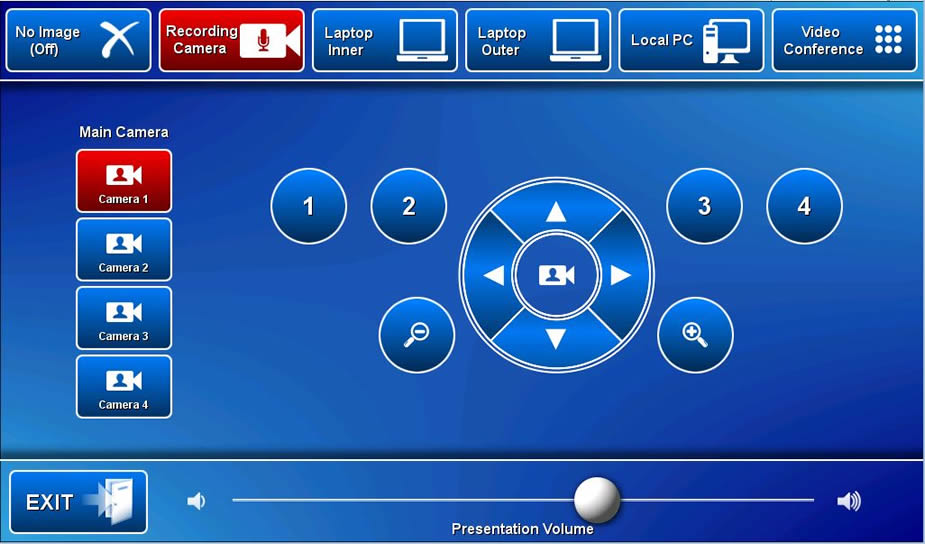
- There are four cameras labelled Camera 1, Camera 2, Camera 3 and Camera 4.
- Select a camera and adjust its angle by touching the pan, tilt and/or zoom buttons - a camera preview is shown on the four displays.
Turn system off
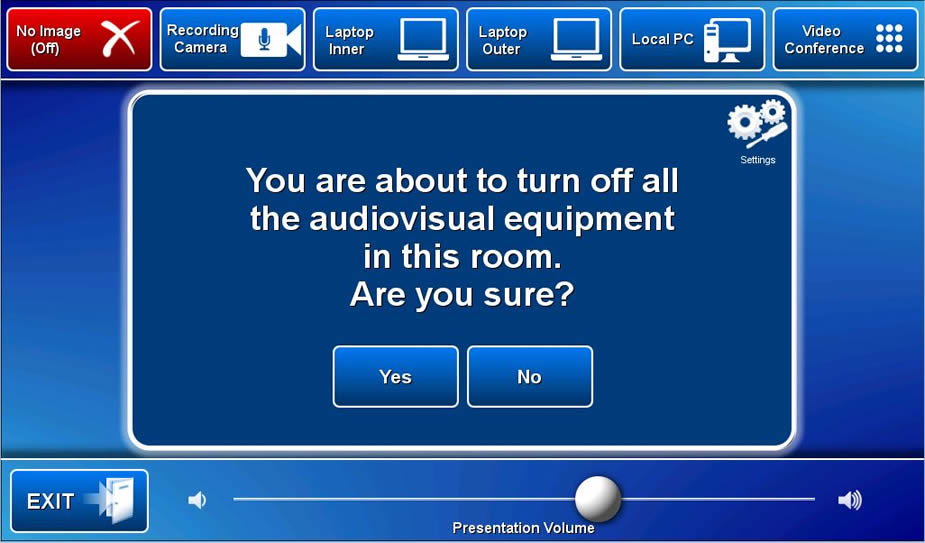
Touch the Exit button and Yes button to turn off the AV system.
Videoconference mode
Set the system in video conference mode for all video calls including Zoom.
Touch the Video Conference tab and the Yes button.
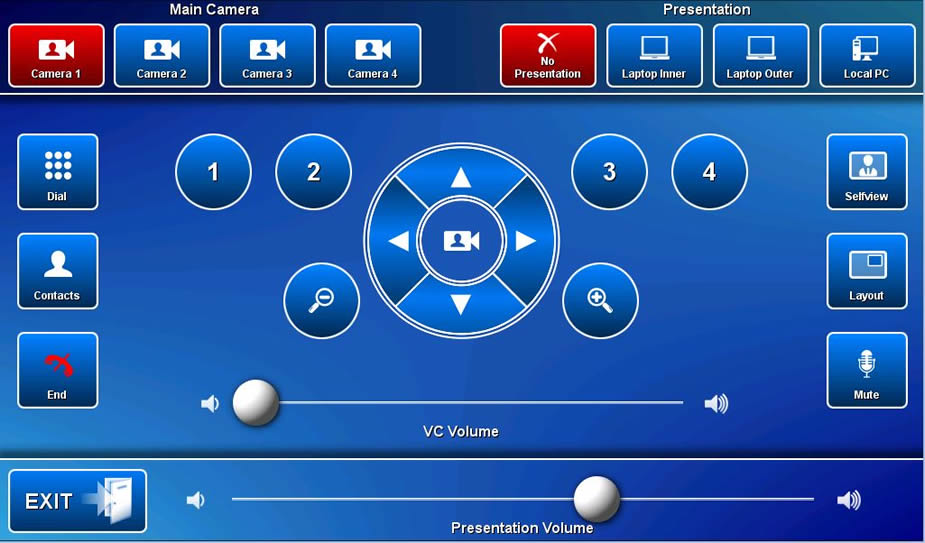
Operation
- Camera 1 - the system defaults to selecting Camera 1 (the camera located above the Chamber entry door). Adjustments are made by touching the on screen pan, tilt and zoom controls.
- Selfview - view the current camera angle on the display system.
- Layout - change the camera and presentation screen composition.
- End - disconnect a video call.
- Audio
- VC Volume (slider) - adjust the far end volume.
- Presentation Volume (slider) - adjust the playback volume of the PC and laptop.
- Mute - turn off the microphones, a red light indicates the microphones are off.
Manually connect video call
- Dial - connect a video call manually by dialling an IP address or SIP URI
- Contacts - locate an endpoint and touch the Call button.
Connect to Zoom
- Touch the Contacts button
- Locate and touch the Zoom meeting entry
- Touch the Zoom Meeting Bridge (SIP) entry
- Touch the Call button
- Touch the Keypad button (appears once the call has connected to the Zoom Bridge)
- Enter the Zoom meeting ID followed by the #-key
- Enter the passcode followed by the #-key
Quit video conference mode
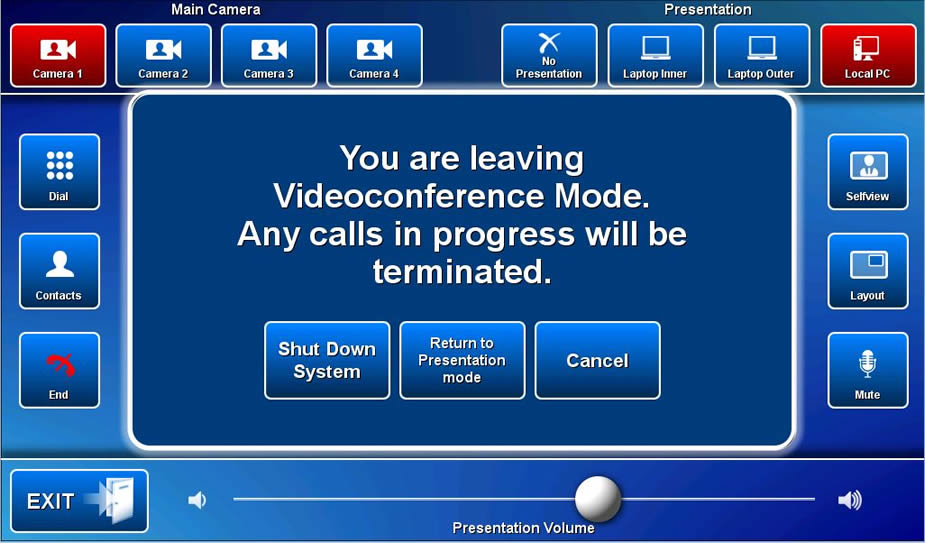
Exit
- Exit & Shut down - turn off the AV system.
- Exit & Return to Presentation Mode - proceed to local presentation mode.
- Cancel - continue in video conference mode.
System is Off
Equipment
- 1x projector
- Touch panel for all AV control
- Desktop PC
- Document camera
- Wireless presenter (Collaborator)
- Panopto lecture capture
- Presenter camera
- 2x wall mounted speakers
- Lectern microphone
- Wireless microphone (hand held and lapel) - recommended for use with Panopto lecture capture recordings
- HDMI cable with adaptors for connecting a laptop to the AV system
- Infrared hearing assist device
Touch the screen to activate the Audio Visual system.
System is on
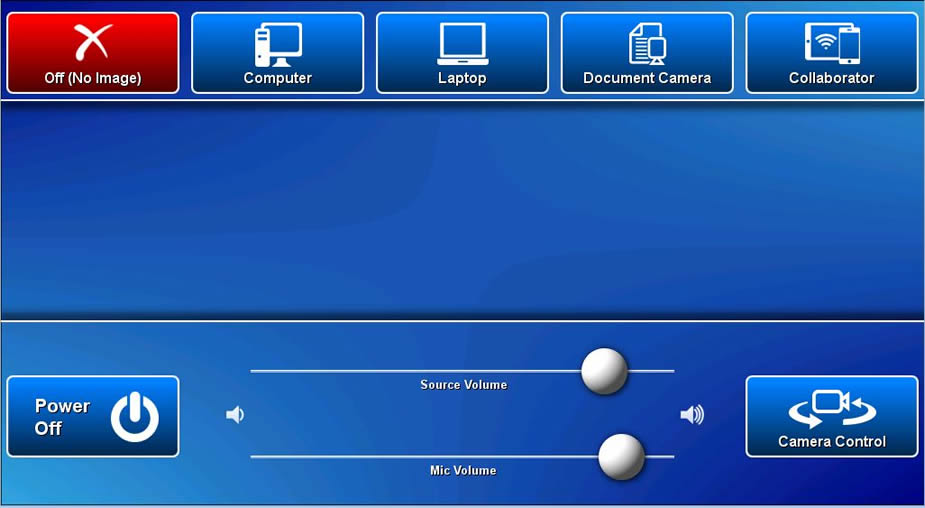
Operation
- Camera control - adjust the lecture recording camera
- Power Off - turn system off
- Audio
- Source Volume (slider) - adjust the playback volume of the PC and laptop
- Mic Volume (slider) - adjust the microphone room reinforcement
Presentation
- Off (No Image) - show nothing.
- Computer - show the desktop PC.
- Laptop - show a laptop connected by the HDMI cable to the AV system.
- Document Camera - show the document camera.
- Collaborator - show the instructions for how to connect a BYOD (laptop, tablet, smart phone) wirelessly to the AV system.
Take note of the Room Name (IP address) and Code shown. Peruse this guide for instructions on how to connect.
Turn off system
Touch the Power Off button and the Yes button.
Equipment
- 2x projectors (18-02B only; will always show identical images)
- Touch panel for all AV control
- Video conference codec (18-02B only)
- AIO Desktop PC
- Document camera
- Audience camera (18-02B only)
- Presenter camera (18-02B only)
- Lectern microphone
- Wireless microphone (hand held and lapel) - recommended for use with Panopto lecture capture recordings
- HDMI cable with adaptors for connecting a laptop to the AV system
- Lecture capture recording device (Panopto, 18-02B only)
- Infrared hearing assist device
- 2x wall mounted speakers
Touch the screen to activate the Audio Visual system.
Local presentation mode
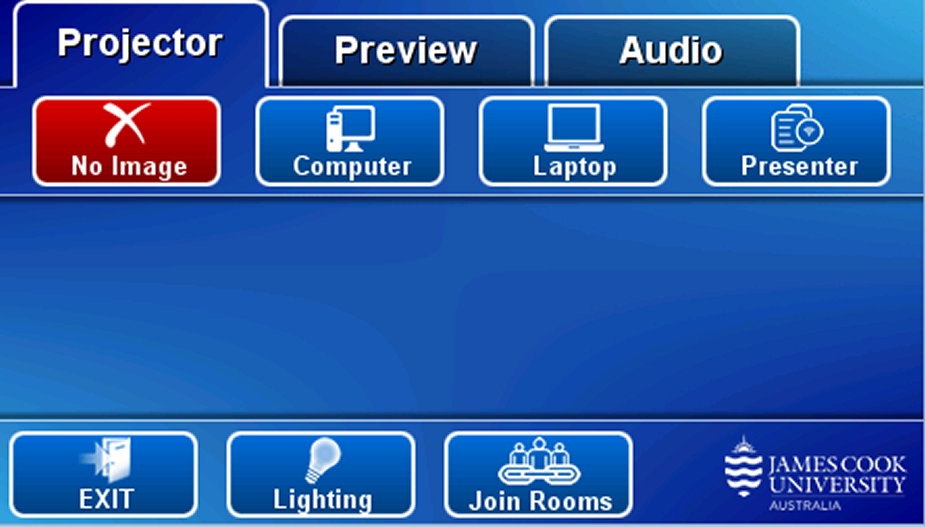
Operation
- Projectors - shows presentation on both projector screens
- Preview - view media on the lectern preview monitor
- Audio - adjust volume
- Video Conference (18-02B only) - set the system in video conference mode, prerequisite for all video calls including Zoom
- Exit - turn system off
- Join Rooms (18-02B only) - provides options for connecting 18-002A and/or 18-002C to 18-002B for the purpose of sharing presentations
- Lights - adjust room lighting
- Blinds - adjust the glass wall blinds
- Exit - turn off the AV system
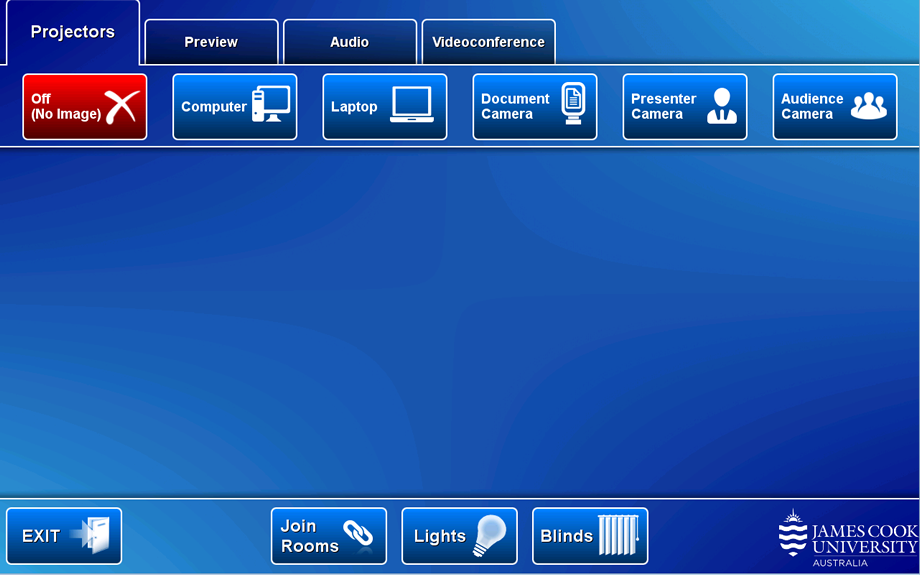
Show Presentation
- Off (No Image) - Show nothing.
- Computer - Show the desktop PC.
- Laptop - Show a laptop connected by the HDMI cable to the AV system.
- Document Camera - Show the document camera.
- Presenter Camera - Show the presenter camera.
- Audience Camera - Show the audience camera.
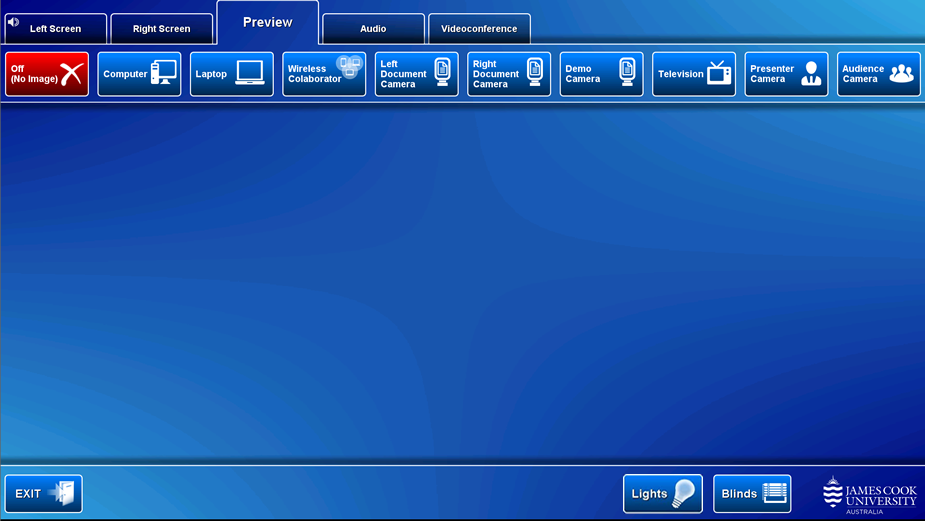
The desktop PC, laptop, document camera, presenter and audience camera can be viewed on the preview monitor prior to showing them on the projector screen. This is a valuable feature for particularly the document camera, presenter and audience camera as it enables adjusting the devices prior to showing/using them.
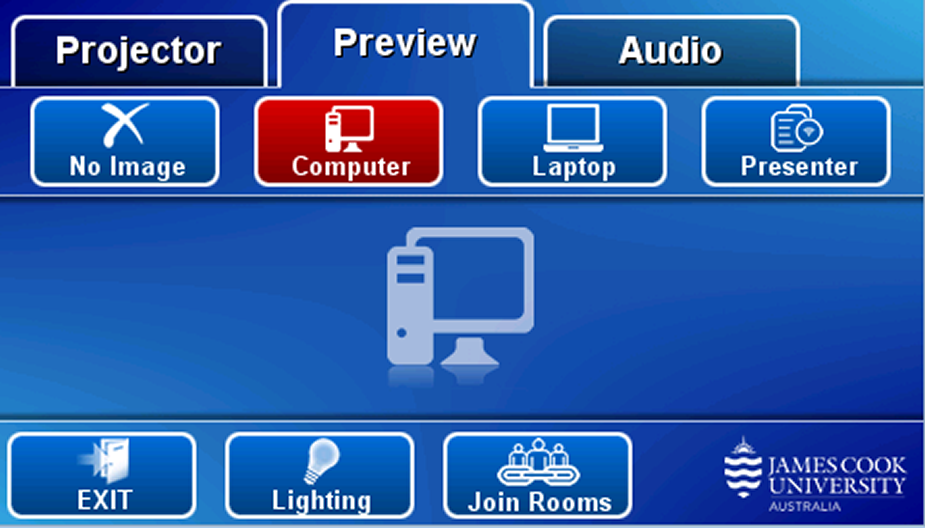
Preview
Touch the Preview tab and a media source button to preview on preview monitor.
- Touch the Presenter Camera button - the current camera angle is shown on the preview monitor.
- Adjust the camera to ensure you are visible at all time regardless of movements.
- Clip on the wireless microphone (body pack & lapel)
- Turn on the wireless microphone
- Touch the media button for device to be used for presentation
- The recording light turns green on the hour indicating the recording has started
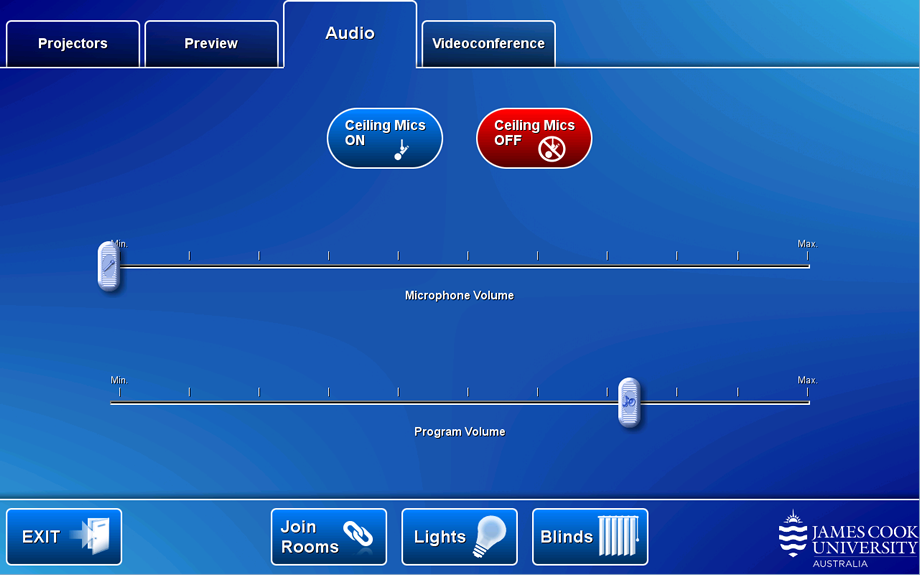
- Ceiling Mics ON/OFF - turn microphones on or off.
- Microphone Volume (slider) - touch and slide to adjust the microphone room reinforcement.
- Program Volume (slider) - touch and slide to adjust the playback volume of the PC and laptop.
The iLearn area can be run as three separate rooms or 18-02B (Room 2) joined for AV purposes with 18-02A (Room 1) and/or 18-02C (Room 3).
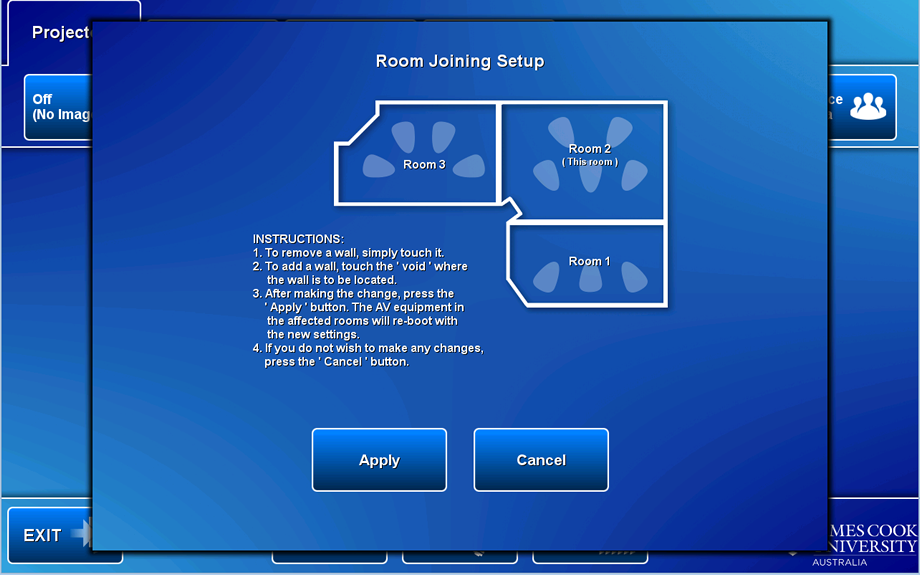
- To remove a wall (indicated by thick white line between the rooms), touch it.
- To add a wall, touch the 'void' (no white line between the rooms) where the wall is to be located.
- After making the change, press the Apply button.
The AV equipment in the affected rooms will re-boot with the new settings.
The touch panel in the room joined to 18-02B will be disabled. - If you do not wish to make any changes, press the Cancel button.
Set the system in video conference mode for all video calls including Zoom.
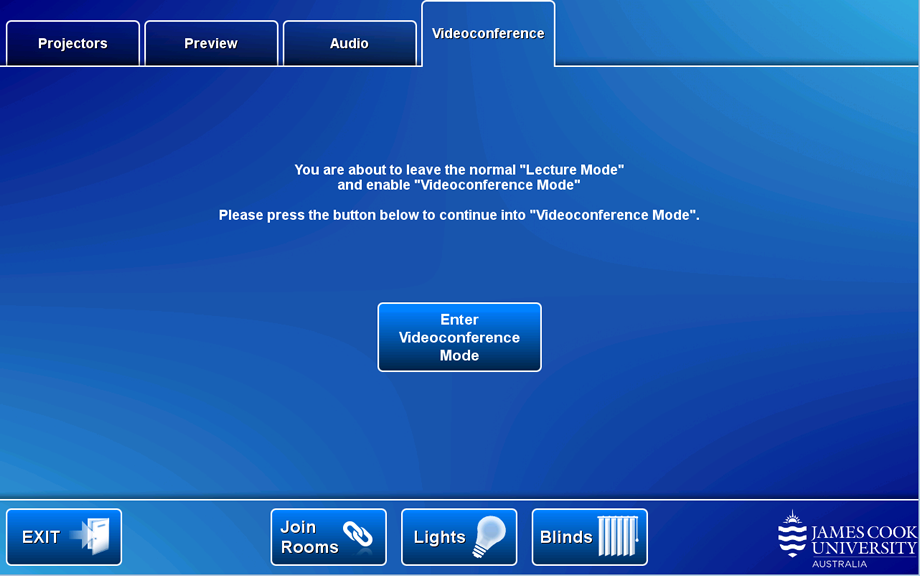
Touch the Videoconference tab and the Enter Videoconference Mode button to set the system in video conference mode.

Touch the EXIT button and the Yes button to turn off the AV system
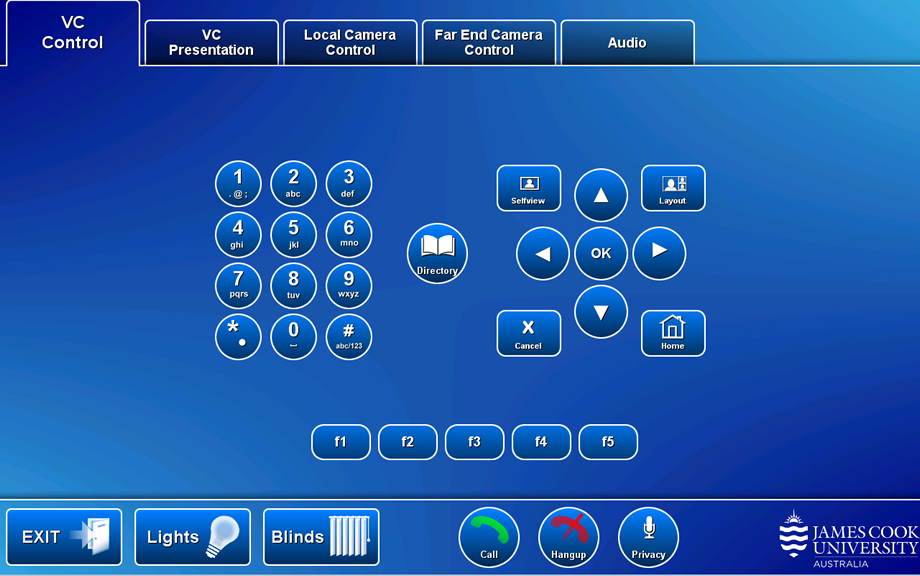
Videoconference Mode
Operation
- VC Control - connect manual video call
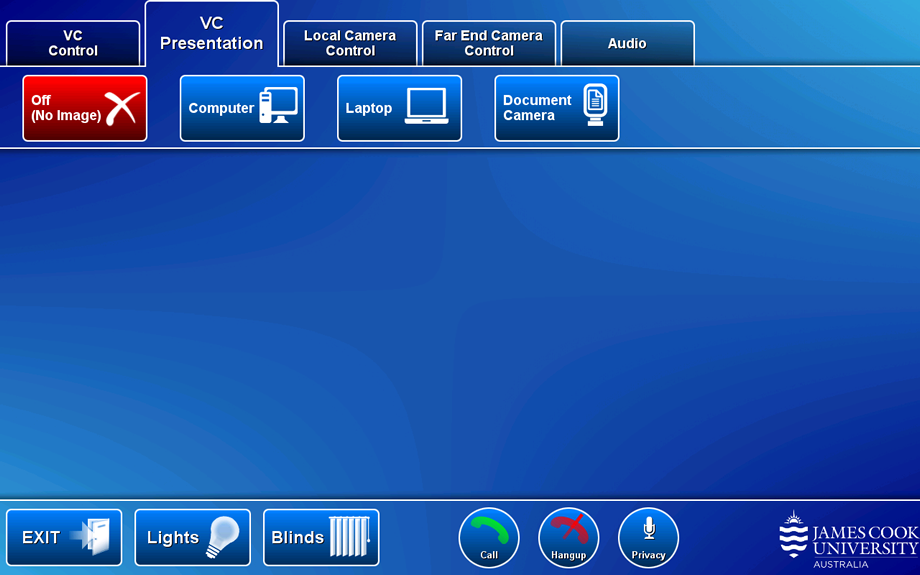
- VC Presentation - select the media source for a presentation
- Local Camera Control - adjust the presenter and/or audience camera angle
- Far End Camera Control - adjust the camera of the Far End (not available in all rooms)
- Audio - adjust microphone volume, far end volume and PC/laptop presentation audio
- Keypad - for entering call particulars manually
- Directory - connect a call manually from entries in a phone book
- Selfview - toggle the camera view on/off (shown on projector screens)
- Layout - change the video and presentation projector screen composition by selecting from the options (shown on the projector screens)
- EXIT - turn off the AV system
- Hang up - disconnect a video call.
- Privacy - mute microphone
Manually connect video call
- Directory - locate an endpoint in the phone book and touch the Call button.
Connect to Zoom
- Touch the Directory button
- Locate and touch the Zoom meeting entry
- Touch the Zoom Meeting Bridge (SIP) entry
- Touch the Call button
- Enter the Zoom meeting ID the keypad followed by the #-key
- Enter the passcode on the keypad followed by the #-key
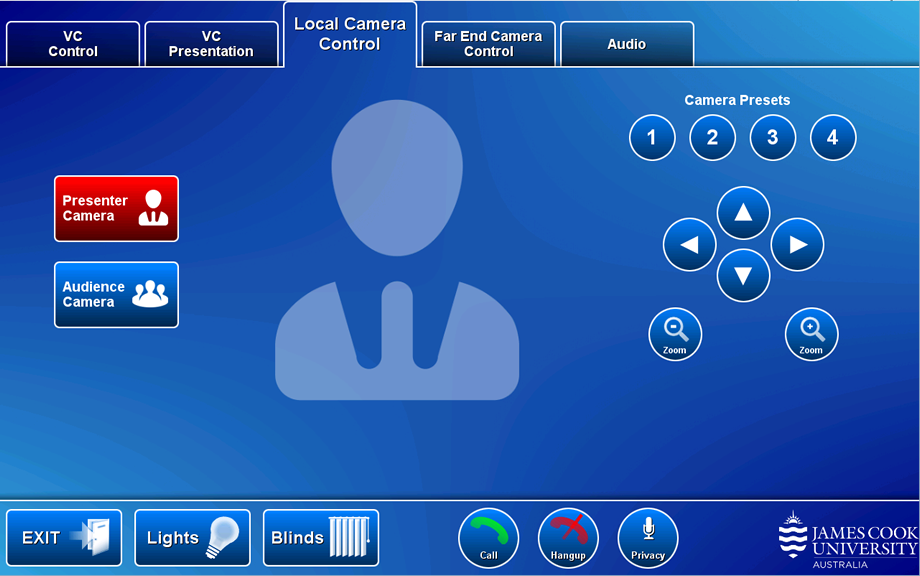
- Touch the Local Camera tab
- Touch the Presenter Camera button - the current camera angle is shown on the preview monitor.
- Adjust the camera to ensure you are visible at all times regardless of movements.
- Clip on the wireless microphone (body pack & lapel)
- Turn on the wireless microphone
- Touch the VC Presentation tab
- Touch the media button for device to be used for presentation
- The recording light turns green on the hour indicating the recording has started
Once the video call is connected, touch a media source button to show a presentation.
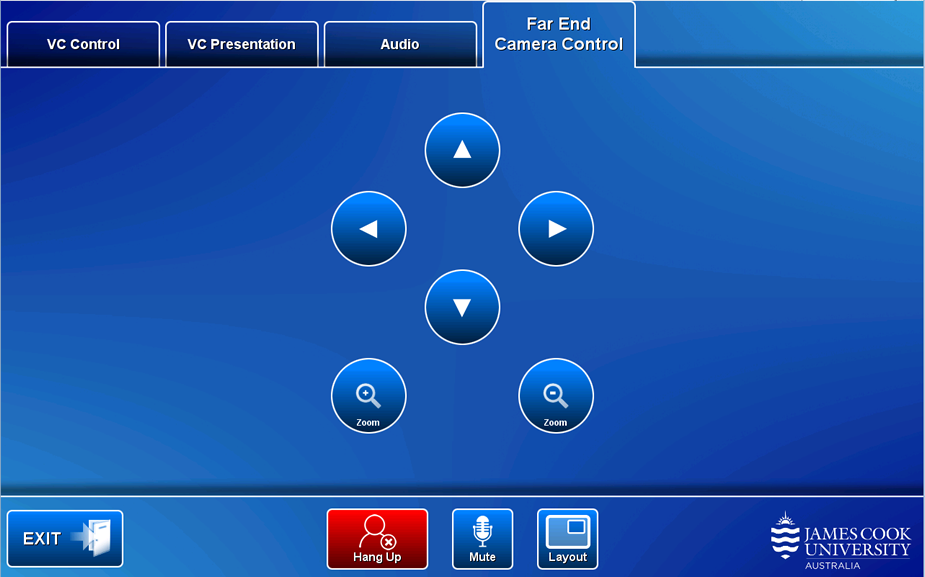
Far End Camera Control (not available in all rooms)
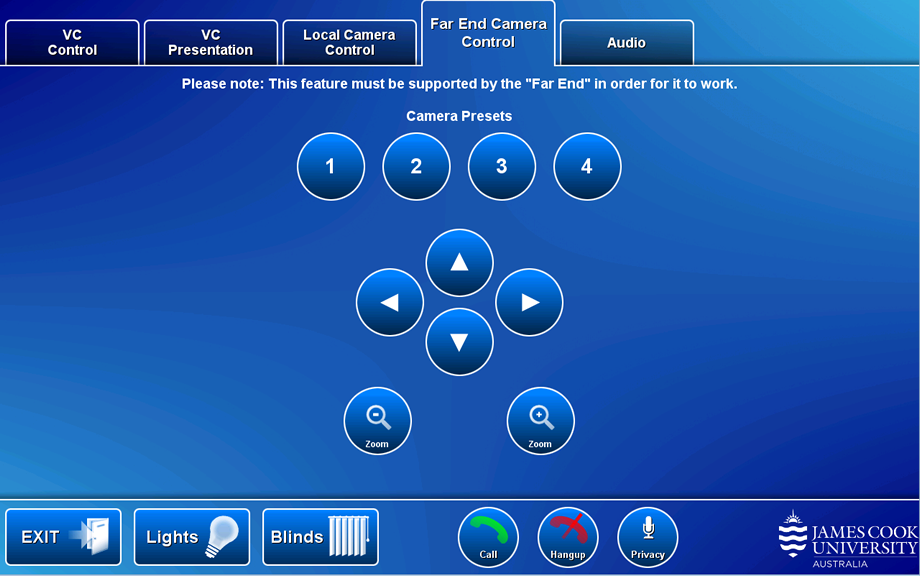
Where systems permit, the camera at the far end is controlled by the touch panel. Touch the Far End Camera Control tab and adjust pan, tilt and zoom.
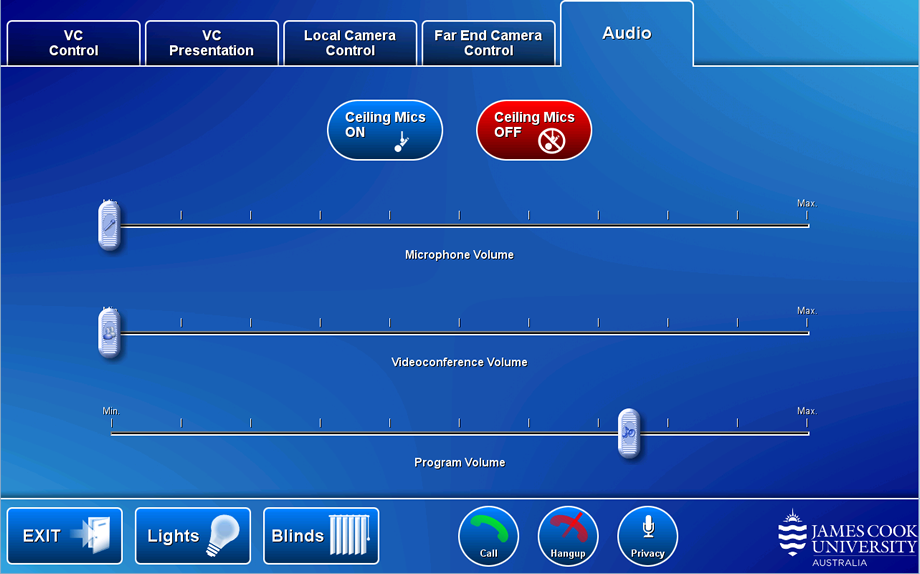
- Ceiling Mics - turn on/off with the buttons.
The ceiling microphones are off by default and should be off while a presentation is under way from the lectern as any noises from the tables could interfere with the presentation. - Microphone volume - touch and slide to adjust the room microphone reinforcement.
- Videoconference volume - touch and slide to adjust the far end volume.
- Program volume - touch and slide to adjust the playback volume of the PC and laptop.
- Exit & shut down – turn off the AV system
- Exit & return to Lecture mode – exit video conference mode and set the system in local lecture mode
- Cancel - continue in videoconferencing mode
Equipment
- 4x large flat panel displays
- Touch panel for all AV control
- Desktop PC
- Document camera
- Microphone - wireless lapel
- Wireless presenter (Kramer VIA)
- 4x ceiling mounted speakers
- HDMI cable with adaptors for connecting a laptop to the AV system
- Infrared hearing assist device
Touch the Link Rooms button (only in 025-005) to join 025-006 with 025-006 for presentation sharing purposes.
Touch any other part of the screen to turn on the AV system without linking.
Touch Panel Operation

Link Rooms - 25-005 can for AV purposes, be linked with the AV system in 25-006 to show the same presentation concurrently in both rooms..
Presentation
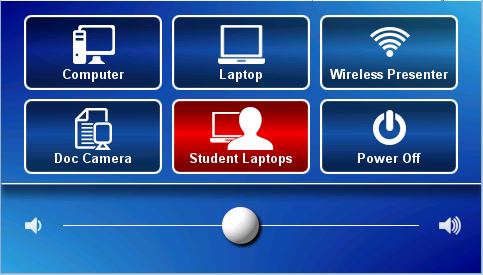
- Computer - show the desktop PC.
- Laptop - show a laptop connected to the AV system by the HDMI cable at the lectern.
- Wireless Presenter - show the instructions for how to connect a BYOD (laptop, tablet, smart phone) wirelessly to the AV system.
Take note of the Room Name (IP address) and Code shown. Peruse this guide for instructions on how to connect. - Document Camera - show the document camera.
- Student Laptops - enable students at the work group table push laptop content onto the associated flat panel display.
Audio
- Volume (slider) - adjust the playback volume of the PC and laptop.
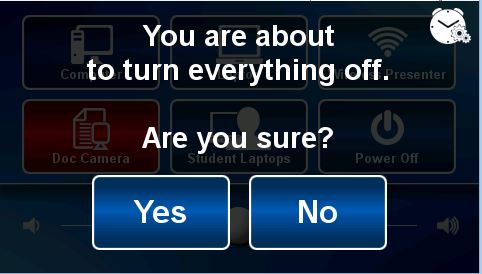
Touch the Power Off button and Yes button to turn off the AV system.
Equipment
- 5x wall mounted large flat panel displays
- Touch panel for all AV control
- Desktop PC (in comms room rack) operated by wireless keyboard and mouse
- Wireless presenter (Kramer VIA) for connecting a BYOD (laptop, tablet, smart phone) to the AV system
- Microphone - (wireless lapel and hand held) must be used for lecture capture recordings
- Presenter camera
- 6x ceiling mounted speakers
- Infrared hearing assist device
- Lecture capture recording device (Panopto)
Touch the screen to activate for connecting a laptop to the AV system.
Touch Panel Operation
Presentation
- Computer - show the desktop PC.
- Wireless Collaborator - show the instructions for how to connect a BYOD (wireless laptop, tablet, smart phone) to the AV system..
Take note of the Room Name (IP address) and Code shown. Peruse this guide for instructions on how to connect. - Presenter camera - static angle for lecture capture recordings.
- Student Laptops - enable students at a work group table push laptop content onto the associated flat panel display by connecting the provided HDMI cable
- The ceiling mounted camera is exclusively used for recording a lecture and not available for any other purposes.
- A wireless microphone (lapel or handheld) must be used for lecture recordings.
- Sound to follow monitors - the presentation audio is played through the ceiling speakers.
- Mute Audio...No Sound - all sound is turned off
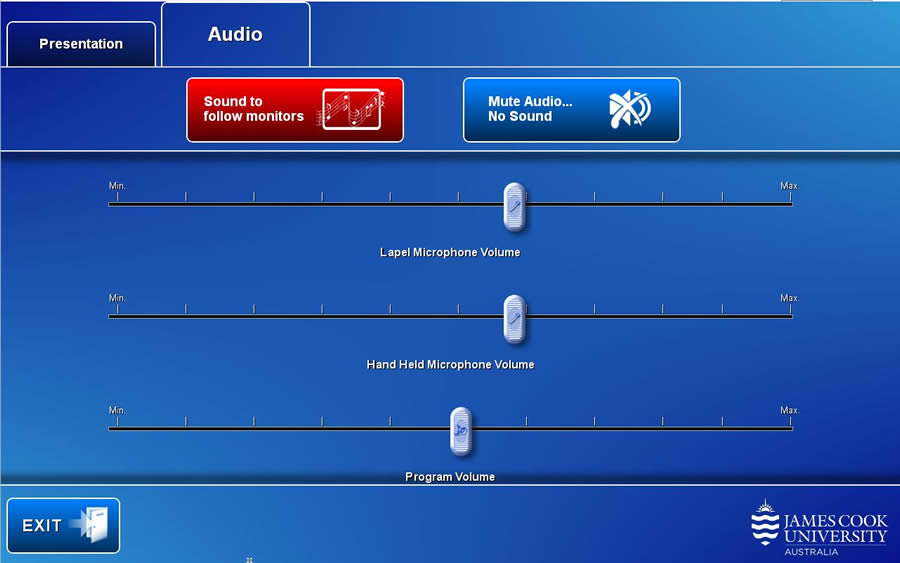
- Lapel Microphone Volume - touch and slide to adjust the microphone room reinforcement.
- Hand Held Microphone Volume - touch and slide to adjust the microphone room reinforcement.
- Program Volume - touch and slide to adjust the playback volume of the PC and laptop.
Touch the Exit button and Yes button to turn off the AV system.
Equipment
- Video wall
- Touch panel for all AV control
- Wireless presenter
- Digital signage
- Set top box (Free to air television)
- Ceiling mounted speakers
- HDMI cable for connecting a laptop to the AV system (outside cabinet)
- 240V power (outside cabinet)
Touch the screen to activate the Audio Visual system.
Touch Panel Operation
Swipe card to the AV rack and key to the outside cabinet, are available from the security office.
- Main Screen - Videowall
- Exit - turn off the AV system
- Audio - Touch and slide the volume button located along the bottom of the screen, to adjust the digital signage and laptop playback volume
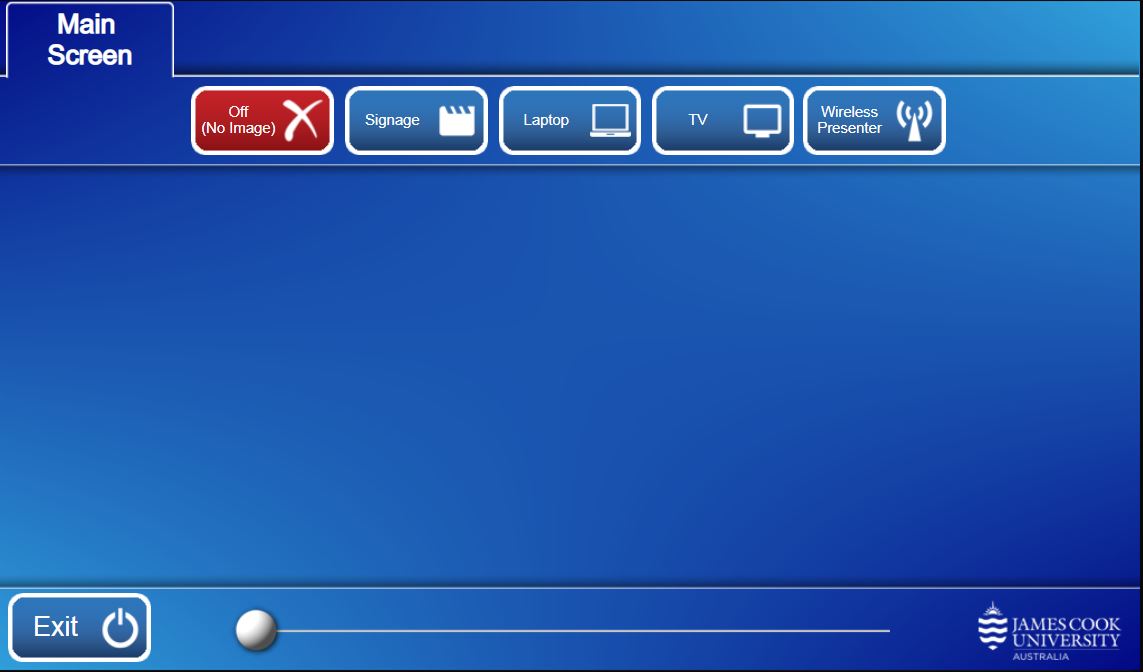
Presentation
- Off (No Image) - show nothing
- Signage - show JCU branded information reel
- Laptop - show a laptop connected by the HDMI cable to the AV system
- TV - set top box (free to air television)
- Wireless presenter - show the instructions for how to connect a BYOD (wireless laptop, tablet, smart phone) to the AV system
Take note of the Room Name (IP address) and Code shown. Peruse this guide for instructions on how to connect.
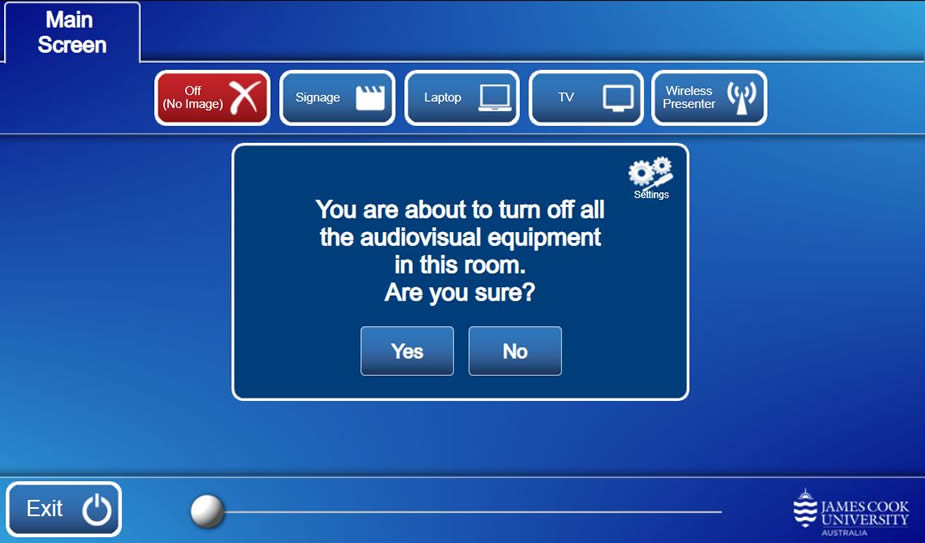
Touch the EXIT button and the YES button to turn off the AV system.
Equipment
- 2x large flat panel displays
- Touch panel for all AV control
- Video conference codec
- Desktop PC
- Document camera
- Wireless presenter
- Audience camera
- Presenter camera
- Wall mounted speakers
- Lectern microphone
- Wireless microphone (wireless hand held and lapel) - recommended for use with Panopto lecture capture recordings
- HDMI cable with adaptors for connecting a laptop to the AV system
- Infrared hearing assist device
- Lecture capture recording device (Panopto)
Touch the screen to activate the Audio Visual system.
Local Presentation Mode
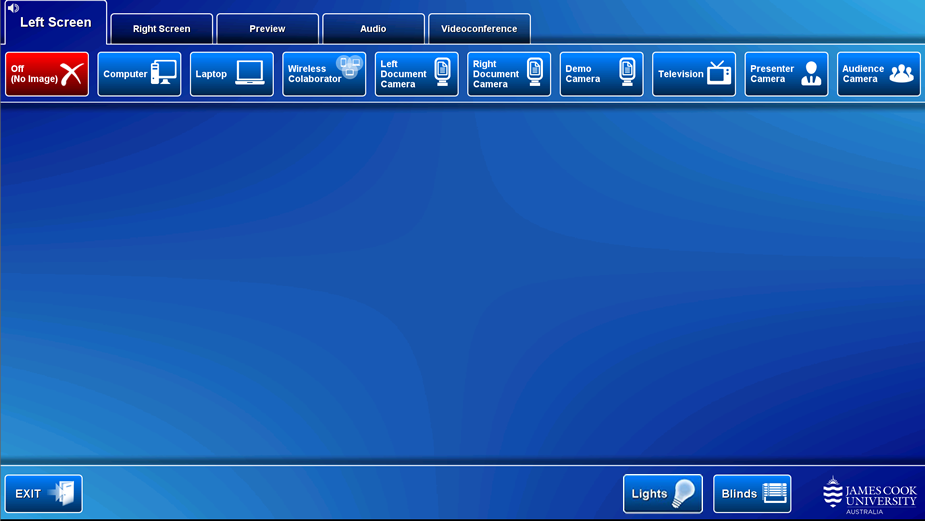
- Left Screen - show presentation on the left projector screen
- Right Screen - show presentation on the right projector screen
- Audio - adjust volume
- Video Conference - set the system in video conference mode, prerequisite for all video calls including Zoom
- Mic VU meter - bar movement confirms microphone is active
- Exit - turn system off
Show Presentation
Select a source for the presentation by touching one of the media buttons.
You can show the same or different or different media on the two large monitors.
- Off (No Image) - show nothing.
- Computer - show the desktop PC.
- Laptop - show a laptop connected by the HDMI cable to the AV system.
- Document Camera - show the document camera.
- Kramer VIA - show the instructions for how to connect a BYOD (laptop, tablet, smart phone) wirelessly to the AV system.
Take note of the Room Name (IP address) and Code shown. Peruse this guide for instructions on how to connect. - Audience Camera 1 - show the audience camera.
- Presenter Camera - show the presenter camera.
- Touch the Presenter Camera button - the current camera angle is shown on the touch panel.
- Adjust the camera to ensure you are visible at all time regardless of movements.
- Clip on the wireless microphone (body pack & lapel)
- Turn on the wireless microphone
- Touch the Left Screen tab and touch the media button for device to be used for presentation
Only media shown on the left screen is recorded. - The recording light turns green on the hour indicating the recording has started
Presentation audio must be routed to the screen where the presentation is shown.
- Sound to follow Left Projector - route the audio to the left projector
- Sound to follow Right Projector - route the audio to the right projector
- Mute Audio... No Sound - turn off the presentation sound
Volume control
- Microphone Volume - touch and slide to adjust the microphone room reinforcement
- Program Volume - touch and slide to adjust the playback volume of the desktop PC and laptop
- Audience Mics - turn the ceiling mounted audience microphones off/on
Set the system in video conference mode for all video calls including Zoom.
Touch the Videoconference tab and the Yes button.
Touch the Exit button and the Yes button to turn off the AV system.
Video Conference Mode
In videoconference mode the system is capable of sending both a camera feed and presentation to the far end as well as receiving camera feeds from the participating far end rooms or zoom participants and sending and receiving audio.
The Presenter Camera is selected by default.
Operation
- VC Main Image - select and adjust the camera to be used.
Adjust the presenter camera to ensure you are visible rirrespective of movements.
Camera controls - select preset camera angles from buttons 1, 2, 3 and 4 or adjust PTZ (pan, tilt and zoom) manually. - VC Presentation - select media to be shown as presentation
- VC Control - connect video calls manually
- Audio - adjust microphone room reinforcement and video conference volume
- Exit - turn the system off.
- Duplicate on both - show the presentation on both projector screens.
- Mute - turn off microphone.
- Selfview - touch to view the current camera angle on the touch panel.
- Layout - change the video and presentation screen composition.
- Mic VU meter - bar is moving when microphone is active.
- The media buttons are greyed out until the video call has been connected.
- Once the video call is connected, select a source for the presentation.
Display option
- Duplicate on both - show the presentation on both projector screens
- Touch the Presenter Camera button - the current camera angle is shown on the touch panel.
- Adjust the camera to ensure you are visible at all times regardless of movements.
- Clip on the wireless microphone (body pack & lapel)
- Turn on the wireless microphone
- Video call connecting
- Touch the VC Presentation tab and the media button for the presentation to be shown.
- Microphone Volume - touch and slide to adjust the microphone room reinforcement.
- Videoconference Volume - touch and slide to adjust the far end volume and the playback volume of the desktop PC and laptop.
- Audience Mics - turn audience microphones off/on.
Manually connect video call
- Dial - connect a video call manually by dialling an IP address or SIP URI
- Contacts - locate an endpoint and touch the Call button.
Connect to Zoom
- Touch the Contacts button
- Locate and touch the Zoom meeting entry
- Touch the Zoom Meeting Bridge (SIP) entry
- Touch the Call button
- Touch the Keypad button (appears once the call has connected to the Zoom Bridge)
- Enter the Zoom meeting ID followed by the #-key
- Enter the passcode followed by the #-key
- Exit & Shut down - turn off the AV system.
- Exit & Return to Lecture Mode - proceed to local presentation mode.
- Cancel - continue in video conference mode.
Equipment
There is no AIO desktop PC in this space - a laptop is required for all presentations
- 1x projector
- Touch panel for all AV control
- Video conference codec
- Wireless presenter
- Video camera
- Ceiling mounted speakers
- Ceiling mounted microphone
- HDMI cable with adaptors for connecting a laptop to the AV system
Touch the screen to activate the Audio Visual system.
Local Presentation Mode
- Projector - show presentation on projector screen
- Audio - adjust volume
- Video Conference - set the system in video conference mode, prerequisite for all video calls including Zoom
- Exit - turn system off
- Mic VU meter - bar movement indicates microphone is live.
Presentation
- Off (No Image) - show nothing.
- Laptop - show a laptop connected by the HDMI cable to the AV system.
- Kramer VIA - show the instructions for how to connect a BYOD (laptop, tablet, smart phone) wirelessly to the AV system.
Take note of the Room Name (IP address) and Code shown. Peruse this guide for instructions on how to connect.
- Microphone Volume - room reinforcement not available
- Program Volume - touch and slide to adjust the laptop playback volume
- Mic VU Meter - bar moving indicates the microphone is live
Set the system in video conference mode for all video calls including Zoom.
Touch the Video Conference tab and Yes button.
Touch the Exit button and Yes button to turn off thresystem.
Videoconference Mode
In videoconference mode the system is capable of sending both a camera feed and presentation to the far end as well as receiving camera feeds from the participating far end rooms or zoom participants and sending and receiving audio.
Operation
- VC Camera - adjust the camera by touching the pan, tilt and zoom controls.
All the room participants should be visible to the far end at all times, hence adjusting the camera is recommended. - Mute - turn off microphone.
- Selfview - touch to view the current camera angle in a picture-in-picture (PiP) on the projector screen.
- Layout - change the video and presentation screen composition.
- Exit - turn of the system.
- Mic VU meter - bar movement indicates the microphone is live.
- The media buttons are greyed out until the video call has been connected.
- Once the video call is connected, select a source for the presentation.
There is no AIO Desktop PC in this space.
- Microphone Volume - room voice reinforcement is not available.
- Videoconference Volume - touch and slide to adjust the far end volume.
- Program Volume - touch and slide to adjust the playback volume of a laptop or other connected BYOD.
- Mic VU meter - bar movement indicates the microphone is active.
Manually connect video call
- Dial - connect a video call manually by dialling an IP address or SIP URI
- Contacts - locate an endpoint and touch the Call button.
Connect to Zoom
- Touch the Contacts button
- Locate and touch the Zoom meeting entry
- Touch the Zoom Meeting Bridge (SIP) entry
- Touch the Call button
- Touch the Keypad button (appears once the call has connected to the Zoom Bridge)
- Enter the Zoom meeting ID followed by the #-key
- Enter the passcode followed by the #-key
- Exit & Shut down - turn off the AV system.
- Exit & Return to Lecture Mode - proceed to local presentation mode.
- Cancel - continue in video conference mode.
Equipment
- 8x large flat panel displays
- Touch panel for all AV control
- Desktop PC
- Document camera
- Wireless presenter
- Fume camera (134-132 only)
- Ceiling mounted speakers
- Lectern microphone
- Wireless microphone (wireless hand held and lapel)
- HDMI cable with adaptors for connecting a laptop to the AV system
- Infrared hearing assist device
Touch the screen to activate the Audio Visual system.
Touch Panel Operation
Operation
- Main Screen - show presentation on all flat panel displays.
- Audio - adjust volume.
- Exit - turn system off.
- Lights - adjust room lighting.
Show Presentation
- Computer - show the desktop PC.
- Laptop - show a laptop connected by the HDMI cable to the AV system.
- Document Camera - show the document camera.
- Wireless presenter - show the instructions for how to connect a BYOD (wireless laptop, tablet, smart phone) to the AV system.
Take note of the Room Name (IP address) and Code shown. Peruse this guide for instructions on how to connect. - Fume Camera (134-132 only) - show the fume camera (adjust by separate remote control).
- Student Display - enable students at a work group table push laptop content onto the associated flat panel display after connecting to the display with the provided HDMI cable.
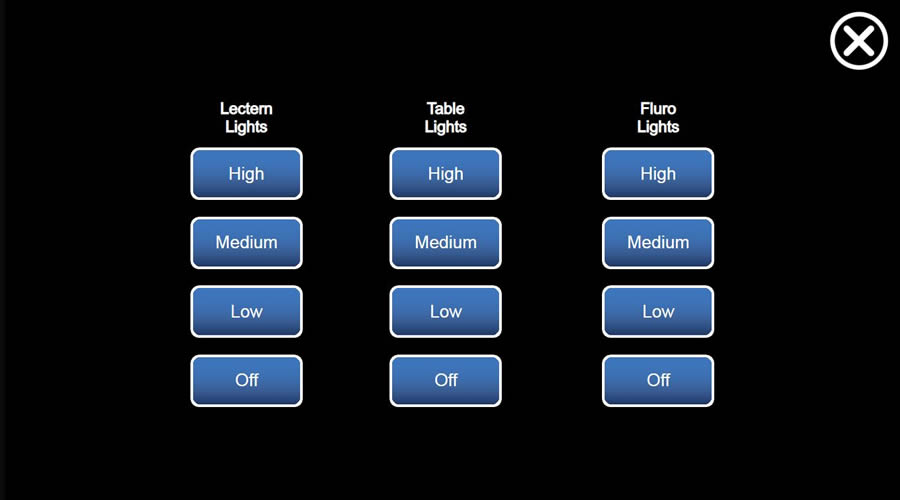
Adjust the room lighting - touch a button for the desired effect.
- Program Volume - touch and slide to adjust the playback volume of the PC and laptop.
- Mic Volume - touch and slide to adjust the room voice reinforcement.
Touch the Exit button and Yes button to turn off the AV systemf.
Available in Townsville rooms: 142-020, 142-021, 142-022 and 142-023
Equipment
- 1x projector
- Touch panel for all AV control
- Desktop PC
- Document camera (142-022 and 142-023 only)
- Preview monitor
- Wireless presenter
- Ceiling mounted speakers
- Wireless microphone (wireless hand held and lapel)
- HDMI cable with adaptors for connecting a laptop to the AV system
- Infrared hearing assist device
Touch the screen to activate the Audio Visual system.
Touch Panel Operation
Operation
- Projector - show presentation on projector screen.
- Preview - view a source on preview monitor.
- Audio - adjust volume.
- Exit - turn system off.
- Lighting - adjust room lighting.
- Join Rooms (142-021, 142-023 only) - link the AV in 142-021 (Master) with 142-020 and 142-023 (Master) with 142-022 to operate the AV systems in both rooms from the Master. Touch the button again to dis-join the rooms.
Show Presentation
- No Image - show nothing.
- Computer - show the desktop PC.
- Laptop - show a laptop connected by the HDMI cable to the AV system.
- Document Camera (142-022 and 142-023 only) - show the document camera.
- Presenter - show the instructions for how to connect a BYOD (wireless laptop, tablet, smart phone) to the AV system.
Take note of the Room Name (IP address) and Code shown. Peruse this guide for instructions on how to connect.

Access the room lighting controls - touch a button for the desired effect.
Lights are also operated from a C-bus panel adjacent to the exit door.
The preview option is useful for adjusting the document camera before pushing it to the projector.
Touch the Preview tab and a media button to view it on the preview monitor located next to the PC on the lectern.

Sound is by default turned on - touch the Sound Off button to mute sound.
- Presentation - touch the "-" and "+" buttons to adjust the playback volume of the PC and laptop.
- Lapel Mic - touch the "-" and "+" buttons to adjust the lapel microphone room voice reinforcement.
- Hand Held Mic - touch the "-" and "+" buttons to adjust the hand held microphone room voice reinforcement.
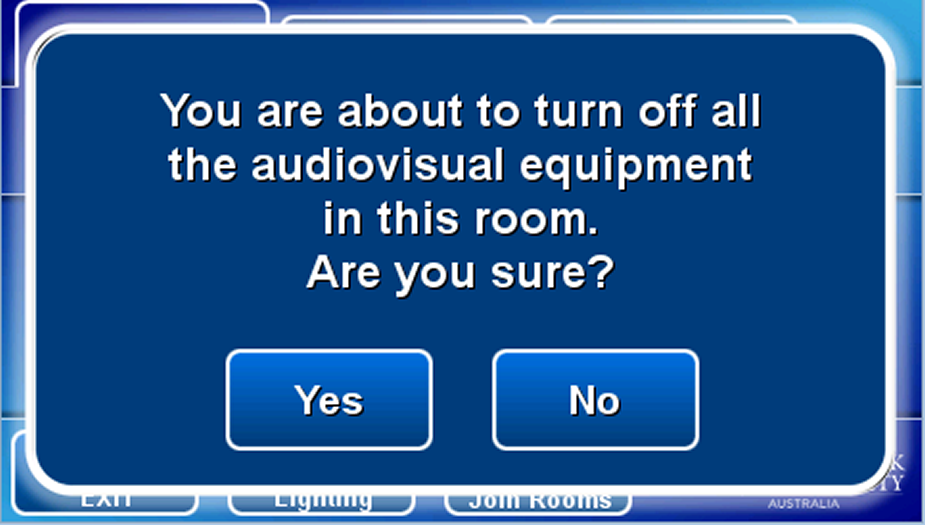
Touch the Exit button and Yes button to turn the AV system off.
Equipment
- 3x large flat panel displays
- Touch panel for all AV control
- Video conference codec
- Desktop PC
- Wireless presenter
- Audience camera
- Presenter camera
- Wall mounted speakers
- Ceiling mounted microphones
- Wireless microphone (wireless handeld and lapel)
- Infrared hearing assist device
Touch the screen to activate the Audio Visual system.
Touch Panel Operation
This system defaults to VC Control which is used for adjusting the room cameras and connecting video calls manually.
Operation
- VC Control - connect video calls including Zoom manually.
- VC Presentation - show PC and BYOD presentation.
- Audio - adjust volume.
- Far End Camera Control - adjust far end camera (not supported in all rooms).
- Address book - show directory of folders and available endpoints
- Keyboard - connect by entering IP address or SIP URI manually.
- Touch tones/Meeting PIN - meeting ID and passcode manually.
- Camera Control - select and adjust the camera for a video conference call.
- Exit - turn off system.
- Hang up - disconnect video call.
- Mute - mute room microphones.
- Layout - change the camera and presentation composition.
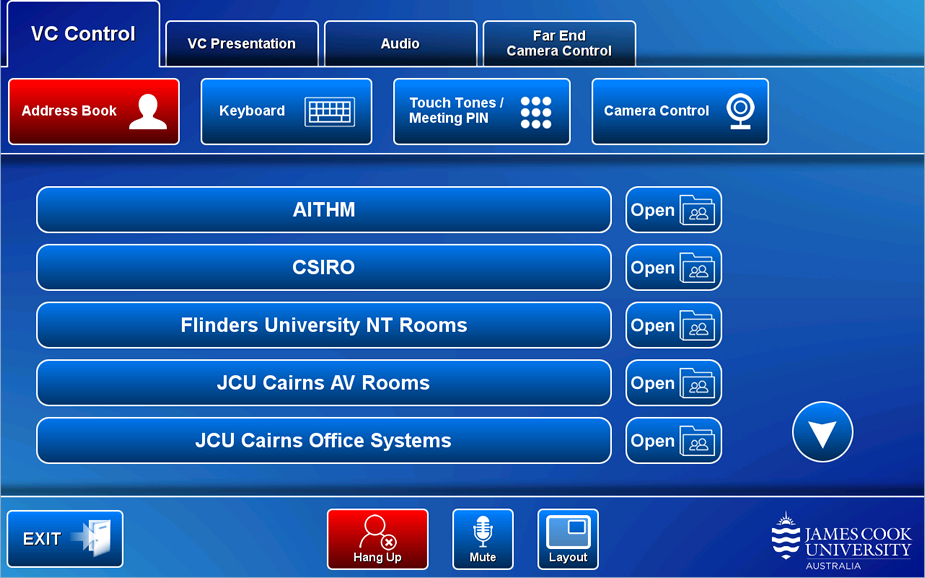
Manually connect video call
- Address Book - locate an endpoint and touch the Call button.
- Keyboard - connect a video call manually by dialling an IP address or SIP URI
- Touch tones/Meeting PIN - enter meeting ID and passcode manually.
Connect to Zoom
- Touch the Address Book button
- Locate and open the Zoom meeting folder
- Touch the Zoom Meeting Bridge (SIP) entry
- Touch the Call button
- Touch the Touch tones/Meeting PIN button (appears once the call has connected to the Zoom Bridge)
- Enter the Zoom meeting ID followed by the #-key
- Enter the passcode followed by the #-key
VC Presentation - select a media source to be used for presentations in both modes (local presentation and video conference).
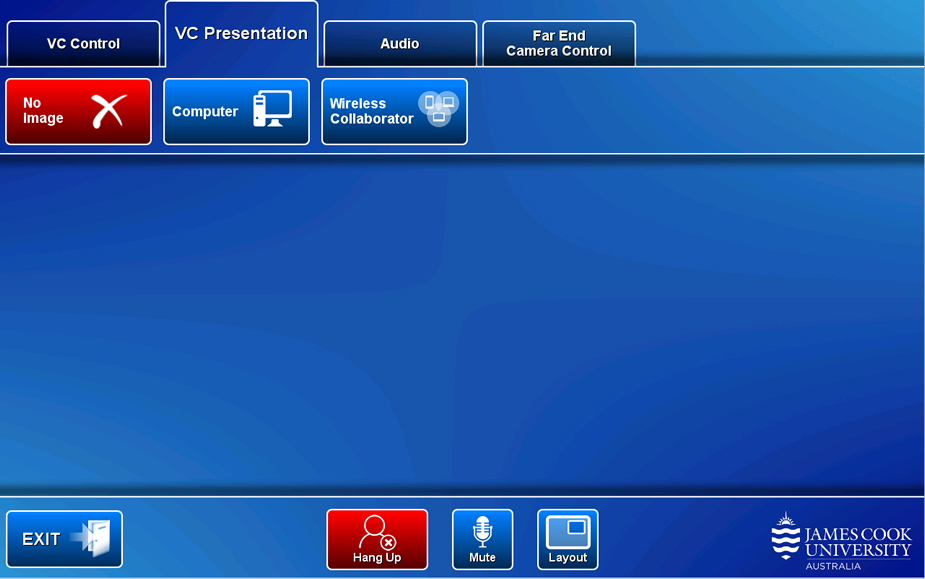
Show presentation
- No Image - show nothing
- Computer - show the desktop PC
- Wireless Collaborator - show the instructions for how to connect a BYOD (wireless laptop, tablet, smart phone) to the AV system.
The laptop must be WiFi capable and connected to Eduroam.
Take note of the Room Name (IP address) and Code shown. Peruse this guide for instructions on how to connect.
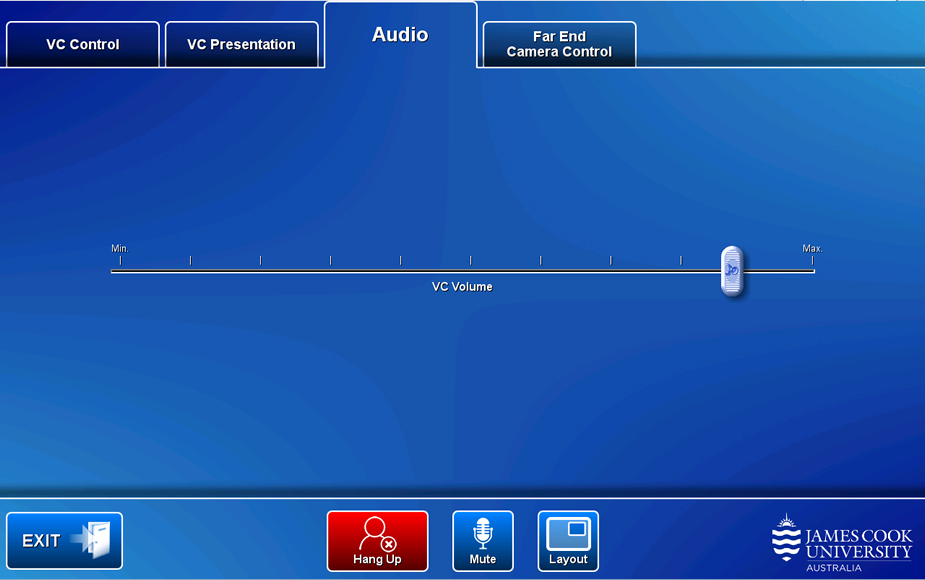
VC Volume - touch and slide to adjust the video conference volume, the PC and laptop playback volume.
Touch the Far End Camera Control tab and adjust its camera (not supported in all rooms) with the on screen pan/tilt/zoom control buttons.
Touch the EXIT button and the Yes button to turn off the AV system.
Available in Townsville rooms
- Bio-Science Labs: 142-101A (Zone 1), 142-101B (Zone 2), 142-101C (Zone 3),
- Chemistry Labs: 142-110A (Zone 1), 142-110B (Zone 2)
Equipment
- 3x large flat panel displays
- Touch panel for all AV control
- Video conference codec (142-101B, 142-110B only)
- Desktop PC
- Document camera
- Video camera (142-101b, 142-110B only)
- Ceiling mounted speakers (sound showers in each zone)
- Lectern microphone
- Wireless microphone (wireless lapel)
- HDMI cable with adaptors for connecting a laptop to the AV system
- Infrared hearing assist device
Touch the screen to activate the Audio Visual system.
Local Presentation Mode
Operation
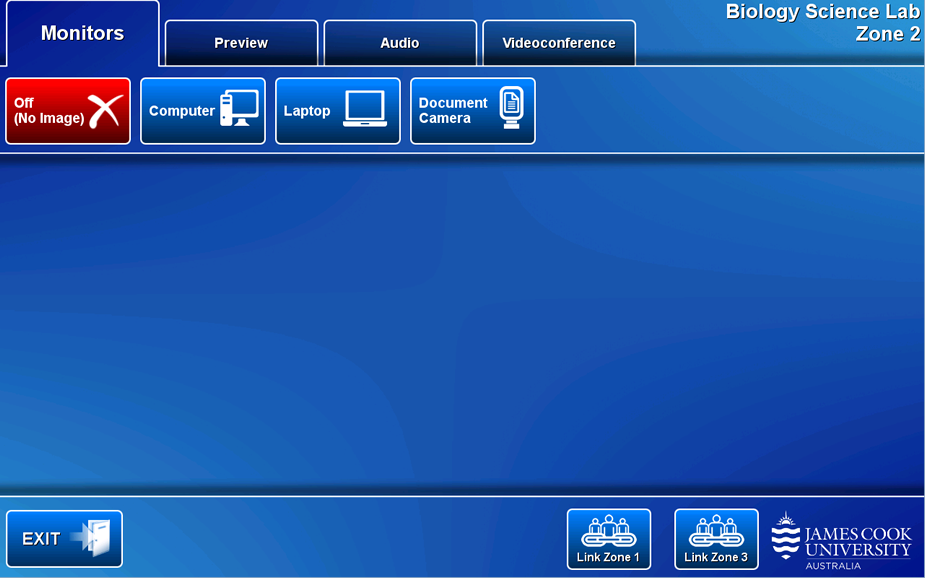
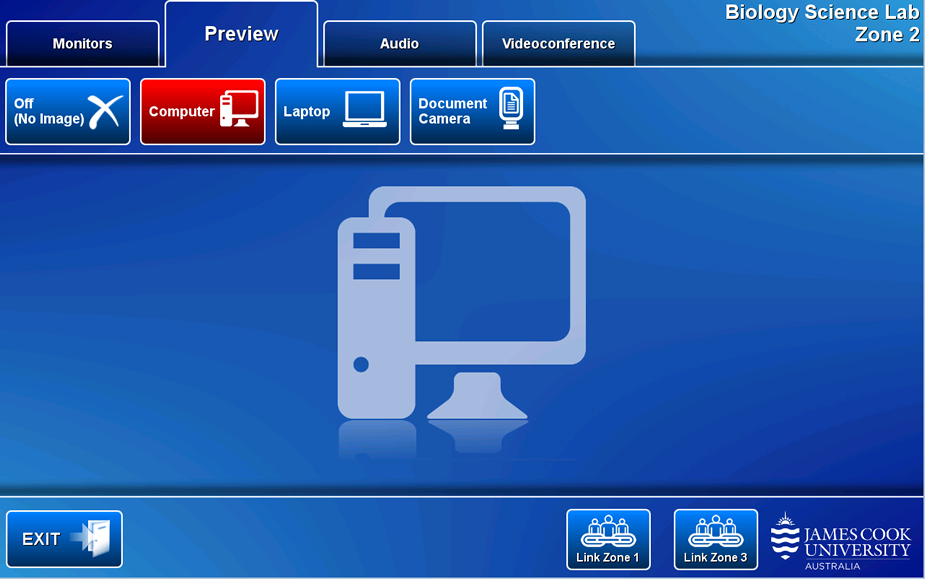
- Monitors - show presentation on the room monitors.
- Preview - view a presentation source on the preview monitor.
- Audio - adjust volume.
- Video Conference (142-101B, 142-110B only) - set the system in video conference mode, prerequisite for all video calls including Zoom.
- Exit - turn system off.
- Link Zone 1 (142-101B, 142-110B) - link Zone 2 with Zone 1 for sharing presentation in both zones.
- Link Zone 3 (142-101B only) - link Zone 2 with Zone 3 for sharing presentation in both zones.
Show Presentation
- Off (No Image) - show nothing.
- Computer - show the desktop PC.
- Laptop - show a laptop connected by the HDMI cable to the AV system.
- Document Camera - show the document camera.
The preview option is useful for adjusting the document camera before pushing it to the projector.
Audio in the lab is played individually in each zone without interfering with each other (sound showers routed to each zone) or touch the Link options to route sound to two or all Zones simultaneously through the sound showers in each zone.
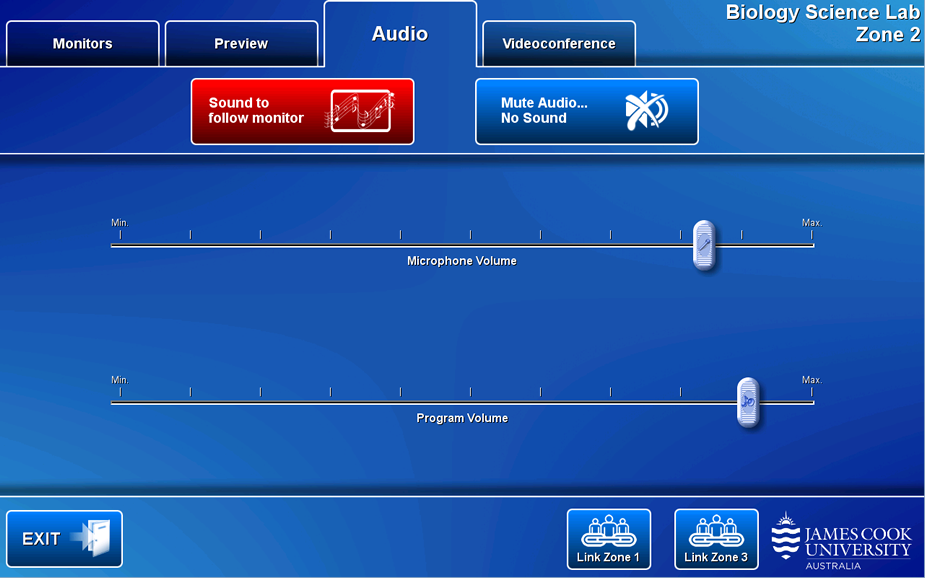
- Sound to follow monitor - route the audio to the to Zone 2 (alternatively link the zones to reproduce sound in two or all the zones from Zone 2)
- Mute Audio... No Sound - turn off all sound.
- Microphone volume - touch and slide to adjust the room voice reinforcement.
- Program Volume - touch and slide to adjust the playback volume of the PC and laptop.
Set the system in video conference mode, a prerequisite for all video calls including Zoom.
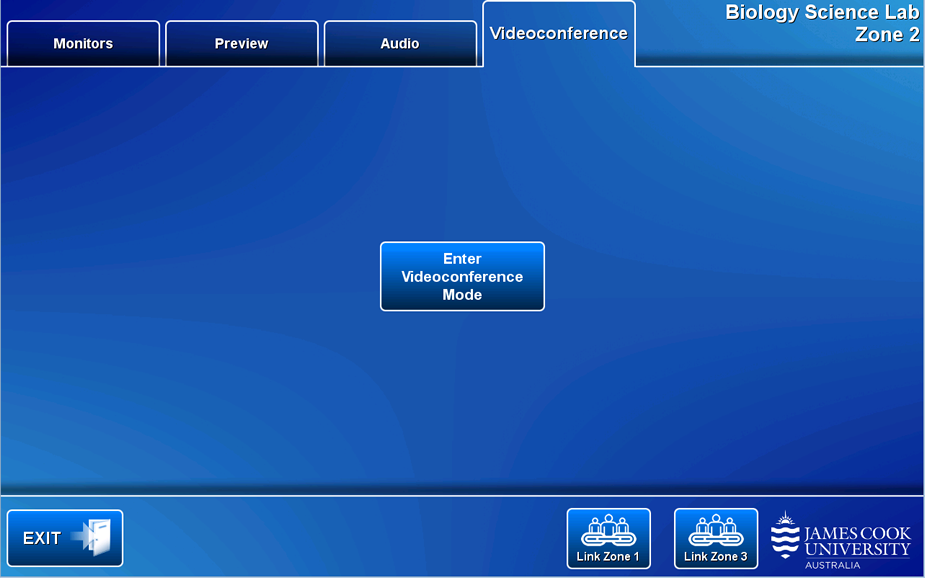
Touch the Videoconference tab and the Enter Videoconference Mode button to enter videoconferencing mode.
Touch the Exit button and Yes button to turn off the AV system.
Videoconference Mode
Operation
Adjust the presenter camera by touching the VC Presentation tab and the Presenter Camera button.
- VC Control - connect video calls manually.
- VC Presentation - show PC and BYOD presentation.
- Audio - adjust volume.
- Far End Camera Control - adjust far end camera (not supported in all rooms).
- Address book - show directory of folders and available endpoints
- Keyboard - connect by entering IP address or SIP URI manually.
- Touch Tones/Meeting PIN - enter Zoom meeting ID and passcode manually.
- Exit - turn off system.
- Hang up - disconnect video call.
- Mute - mute room microphones.
- Layout - change the camera and presentation composition.
- Link Zone 1 - Join Zone 2 with Zone 1 in video conference mode
- Link Zone 3 - Link Zone 2 with Zone 3 in video conference mode
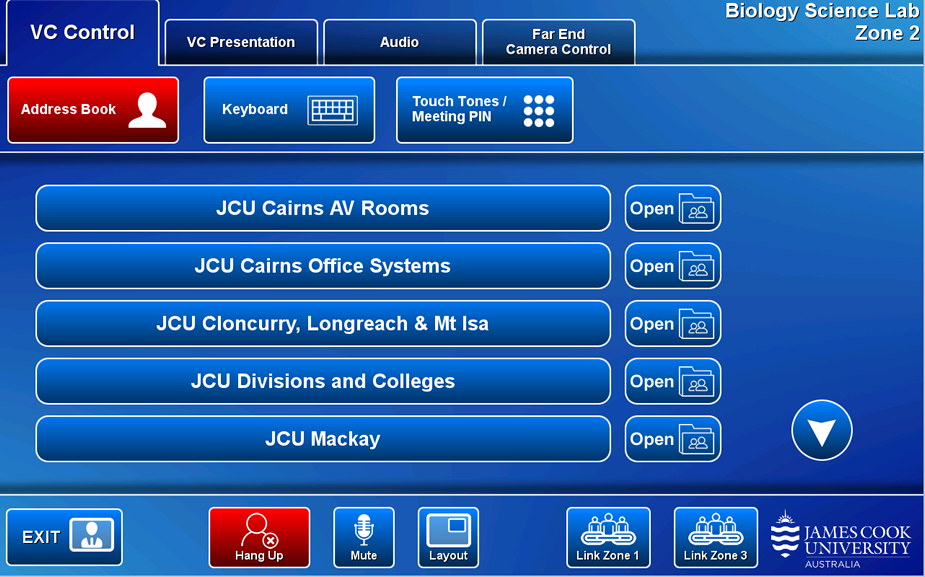
Manually connect video call
- Address Book - locate an endpoint and touch the Call button.
- Keyboard - connect a video call manually by dialling an IP address or SIP URI
- Touch tones/Meeting PIN - enter meeting ID and passcode manually.
Connect to Zoom
- Touch the Address Book button
- Locate and open the Zoom meeting folder
- Touch the Zoom Meeting Bridge (SIP) entry
- Touch the Call button
- Touch the Touch Tones/Meeting PIN button (appears once the call has connected to the Zoom Bridge)
- Enter the Zoom meeting ID followed by the #-key
- Enter the passcode followed by the #-key
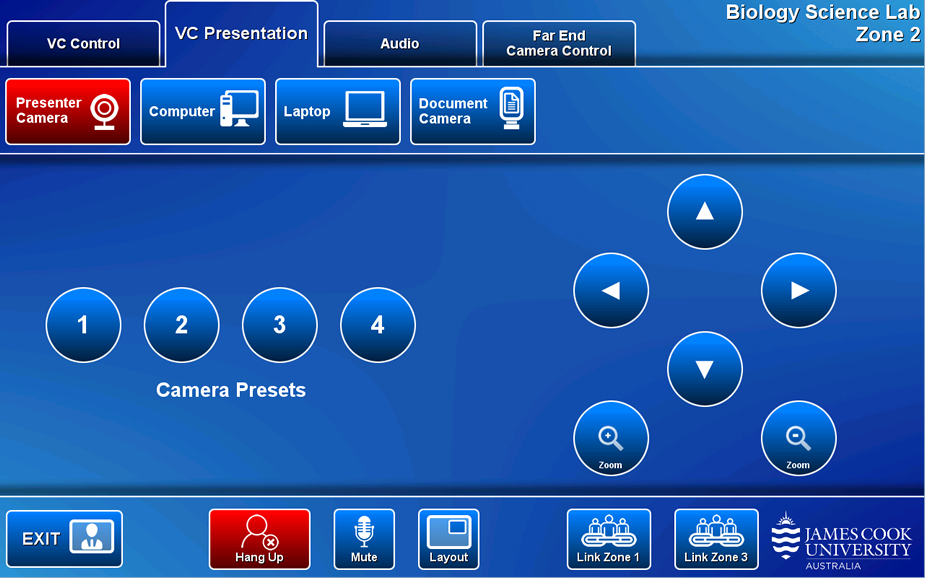
- Presenter Camera - adjust the camera angle by the pan, tilt and zoom buttons to ensure you are visible at all times irrespective of movements.
- Computer - show desktop PC
- Laptop - show laptop connected to the AV system by the HDMI cable
- Document Camera - show document camera
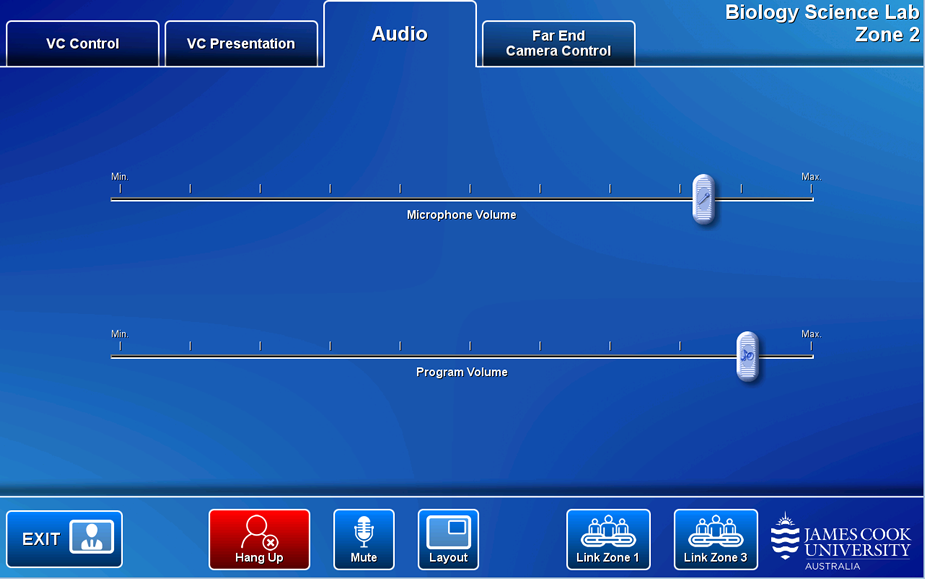
- Microphone volume - touch and slide to adjust the room voice reinforcement.
- Program Volume - touch and slide to adjust the playback volume of the PC and laptop.
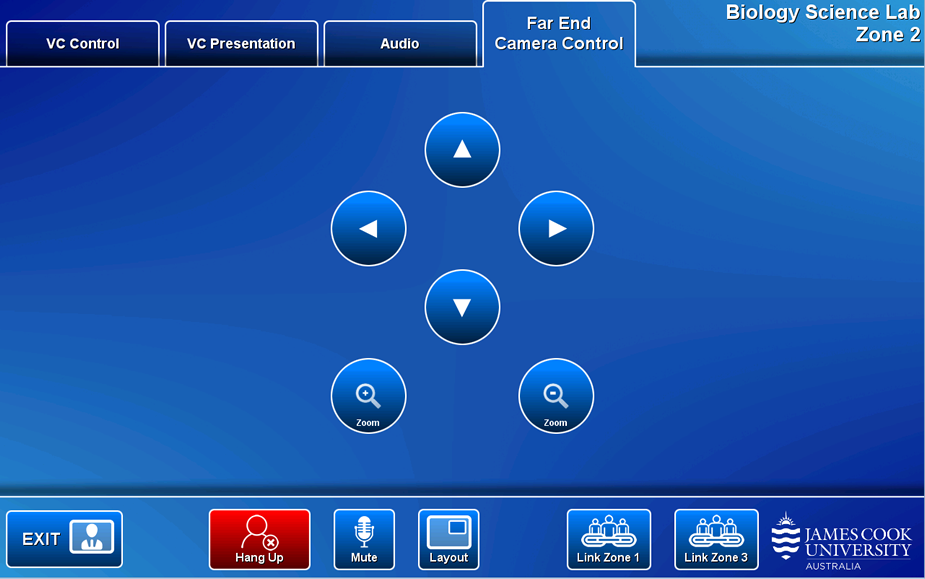
Touch the on screen pan/tilt/zoom control buttons to adjust the far end room camera (not supported in all rooms).

- Exit & shut down - turn off the AV system
- Exit & return to Presentation Mode - proceed to local presentation mode
- Cancel - continue in video conference mode.
Equipment
- 2x projectors
- 2x comfort monitors
- Touch panel for all AV control
- Video conference codec
- Desktop PC
- 3x Document cameras
- Wireless presenter
- Audience camera
- Presenter camera
- Wall mounted speakers
- Lectern microphone
- Wireless microphone (wireless hand held and lapel) - recommended for use with Panopto lecture capture recordings
- HDMI cable with adaptors for connecting a laptop to the AV system
- Infrared hearing assist device
- Lecture capture recording device (Panopto)
Touch the screen to activate the Audio Visual system
Local Presentation Mode
Operation
- Left Screen - show presentation on the left projector screen
- Right Screen - show presentation on the right projector screen
- Preview - view media on the preview monitor
- Audio - adjust volume
- Video Conference - set the system in video conference mode, prerequisite for all video calls including Zoom
- Exit - turn system off
- Lights - adjust the room lighting for optimum projector screen contrast.
- Blinds - control the window blinds for best lighting conditions in the theatre.
Show Presentation
The presentation can be the same or different on the two projector screens (left and right).
- Off (No Image) - show nothing.
- Computer - show the desktop PC.
- Laptop - show a laptop connected by the HDMI cable to the AV system.
- Wireless Collaborator - show the instructions for how to connect a BYOD (wireless laptop, tablet, smart phone) to the AV system.
Take note of the Room Name (IP address) and Code shown. Peruse this guide for instructions on how to connect. - Left Document Camera - show the left document camera.
- Right Document Camera - show the right document camera.
- Demo Camera - show the red lady bug document camera.
- Television - not available
- Presenter Camera - adjust and show the presenter camera.
- Audience Camera - adjust and show the audience camera.
The preview is particularly useful to adjust a document camera view prior to pushing it to the projector screen.
Touch the Preview tab and a media button to view it on the touch panel.
- Touch the Presenter Camera button - the current camera angle is shown on the touch panel.
- Adjust the camera to ensure you are visible at all time irrespective of movements.
- Clip on the wireless microphone (body pack & lapel)
- Turn on the wireless microphone
- Touch the Left Screen tab and the media button for device to be used for presentation
Only media shown on the left screen is recorded. - The recording light turns green on the hour indicating the recording has started
Presentation audio must be routed to the screen where the presentation is shown.
- Sound to follow Left Projector - route the audio to the left projector.
- Sound to follow Right Projector - route the audio to the right projector.
- Mute Audio... No Sound - turn off the presentation sound.
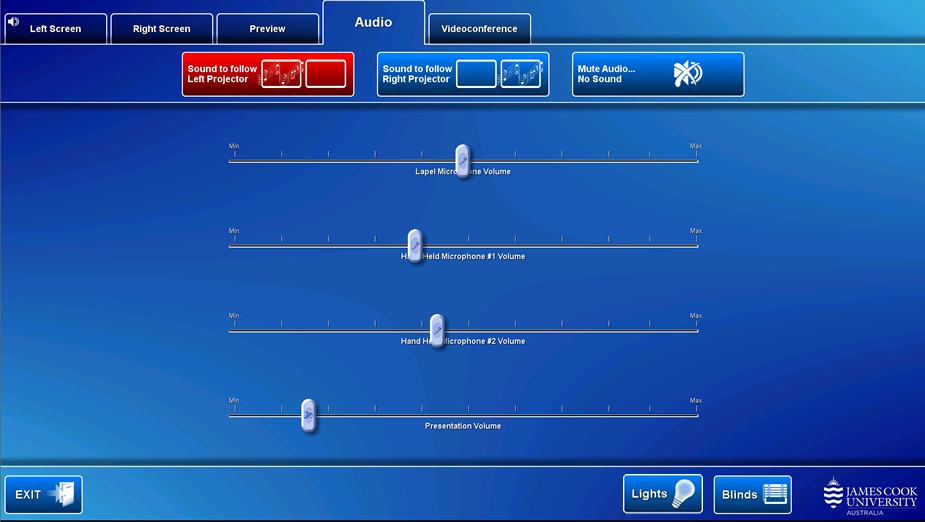
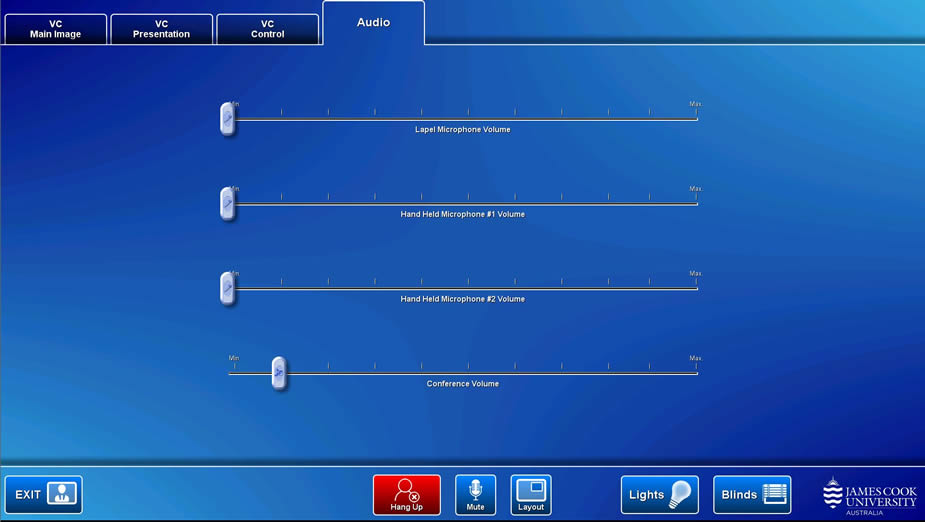
Volume control
- Lapel Microphone Volume - touch and slide to adjust the lapel microphone room voice reinforcement.
- Hand Held microphone #1 Volume - touch and slide to adjust the #1 handheld microphone voice room reinforcement.
- Hand Held microphone #2 Volume - touch and slide to adjust the #2 handheld microphone voice room reinforcement.
- Program Volume - touch and slide to adjust the playback volume of the desktop PC and laptop.
- Presentation Volume - touch and slide to adjust the playback volume of the PC and laptop
Videconference mode is a prerequisite for all video calls including Zoom.
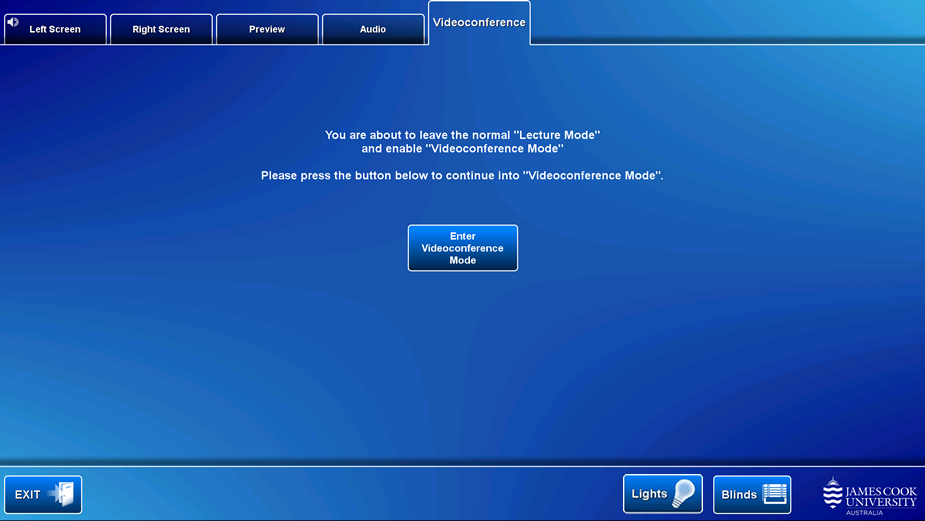
Touch the Videoconference tab and the Enter Videconference Mode button
Touch the Exit button and Yes button to turn off the AV system.
Videoconference Mode
In videoconference mode the system is capable of sending both a camera feed and presentation to the far end as well as receiving camera feeds from the participating far end rooms or zoom participants and sending and receiving audio.
The presenter camera is selected by default.
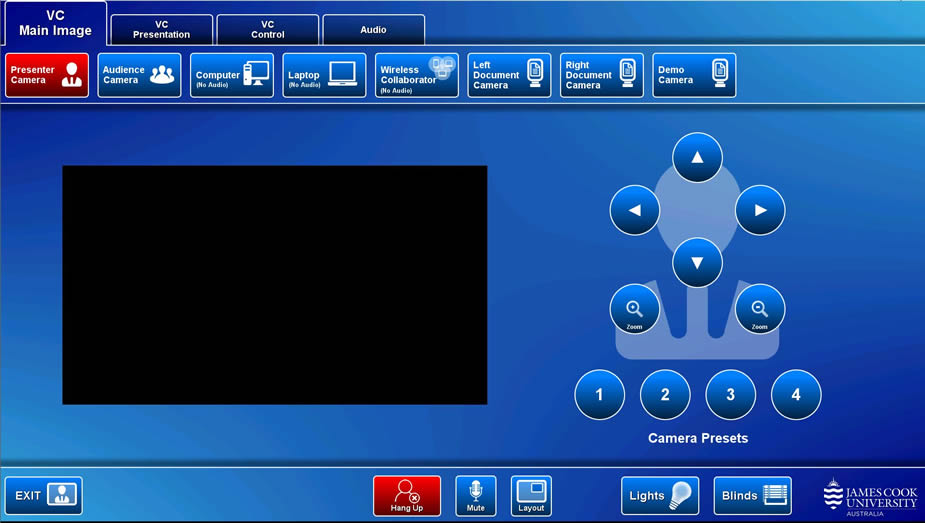
Operation
- VC Main Image - select the presenter camera or audience camera as the primary video stream (presenter) and make adjustments
- VC Presentation - touch a media button to select the second media stream (presentation)
- VC Control - connect a video call manually
- Audio - adjust microphone room reinforcement level and PC/laptop playback volume
- Exit - turn off the AV system
- Hangup - disconnect the video call
- Mute - turn off the microphones
- Layout - change the camera and presentation projector screen composition
Touch the VC Presentation tab and a media source button to show the presentation

Show Presentation
- No Presentation - show no presentation
- Computer - show the AIO Desktop PC
- Laptop - show a laptop connected to the AV system by the provided HDMI cable
- Wireless Collaborator - show the instructions for how to connect a BYOD (wireless laptop, tablet, smart phone) to the AV system..
Take note of the Room Name (IP address) and Code shown. Peruse this guide for instructions on how to connect. - Left Document Camera - show the left flat bed document camera
- Right Document Camera - show the right flat bed document camera
- Demo Camera - show the lady bug document camera
- Touch the Presenter Camera button - the current camera angle is shown on the touch panel.
- Adjust the camera to ensure you are visible at all time regardless of movements.
- Clip on the wireless microphone (body pack & lapel)
- Turn on the wireless microphone
- Video call connecting
- Touch the VC Presentation tab and the media button for the presentation to be shown.
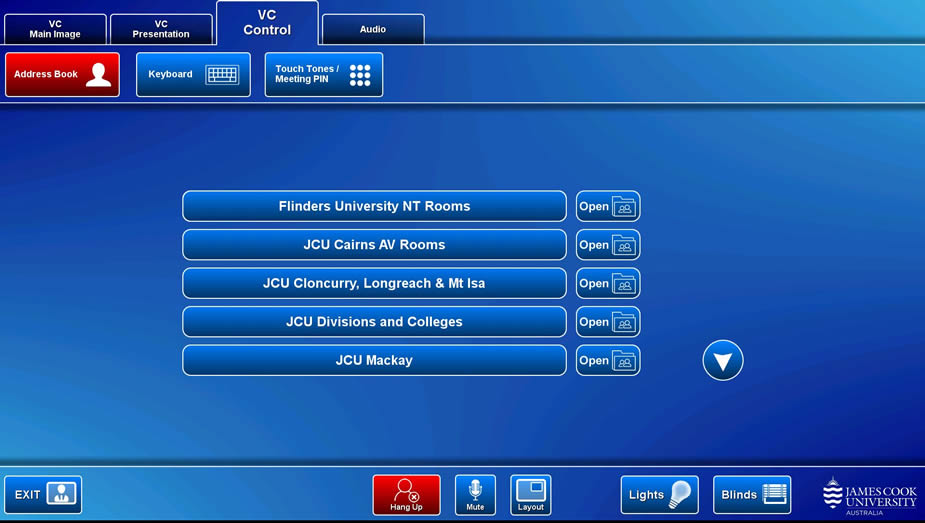
Manually connect video call
- Address Book - open a phone book folder, locate the endpoint and touch the Call button.
- Keyboard - connect a video call manually by dialling an IP address or SIP URI
- Touch tones/Meeting PIN - enter meeting ID and passcode manually.
Connect to Zoom
- Touch the Address Book button
- Locate and open the Zoom meeting folder
- Touch the Zoom Meeting Bridge (SIP) entry
- Touch the Call button
- Touch the Touch tones/Meeting PIN button (appears once the call has connected to the Zoom Bridge)
- Enter the Zoom meeting ID followed by the #-key
- Enter the passcode followed by the #-key
- Lapel Microphone Volume - adjust the room voice reinforcement of the lapel microphone.
- Hand Held Microphone #1 volume - adjust the room voice reinforcement of the Hand Held Mic 1.
- Hand Held Microphone #2 volume - adjust the room voice reinforcement of the Hand Held Mic 2.
- Conference Volume - adjust the far end room(s) volume and playback volume of the PC and laptop..
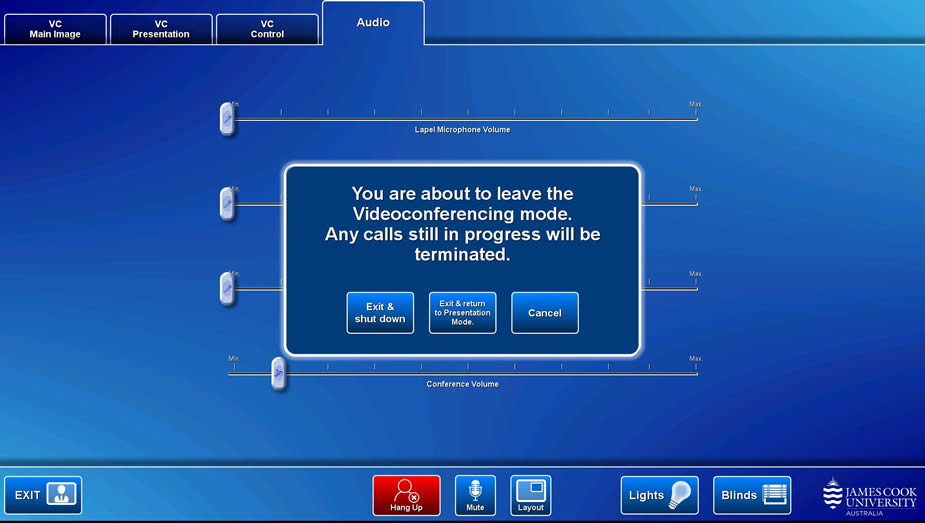
- Exit & Shut down - turn off the AV system.
- Exit & Return to Presentation Mode - proceed to local presentation mode.
- Cancel - continue in video conference mode.
Central Plaza is not suitable for Videoconferencing/Zoom connections as there is no camera installed nor are the microphones available to the room PC. A laptop can be used for this purpose but is not recommended due to the limitations of the inbuilt laptop camera and microphone.
The AV equipment is located in a locked space adjacent to the stage. For access during office hours, please contact VAVS on 4781 4643 or videoconferencing@jcu.edu.au
Equipment
- Video wall
- Mobile lectern - connectable at the raised stage or centre of the floor area
- Touch panel for all AV control
The system is programmed to turn on automatically Mo-Fr 8am-6pm to show the Digital Signage - Mini PC with wireless keyboard and mouse
- Lectern and wireless microphones
- Wireless Presenter
- Speakers (wall mounted on either side of video wall and in the open space)
Touch the screen to turn on the AV system
Touch Panel Operation
Operation
- Presentation - show media on the video wall.
- Audio - volume control.
- Exit - turn off system.
Show Presentation
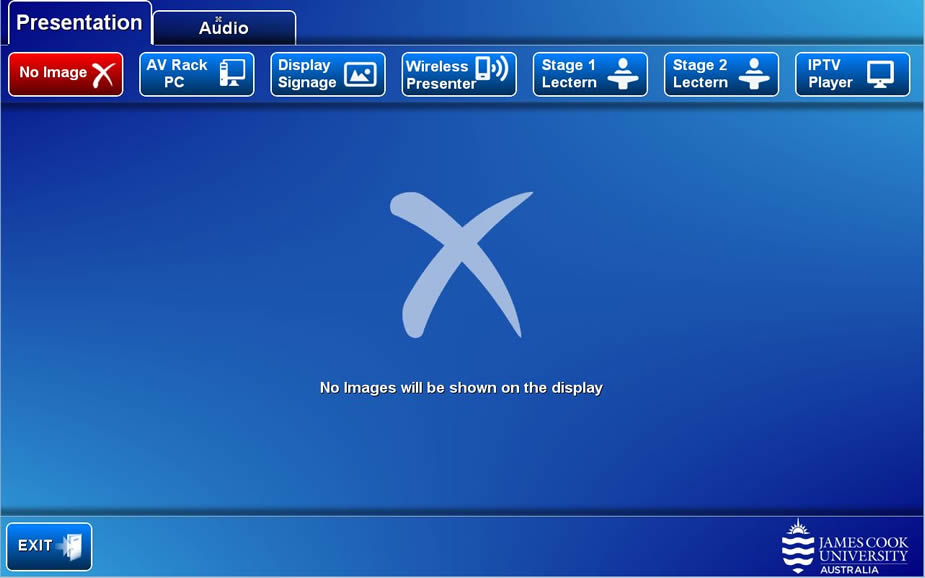
- No Image - show nothing.
- AV Rack PC - show the mini PC.
- Display Signage - show the JCU branded news reel.
- Wireless Presenter - show the instructions for how to connect a BYOD (laptop, tablet, smart phone) wirelessly to the AV system.
Take note of the Room Name (IP address) and Code shown. Peruse this guide for instructions on how to connect. - IPTV - not available
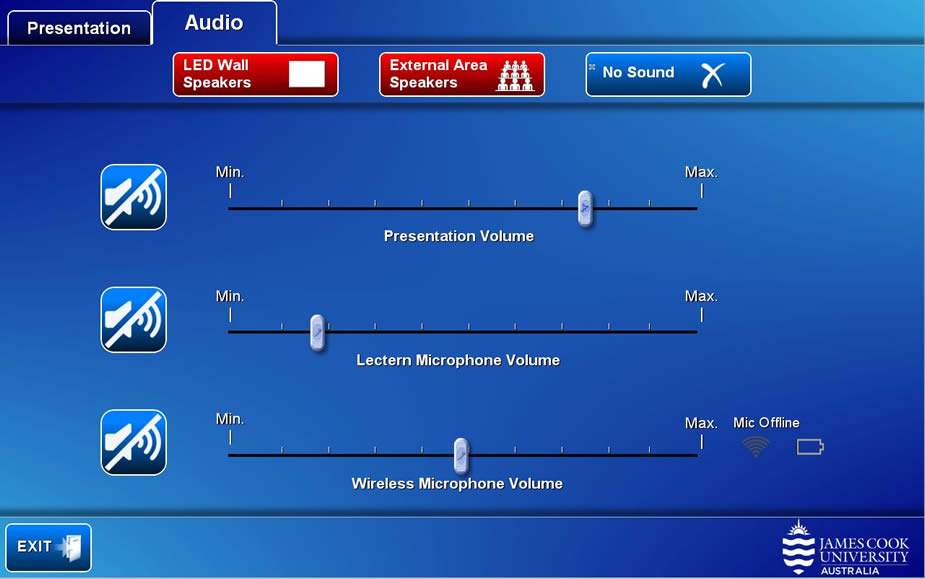
Two speaker pairs are located in this space
- LED Wall speakers - mounted on either side of the video wall,
- External area speakers - mounted in the open space below the waved roof.
- No Sound - mute all sound
Volume control
- Presentation Volume - touch and slide to adjust the playback volume of the mini PC and laptop.
- Lectern Microphone Volume - touch and slide to adjust the lectern microphone voice reinforcement through the speakers.
- Wireless Microphone Volume - touch and slide to adjust the wireless microphone voice reinforcement through the speakers.
Equipment
- 5x large flat panel displays
- Touch panel for all AV control
- Desktop PC
- Document camera
- Wireless presenter
- Video camera (lecture capture recordings)
- Ceiling mounted speakers
- Wireless microphone (wireless hand held and lapel) - must be used for Panopto lecture capture recordings
- HDMI cable with adaptors for connecting a laptop to the AV system
- Infrared hearing assist device
- Lecture capture recording device (Panopto) in 301-002 only
Touch the screen to activate the Audio Visual system.
Touch Panel Operation
Operation
- Displays - show presentation on all displays.
- Exit - turn off the AV system.
- Microphone Volume - touch and slide to adjust the microphone room reinforcement.
- Program Volume - touch and slide to adjust the playback volume of the PC and laptop.
Show Presentation
- Off (No Image) - show nothing.
- Computer - show the desktop PC.
- Laptop - show a laptop connected by the HDMI cable to the AV system.
- Wireless Presenter - show the instructions for how to connect a BYOD (laptop, tablet, smart phone) wirelessly to the AV system.
Take note of the Room Name (IP address) and Code shown. Peruse this guide for instructions on how to connect. - Document Camera - show the document camera.
- Presenter Camera - show the presenter camera.
Lecture recording is available in 301-002 only
- Clip on the wireless microphone body pack and lapel
- Turn on the wireless microphone
- Touch a media source button for the presentation
- The green recording light turns on on the hour indicating the recording is under way
Touch the Exit button and Yes button to turn off the AV system.
Equipment
- 2x large flat panel displays
- AMX button controller
- Video conference codec
- Desktop PC
- Table microphones
- Video Camera
- HDMI cable with adaptors for connecting a laptop to the system
AV System
The two flat panel displays are turned on by pressing the On button on the wall mounted button controller located immediately to the right of the entry door.

AV system control is by way of a 10" Cisco touch pad, located on the equipment shelf at the front of the room.
Operation
- Camera control - touch the Icon located at the top right of the pad and change the camera setting
- Connect a conference call - touch to connect a video call manually
- Phone Book - contains a list of availab e far end rooms to which connection is made manually
- Show Meetings - list of scheduled meetings for this space
- Show Presentation - share desktop PC or laptop content.
- Volume control - adjust the video conference far end volume
- Privacy Mic mute - turn of the table microphones
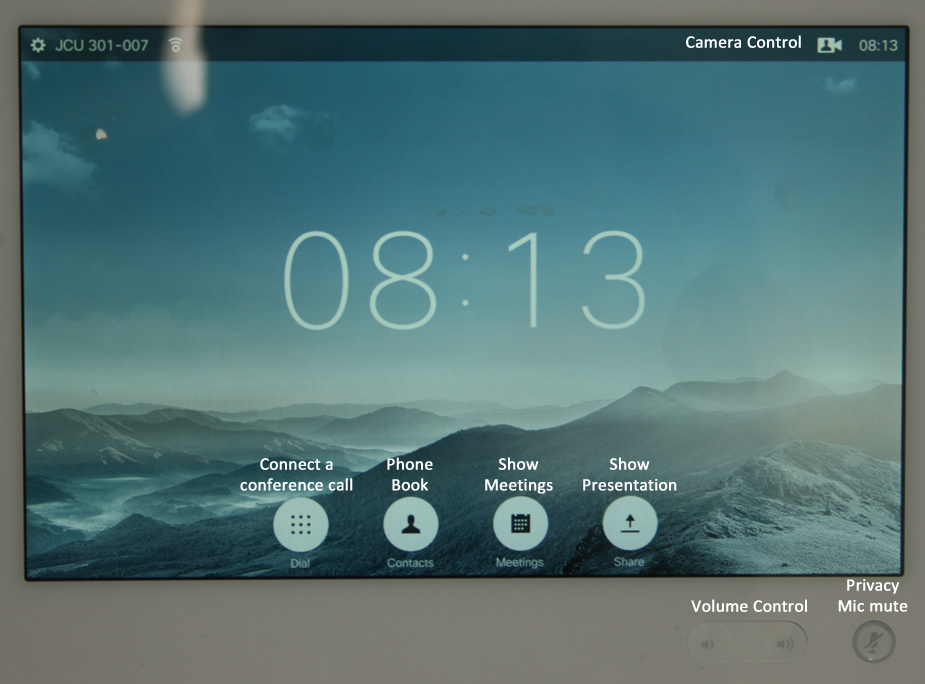
Share laptop presentation
- Connect a laptop to the AV system using the provided HDMI cable.
- Ensure the laptop is set to duplicate/mirror its display.
- Touch the Show Presentation button.
Connect a Zoom call
- Touch the Phone Book icon.
- Locate the Zoom Meeting entry in the directory.
- Call the Zoom Meeting Bridge (SIP).
- Enter the Zoom meeting ID followed by the #-key.
- Enter the Zoom passcode followed by thd #-key.
Equipment
- 1x presentation projector
- 1x video wall
- 1x large wall mounted flat panel display
- Touch panel for all AV control
- Desktop PC
- Document camera
- Wireless presenter
- Presenter camera
- Wall mounted speakers
- Lectern microphone
- Wireless microphone (wireless hand held and lapel)
- HDMI cable with adaptors for connecting a laptop to the AV system
- Infrared hearing assist device
Touch the screen to activate the Audio Visual system.
Touch Panel Operation
Operation
- Projector - show presentation on the projector screen.
- Video Wall - show presentation on the video wall and large flat panel display.
- Audio - volume control
- Exit - turn system off
Show Presentation
The projector and VideoWall/Large Monitor can show the same or different media.
- Off (No Image) - show nothing.
- Computer - show the desktop PC.
- Laptop - show a laptop connected by the HDMI cable to the AV system.
- Wireless Presenter - show the instructions for how to connect a BYOD (laptop, tablet, smart phone) wirelessly to the AV system.
Take note of the Room Name (IP address) and Code shown. Peruse this guide for instructions on how to connect. - Document Camera - show the document camera.
- Presenter Camera - show the presenter camera.
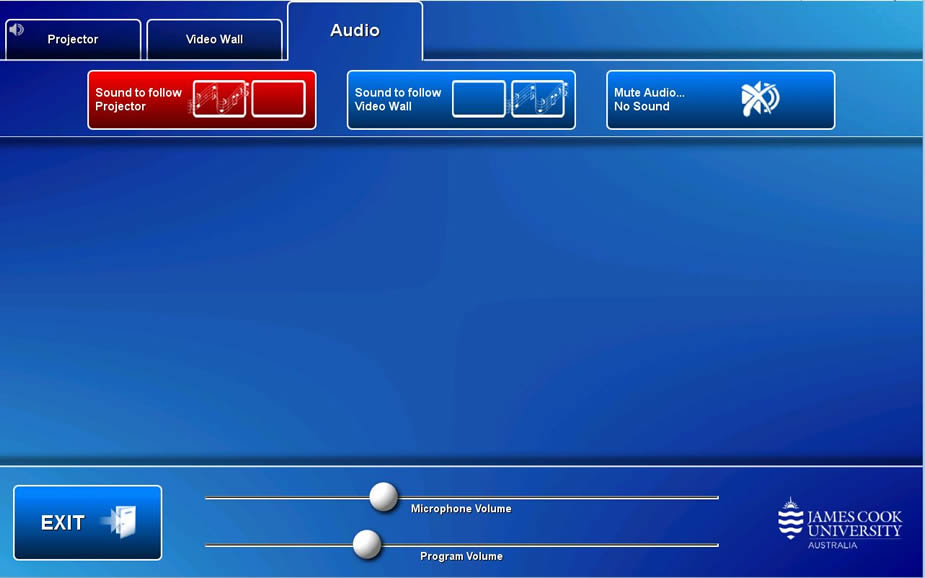
Presentation audio must be routed to the display where the presentation is shown.
- Sound to follow Projector - route the audio to the projector.
- Sound to follow Video Wall - route the audio to the video wall and large flat panel display.
- Mute Audio... No Sound - turn off the presentation sound.
Volume control
- Microphone Volume - touch and slide to adjust the microphone room reinforcement.
- Program Volume - touch and slide to adjust the playback volume of the desktop PC and laptop.
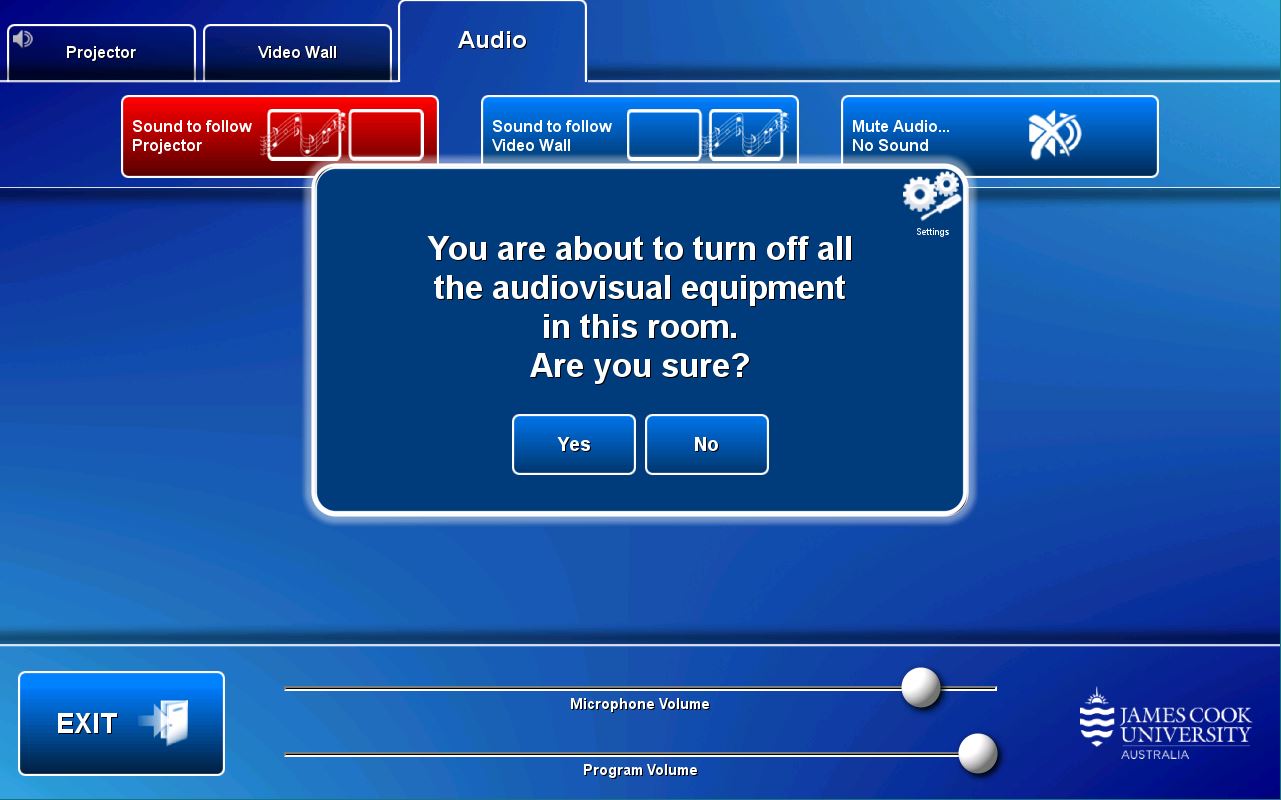
Touch the EXIT button and Yes button to turn off the AV system.
Equipment
- 3x large flat panel displays
- Touch panel for all AV control
- Desktop PC
- Document camera
- Wireless presenter
- Video camera
- Ceiling mounted speakers
- Wireless microphone (wireless hand held and lapel)
- HDMI cable with adaptors for connecting a laptop to the AV system
Touch the screen to activate the Audio Visual system.
Touch Panel Operation
Operations
- Exit - turn off the AV system
- Audio - touch and slide to adjust the playback volume of the PC and laptop.
Show Presentation
- Off (No Image) - show nothing.
- Computer - show the desktop PC and turn on/adjust camera for Zoom meetings
- Laptop - show a laptop connected by the HDMI cable to the AV system.
- Document Camera - show the document camera.
- Kramer VIA - show the instructions for how to connect a BYOD (laptop, tablet, smart phone) wirelessly to the AV system.
Take note of the Room Name (IP address) and Code shown. Peruse this guide for instructions on how to connect. - Panopto - turn on and adjust the video camera.
- Clip on the wireless microphone body pack and lapel
- Turn on the wireless microphone
- Touch a media source button for the presentation
- The recording light turns green on the hour, indicating the recording is under way
Exit - touch the exit button and Yes button to turn the system off.
Display system
- 2x ceiling mounted projectors (left and right)
- 8x work group table monitors
Touch the screen to activate the Audio Visual system.
Equipment
- 2x presentation projectors
- 8x flat panel displays
- Touch panel for all AV control
- Desktop PC
- Document camera
- Wireless presenter (Kramer VIA)
- Video camera
- Ceiling mounted speakers
- Ceiling mounted microphones
- Wireless microphone (wireless hand held and lapel) - recommended for use with Panopto lecture capture recordings
- HDMI cable with adaptors for connecting a laptop to the AV system
- Infrared hearing assist device
- Lecture capture recording device (Panopto)
Touch the screen to activate the Audio Visual system.
Touch Panel Operation
Operation
- Left Screen - show presentation on the left projector screen.
- Right Screen - show presentation on the right projector screen.
- Preview - view a source on the touch panel.
- Work Group Monitors - show presentation on the work group monitors.
- Audio - adjust volume.
- Exit - turn system off.
Show Presentation
The same or different presentation can be shown on the two projector screens and workgroup monitors
- Off (No Image) - show nothing.
- Computer - show the desktop PC.
- Laptop - show a laptop connected by the HDMI cable at the lectern
- Kramer VIA - show the instructions for how to connect a BYOD (wireless laptop, tablet, smart phone) to the AV system.
Take note of the Room Name (IP address) and Code shown. Peruse this guide for instructions on how to connect. - Student Laptops - show a student laptop connected at a workgroup table
A media source is previewed on the preview monitor after touching a media button.
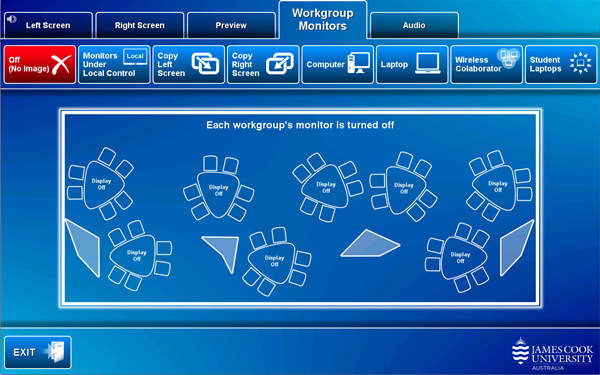
Workgroup Monitors
The presenter controls what content is pushed to the all the work group monitors by touching the Workgroup Monitors tab.
- Off (No Image) - show nothing.
- Monitors Under Local Control - allow local monitor input at work group table.
- Copy Left Screen - show what is shown on the left projector screen.
- Copy Right Screen - show what is shown on the right projector screen.
- Computer - show the desktop PC.
- Laptop - show the presenter's laptop.
- Wireless Collaborator - show the instruction for how to connect a BYOD (laptop, tablet, smart phone) to the lectern collaborator.
- Student Laptops - show a student's laptop: touch the Table Location of the work group table where the laptop is connected.
- Clip on the wireless microphone body pack and lapel
- Turn on the wireless microphone
- Touch a media source button for the presentation
- The recording light turns green on the hour, indicating the recording is under way
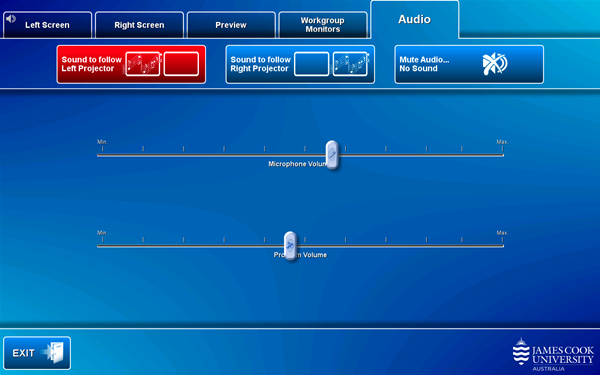
Presentation audio must be routed to the projector screen where the presentation is shown.
- Sound to follow Left Projector - route the audio to the left projector.
- Sound to follow Right Projector - route the audio to the right projector.
- Mute Audio... No Sound - turn off the presentation sound.
Volume control
- Microphone Volume -touch and slide to adjust the microphone room reinforcement.
- Program Volume - touch and slide adjust the playback volume of the desktop PC and laptop
Touch the EXIT button and Yes button to turn off the system.
System is Off
The system is designed to run in two different states:
- Presentation Mode – local court session.
- Videoconference Mode – court session linked by video conference to remote courts or room including those run by Zoom.

Equipment
- 2x large flat panel displays
- Touch panel for all AV control
- Video conference codec
- Desktop PC
- Audience camera
- Presenter camera
- Ceiling mounted speakers
- 5x fixed gooseneck microphones (bench, defence, prosecutor, dock and witness)
- HDMI cable with adaptors for connecting a laptop to the AV system
- Infrared hearing assist device
- Lecture capture recording device (Panopto)
Touch the button corresponding to the planned activity to turn the system on.
Presentation Mode
Operation
- Left Monitor - show presentation on the left flat panel display.
- Right Monitor - show presentation on the right flat panel display.
- Bench Monitor - push presentation to the Bench's monitor.
- Clerk's Monitor - push presentation to the Clerk's monitor.
- Shut Down - turn off the AV system
- Volume - touch and slide the Volume button located along the bottom of the panel to adjust the playback volume of the PC and laptop
- Audio - route the audio to the monitor where the presentation is shown
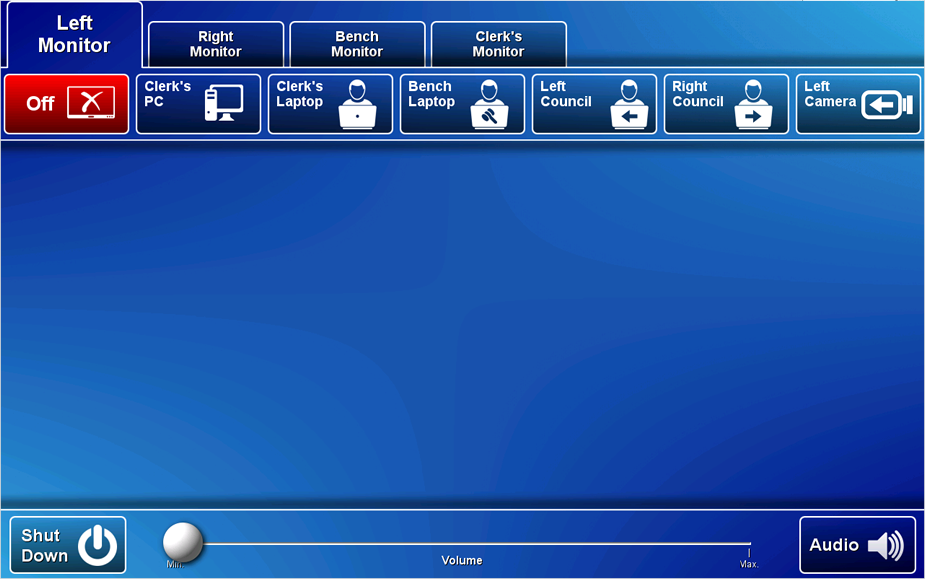
Show Presentation
The clerk pushes content from the touch panel to the display systems (left monitor, right monitor, bench monitor and clerk monitor).
- Off (No Image) - show nothing.
- Clerk's PC - show the desktop PC.
- Clerk's Laptop - show a laptop connected by the HDMI cable to the AV system at the clerk location.
- Bench Laptop - show a laptop connected by the HDMI cable to the AV system at the bench location.
- Left Council - show a laptop connected by the HDMI cable to the AV system at the left council location.
- Right Council - show a laptop connected by the HDMI cable to the AV system at the right council location.
- Left Camera - show the presenter camera.
- Microphones are located at bench, defence, prosecutor, dock and witness locations
- The clerk touches one of the presentation source buttons to record its content
- The recording light turns green on the hour, indicating the recording is under way
Touch the Shut Down button and Yes button to turn off the system.
Videoconference Mode
Operation
- Left Camera - select and adjust the left camera using the Local Camera Control pan/tilt/zoom buttons.
- Right Camera - select and adjust the left camera using the Local Camera Control pan/tilt/zoom buttons.
- Far End Camera Control - adjust the far end camera (not available in all rooms)
- Dial - connect a video call by IP and SIP manually.
- Contacts - connect a video call to an endpoint from the address book.
- Hang Up - disconnect a video call.
- Mute - turn off microphones.
- Selfview - show the camera angle on the flat panel displays.
- Layout - change the camera and presentation composition.
- Volume - touch and slide the Volume button (horizontal slider) located along the bottom of the panel to adjust the playback volume of the PC and laptop.
- VC Volume - Touch and slide the VC Volume button (vertical slider) located along the left hand side of the panel to adjust the volume of the far end.
- Shut Down - turn off the AV system.
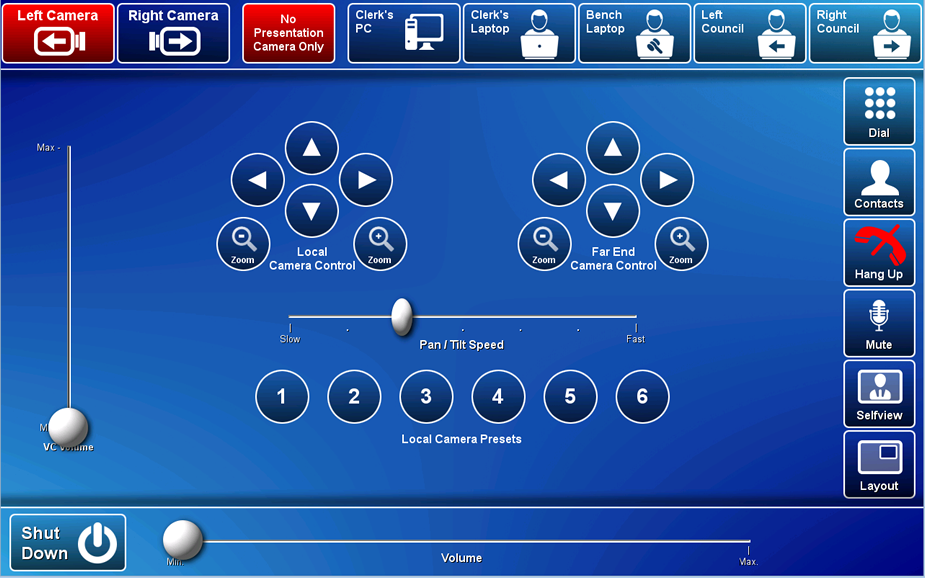
Show Presentation
- No Presentation Camera Only - show no presentation.
- Clerk's PC - show the desktop PC.
- Clerk's Laptop - show a laptop connected by the HDMI cable to the AV system at the clerk location.
- Bench Laptop - show a laptop connected by the HDMI cable to the AV system at the bench location.
- Left Council - show a laptop connected by the HDMI cable to the AV system at the left council location.
- Right Council - show a laptop connected by the HDMI cable to the AV system at the right council location.
- Microphones are located at bench, defence, prosecutor, dock and witness locations
- The clerk touches one of the presentation source buttons to record its content
- The recording light turns green on the hour, indicating the recording is under way
Manually connect video call
- Touch the Dial button and enter a SIP or IP address
- Touch the Contacts button, locate an endpoint in the phone book and touch the Call button.
Connect to Zoom
- Touch the Contacts button
- Locate and touch the Zoom meeting entry
- Touch the Zoom Meeting Bridge (SIP) entry
- Touch the Call button
- Touch the Keypad button (appears once the call has connected to the Zoom Bridge)
- Enter the Zoom meeting ID followed by the #-key
- Enter the passcode followed by the #-key
Touch the Shut Down button and Yes button to turn off the system.
System is Off
The system is designed to run in two different states:
- Presentation Mode – local court session.
- Videoconference Mode – court session linked by video conference to remote courts or room including those run by Zoom.
Equipment
- 2x large flat panel displays
- Touch panel for all AV control
- Video conference codec
- Video camera
- Wall and ceiling mounted speakers
- Ceiling and table mounted microphones
- 4x connections points around the table with 240V power and HDMI cable with adaptors for connecting laptops to the AV system
- Infrared hearing assist device
- Room lighting control
Presentation Mode
Operation
- Left Screen - show presentation on the left flat panel display.
- Right Screen - show presentation on the right flat panel display.
- Volume - touch and slide the Volume button to adjust the playback volume of a laptop.
Presentation audio must be routed to the monitor where the presentation is shown. - Shut Down - turn off the AV system.
- Lights - room lighting is adjustable by the touch panel or a wall mounted control.
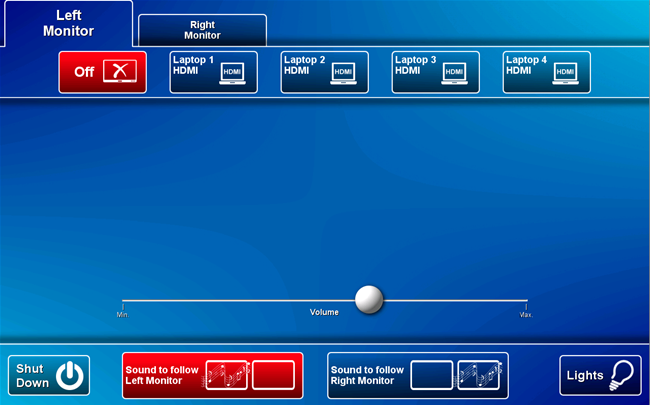
Presentation
- Off (No Image) - show nothing.
- Laptop 1 HDMI - show a laptop connected by the HDMI cable to the AV system at position 1.
- Laptop 2 HDMI - show a laptop connected by the HDMI cable to the AV system at position 2.
- Laptop 3 HDMI - show a laptop connected by the HDMI cable to the AV system at position 3.
- Laptop 4 HDMI - show a laptop connected by the HDMI cable to the AV system at position 4.
Touch the Shut Down button and Yes button to turn off the system
Videoconference Mode
VC Operation
- Local Camera Control - touch the on screen pan/tilt/zoom control buttons to adjust the video camera.
- Far End Camera Control - adjust the far end room camera (not supported in all rooms)
- Dial - connect a video call manually.
- Contacts - connect a video call from the address book.
- Hang Up - disconnect a video call.
- Mute - turn off microphones.
- Selfview - show the camera angle on the flat panel displays.
- Layout - change the camera and presentation picture composition.
- Main Volume - touch and slide the Main Volume button to adjust the playback volume of the PC and laptop.
- VC Volume - touch and slide the VC Volume button to adjust the adjust the volume of the far end.
- Lights - room lighting is adjustable by the touch panel and a wall mounted control.
- Shut Down - turn off the AV system.
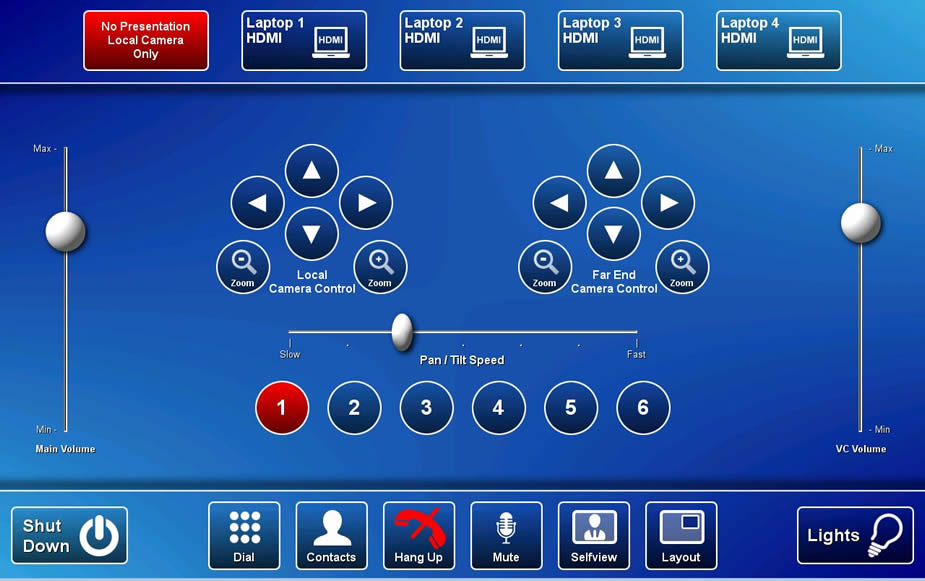
Presentation
- No Presentation Camera Only - show no presentation.
- Laptop 1 HDMI - show a laptop connected by the HDMI cable to the AV system at position 1.
- Laptop 2 HDMI - show a laptop connected by the HDMI cable to the AV system at position 2.
- Laptop 3 HDMI - show a laptop connected by the HDMI cable to the AV system at position 3.
- Laptop 4 HDMI - show a laptop connected by the HDMI cable to the AV system at position 4.
- Touch the Dial button and enter a SIP or IP address
- Touch the Contacts button, locate an endpoint in the phone book and touch the Call button.
Connect to Zoom
- Touch the Contacts button
- Locate and touch the Zoom meeting entry
- Touch the Zoom Meeting Bridge (SIP) entry
- Touch the Call button
- Touch the Keypad button (appears once the call has connected to the Zoom Bridge)
- Enter the Zoom meeting ID followed by the #-key
- Enter the passcode followed by the #-key
Touch the Shut Down button and Yes button to turn off the system.
Equipment
- 9x large flat panel displays
- Touch panel for all AV control
- Desktop PC
- Document camera
- Wireless presenter
- Video camera
- Presenter camera
- Wall mounted speakers
- Wireless microphone (wireless hand held and lapel) - must be used for Panopto lecture capture recordings
- HDMI cable with adaptors for connecting a laptop to the AV system
- Lecture capture recording device (Panopto)
Touch the screen to turn on the AV system.
System is On
Touch Panel Operation
Operation
- Displays - show presentation on all flat panel displays
- Microphone Volume - touch and slide to adjust the microphone room reinforcement
- Program Volume - touch and slide to adjust the playback volume of the PC and a laptop
- Exit - turn off the system
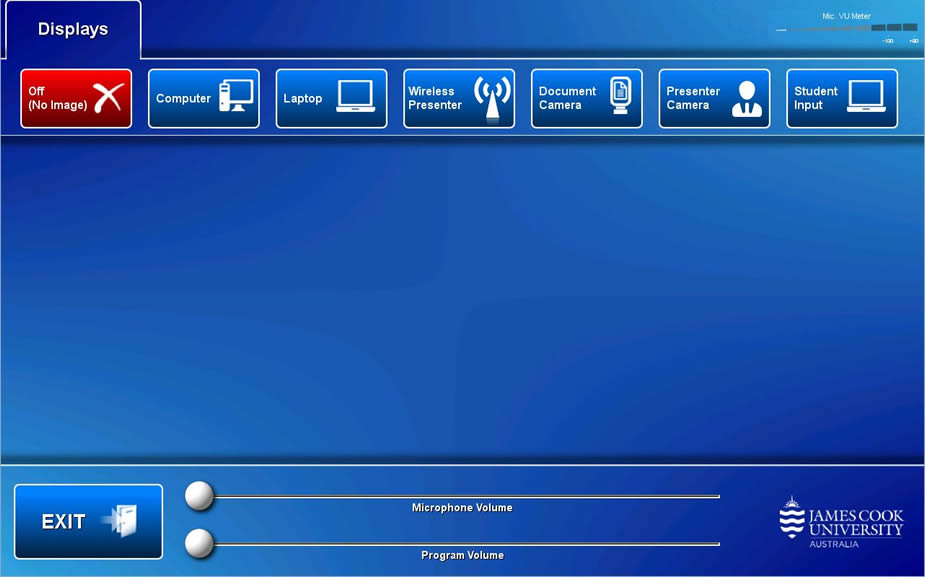
Show Presentation
- Off (No Image) - show nothing.
- Computer - show the desktop PC.
- Laptop - show a laptop connected by the HDMI cable to the AV system.
- Wireless Presenter - show the instructions for how to connect a BYOD (wireless laptop, tablet, smart phone) to the AV system.
Take note of the Room Name (IP address) and Code shown. Peruse this guide for instructions on how to connect. - Document Camera - show the document camera.
- Presenter Camera - show the presenter camera.
- Student Input - enable students at the work group table push laptop content onto the associated flat panel display.
- Clip on the wireless microphone body pack and lapel
- Turn on the wireless microphone
- Touch a media source button for the presentation
- The recording light turns green on the hour, indicating the recording is under way
Touch the Exit button and Yes button to turn off the AV system.
Equipment
- 9x large flat panel displays
- Touch panel for all AV control
- Desktop PC
- Document camera
- Wireless presenter
- Video camera
- Presenter camera
- Wall mounted speakers
- Wireless microphone (wireless hand held and lapel) - must be used for Panopto lecture capture recordings
- HDMI cable with adaptors for connecting a laptop to the AV system
- Lecture capture recording device (Panopto)
Touch the screen to turn on the AV system.
System is On
Touch Panel Operation
Operation
- Displays - show presentation on all flat panel displays
- Microphone Volume - touch and slide to adjust the microphone room reinforcement
- Program Volume - touch and slide to adjust the playback volume of the PC and a laptop
- Exit - turn off the system
Show Presentation
- Off (No Image) - show nothing.
- Computer - show the desktop PC.
- Laptop - show a laptop connected by the HDMI cable to the AV system.
- Wireless Presenter - show the instructions for how to connect a BYOD (wireless laptop, tablet, smart phone) to the AV system.
Take note of the Room Name (IP address) and Code shown. Peruse this guide for instructions on how to connect. - Document Camera - show the document camera.
- Presenter Camera - show the presenter camera.
- Student Input - enable students at the work group table push laptop content onto the associated flat panel display.
- Clip on the wireless microphone body pack and lapel
- Turn on the wireless microphone
- Touch a media source button for the presentation
- The recording light turns green on the hour, indicating the recording is under way
Touch the Exit button and Yes button to turn off the AV system.
Equipment
- 1x large flat panel display
- Touch panel for all AV control
- Desktop PC
- Document camera
- Wireless presenter
- Wireless microphone (wireless hand held and lapel)
- HDMI cable with adaptors for connecting a laptop to the AV system
Touch the screen to activate the Audio Visual system.
Touch Panel Operation
Operation
- Main Screen - show presentation on the flat panel display
- Volume - touch and slide to adjust the playback volume of the PC and laptop
- Exit - turn system off
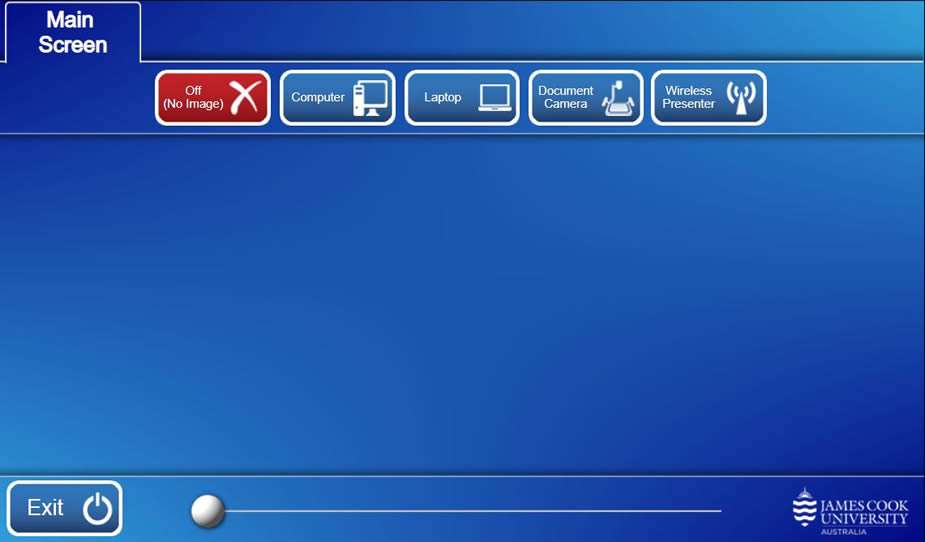
Show presentation
- Off (No Image) - show nothing.
- Computer - show the desktop PC.
- Laptop - show a laptop connected by the HDMI cable to the AV system.
- Document Camera - show the document camera.
- Kramer VIA - show the instructions for how to connect a BYOD (wireless laptop, tablet, smart phone) to the AV system.
Take note of the Room Name (IP address) and Code shown. Peruse this guide for instructions on how to connect.
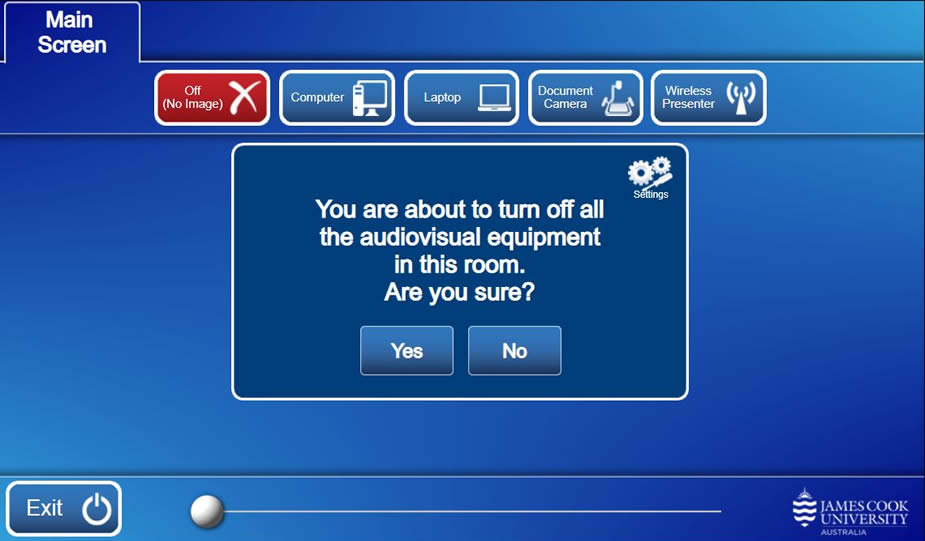
Touch the Exit button and Yes button to turn off the system.
Prosthodontics
Equipment
- 3x large flat panel displays
- Touch panel for all AV control
- Desktop PC
- 2x mini PC
- Document camera
- Presenter camera
- Arm camera
- 6x Axis IP cameras
- Ceiling mounted speakers
- Microphone (ceiling mounted)
- Microphone (wireless hand held and lapel)
- HDMI cable with adaptors for connecting a laptop to the AV system
- Infrared hearing assist device
- Lecture capture recording device (Panopto)
Touch the screen to activate the Audio Visual system.
Touch Panel Operation
Operation
The same or different media is shown on the three room displays
- Display 1 - show presentation on flat panel display 1
- Display 2 - show presentation on flat panel display 2
- Display 3 - show presentation on flat panel display 3
- Preview - view device on preview monitor
- Panopto(Mediasite) - select lecture capture recorder streams
- Microphone Volume - touch and slide to adjust room voice reinforcement
- Program Volume - touch and slide to adjust the playback volume of the PC and laptop
- Mic VU meter - bar movement confirms microphone is active
- Exit - turn system off
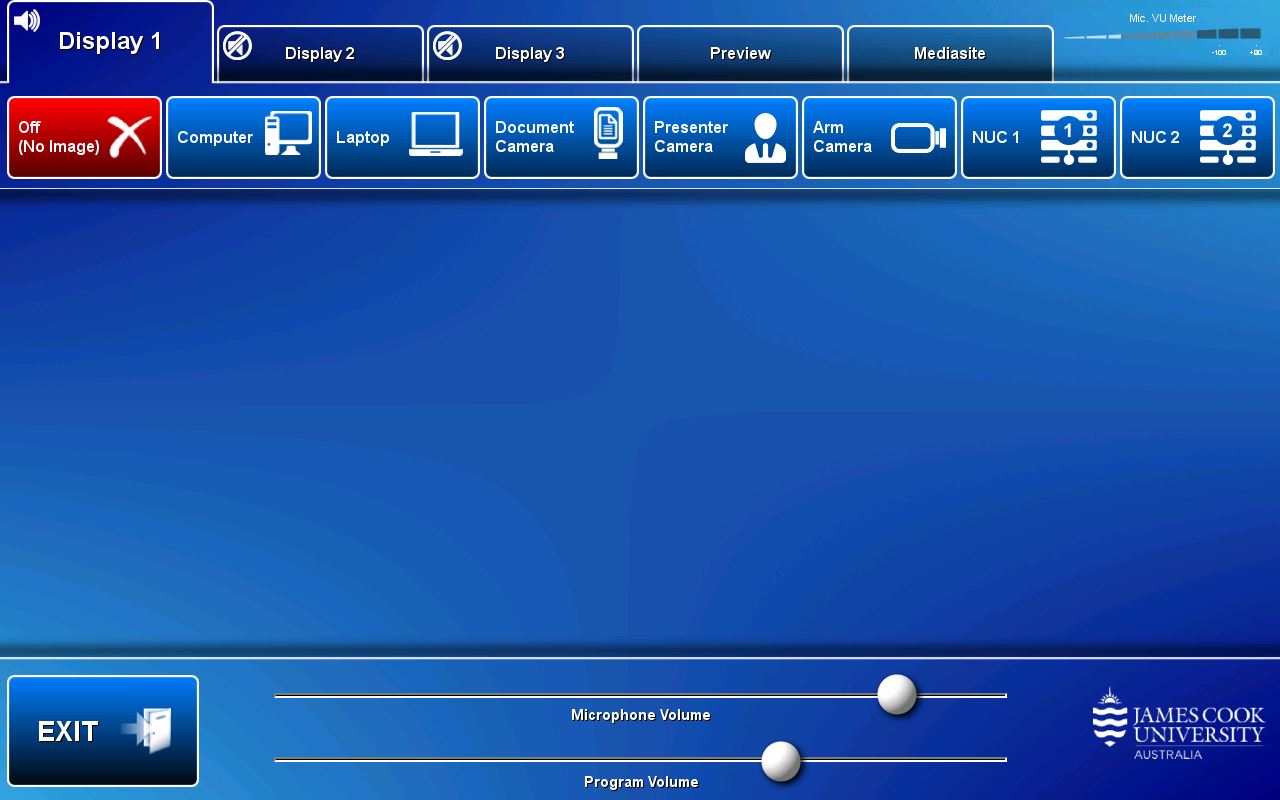
Show Presentation
- Off (No Image) - show nothing.
- Computer - show the desktop PC.
- Laptop - show a laptop connected by the HDMI cable to the AV system.
- Document Camera - show the document camera.
- Presenter Camera - show the instructions for how to connect a BYOD (wireless laptop, tablet, smart phone) to the AV system.
Take note of the Room Name (IP address) and Code shown. Peruse this guide for instructions on how to connect. - Arm Camera - adjust and show the close up camera mounted on the lectern.
- Presenter Camera - adjust and show the presenter camera (Panopto recordings)
- NUC 1 - Select NUC 1 mini PC as a presentation source.
- NUC 2 - Select NUC 2 mini PC as a presentation source.
Operation
Combine the streams required for a lecture recording by touching the source for Stream 1 and Stream 2.
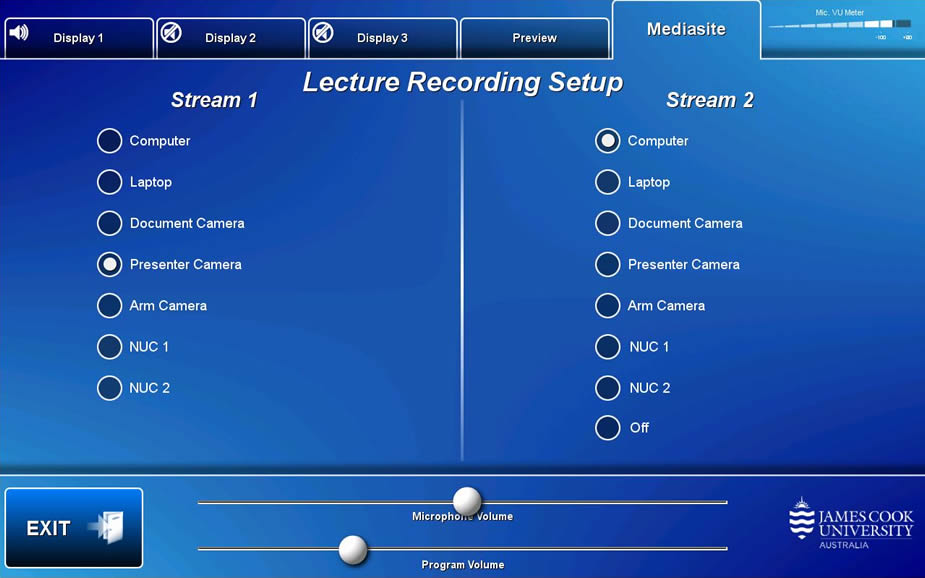
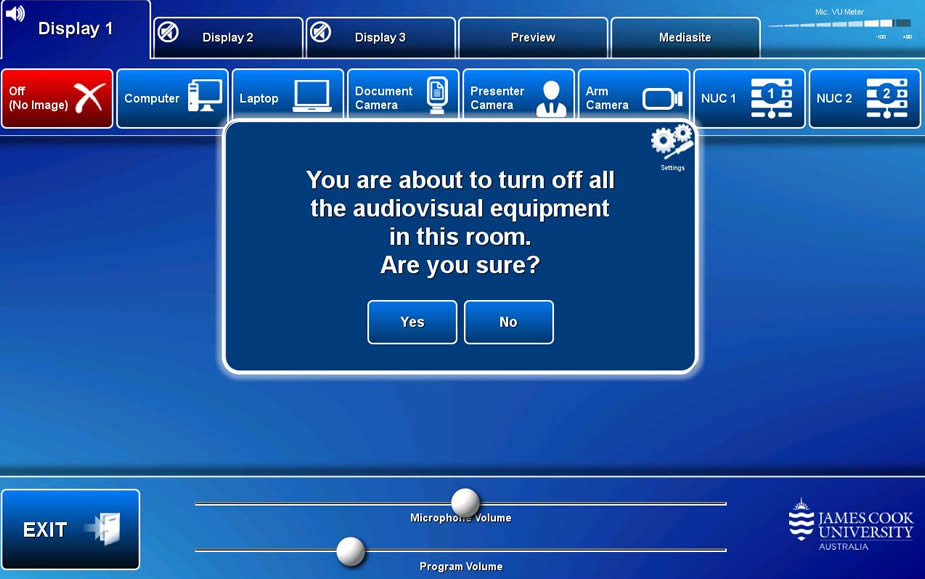
Touch the Exit button and Yes button to turn off the AV system.
Simulation Lab
Equipment
- 10x large flat panel displays
- Touch panel for all AV control
- Desktop PC
- Document camera
- Presenter camera
- Bench camera
- Arm camera
- Ceiling mounted speakers
- Microphone (ceiling mounted)
- Microphone (2x wireless lapel) - recommended for lecture capture recordings.
- HDMI cable with adaptors for connecting a laptop to the AV system
- Infrared hearing assist device
- Lecture capture recording device (Panopto)
Touch the screen to activate the Audio Visual system.
Touch Panel Operation
Operation
- Main Displays - show presentation on all flat panel displays.
- Student Displays - Show media on the PC station displays.
- Panopto(Mediasite) Recorder - select lecture capture recorder streams.
- Microphone Volume - touch and slide to adjust room voice reinforcement
- Program Volume - touch and slide to adjust the playback volume of the PC and laptop.
- Mic VU meter - bar movement confirms microphone is active.
- Exit - turn system off.

Show Presentation
- Off (No Image) - show nothing.
- Computer - show the lectern desktop PC.
- Laptop - show a laptop connected by the HDMI cable to the AV system.
- Document Camera - show the document camera.
- Presenter Camera - show the presenter camera.
- Bench Camera - adjust and show the bench camera located above the lectern.
- Arm Camera - adjust and show the close up camera mounted on the lectern.
Operation
Presentations can be shown not only on the large TV monitors around the lab but also on the student displays at each pod.
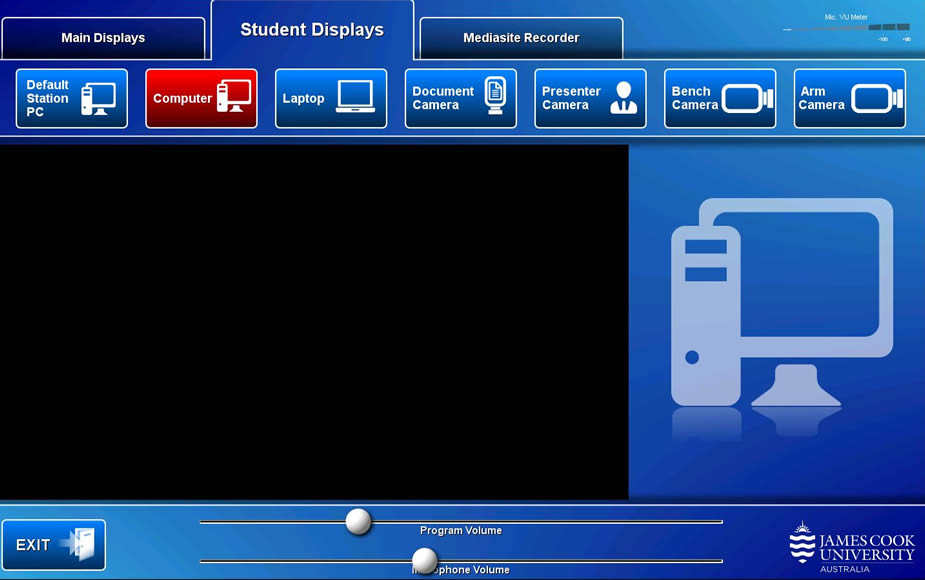
Show Presentation
- Default station PC - show the local station PC content
- Computer - show lectern desktop PC
- Laptop - show laptop connected to the system at the lectern
- Document camera - show document camera
- Presenter camera - show presenter camera
- Bench camera - show bench camera
- Arm camera - show arm camera
Operation
Combine the streams required for a lecture recording by touching the source for Stream 1 and Stream 2.
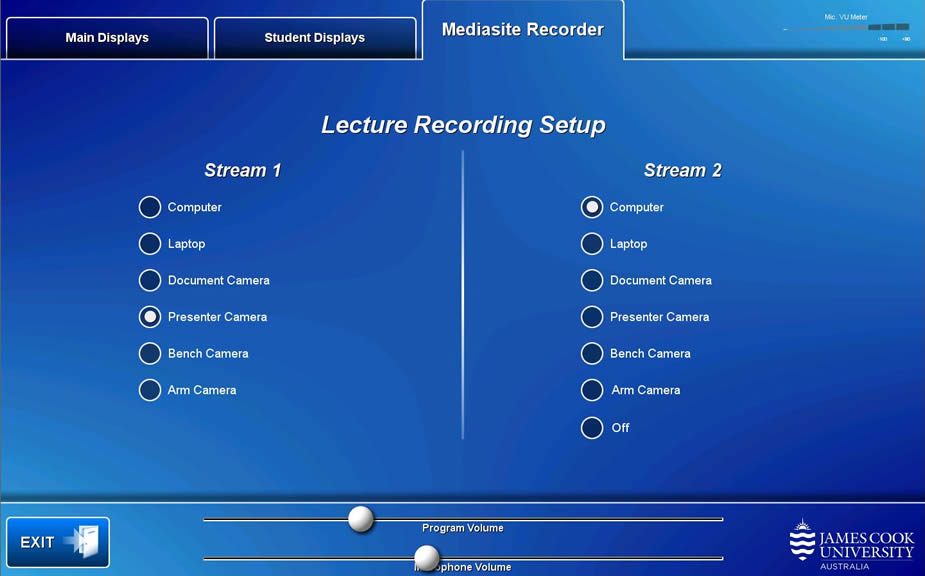
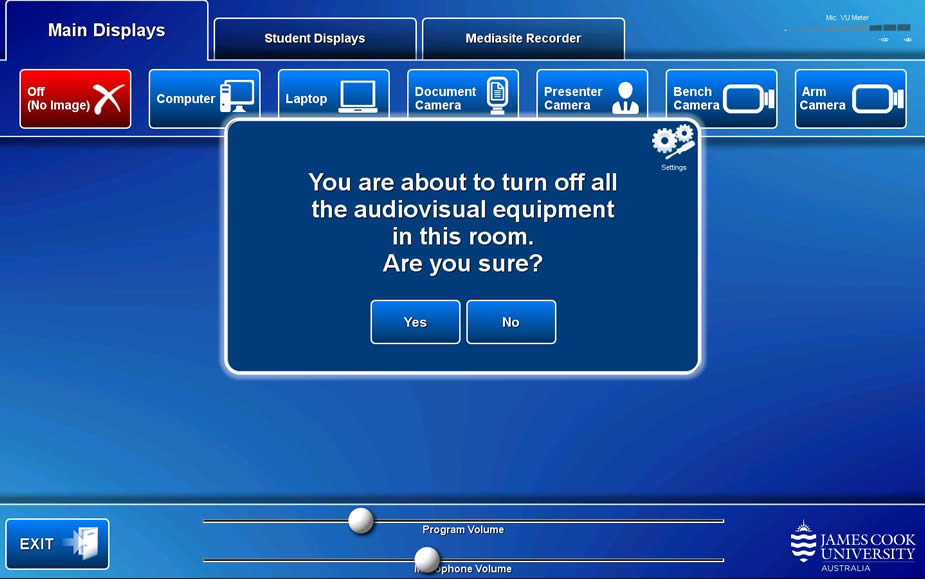
Touch the Exit button and Yes button to turn off the system.
Touch the Exit button and Yes button to turn off the AV system
Dental Surgery - Master chair
Equipment
- 1x large flat panel display
- Touch panel for all AV control
- Video conference codec
- Desktop PC
- Video camera (arm mounted, mechanically adjustable)
- Ceiling mounted speakers
- Microphone (ceiling mounted)
- Infrared hearing assist device
Touch the screen to activate the Audio Visual system.
Touch Panel Operation
Operation
The system when turned on defaults to showing the desktop PC.
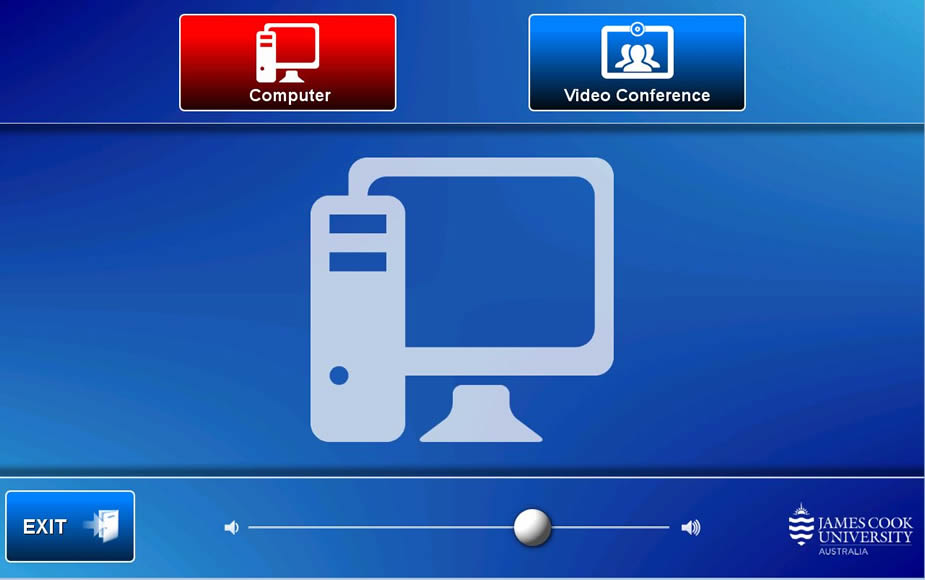
Show presentation
The desktop PC is shown by default
Touch and slide the Volume button to adjust the playback volume of the desktop PC
VC Operation
The master chair is fitted with a video camera mounted on a movable arm for the purpose of showing close ups of the subject.
- Show Camera - select, adjust and show the arm camera.
- Dial - connect a video call manually.
- Contacts - connect a video call from entries in a phone book.
- Hang up - disconnect a video call.
- Selfview - touch to view the current camera angle on the touch panel.
- VC Volume - touch the Speaker buttons (up/down) to adjust the far end volume.
- Volume - touch and slide the Volume button to adjust the playback volume of the PC
- Layout - change the video and presentation screen composition.
- Mute - turn off microphone.
- Exit - turn off the system
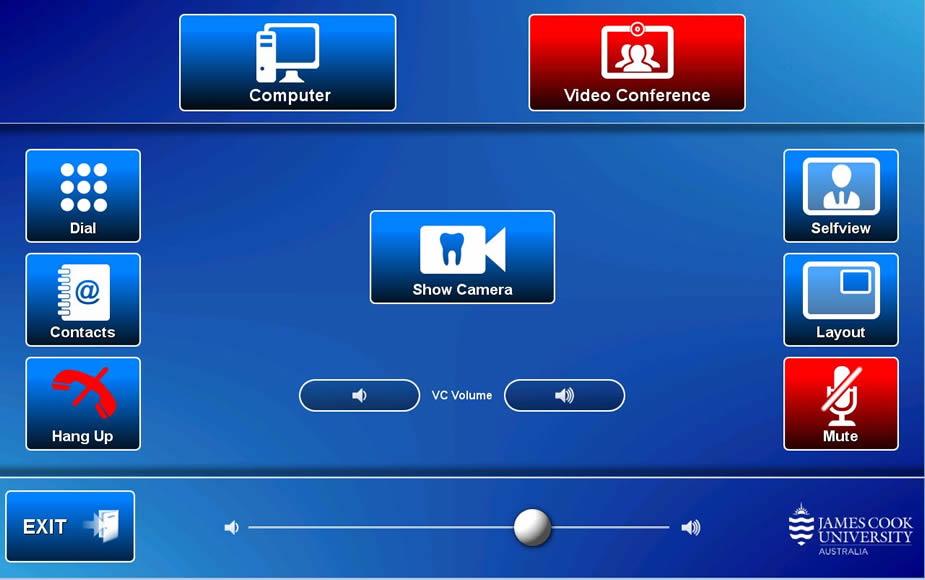
Manually connect video call
- Dial - connect a video call manually by dialling an IP address or SIP URI
- Contacts - locate an endpoint in the phone book and touch the Call button.
Connect to Zoom
- Touch the Contacts button
- Locate and touch the Zoom meeting entry
- Touch the Zoom Meeting Bridge (SIP) entry
- Touch the Call button
- Touch the Keypad button (appears once the call has connected to the Zoom Bridge)
- Enter the Zoom meeting ID followed by the #-key
- Enter the passcode followed by the #-key
Touch the Exit button and Yes button to turn off the AV system.
Anatomy lab
Equipment
- 1x large main flat panel display
- 4x large student flat panel display
- Touch panel for all AV control
- Desktop PC
- Document camera
- Presenter camera
- Arm camera
- Ceiling mounted speakers
- Lectern microphone
- Wireless microphone (wireless hand held and lapel) - recommended for use with Panopto lecture capture recordings
- HDMI cable with adaptors for connecting a laptop to the AV system
- Infrared hearing assist device
- Lecture capture recording device (Panopto)
Touch the screen to activate the Audio Visual system.
Touch Panel Operation
Operation
- Main Display - show presentation on all flat panel displays
- Student Display 1 - Show media on student display 1
- Student Display 2 - Show media on student display 2
- Student Display 3 - Show media on student display 3
- Student Display 4 - Show media on student display 4
- Panopto(Mediasite) Recorder - select lecture capture recorder streams
- Microphone Volume - touch and slide to adjust room voice reinforcement
- Program Volume - touch and slide to adjust the playback volume of the PC and laptop
- Mic VU meter - bar movement confirms microphone is active
- Exit - turn system off
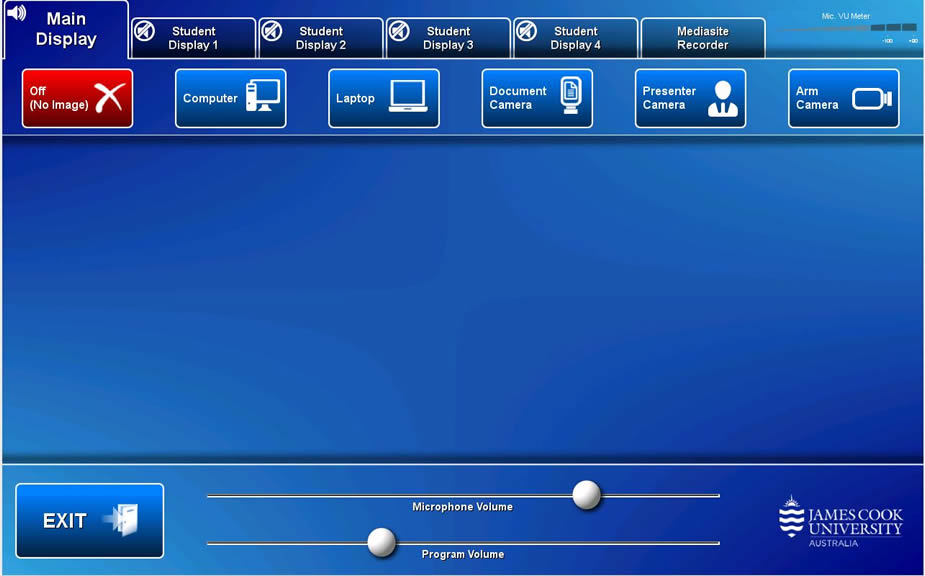
Show Presentation
- Off (No Image) - show nothing.
- Computer - show the desktop PC.
- Laptop - show a laptop connected by the HDMI cable to the AV system.
- Document Camera - show the document camera.
- Presenter Camera - show the presenter camera.
- Arm Camera - adjust and show the close up camera mounted on the lectern.
Operation
Combine the streams required for a lecture recording by touching the source for Stream 1 and Stream 2.
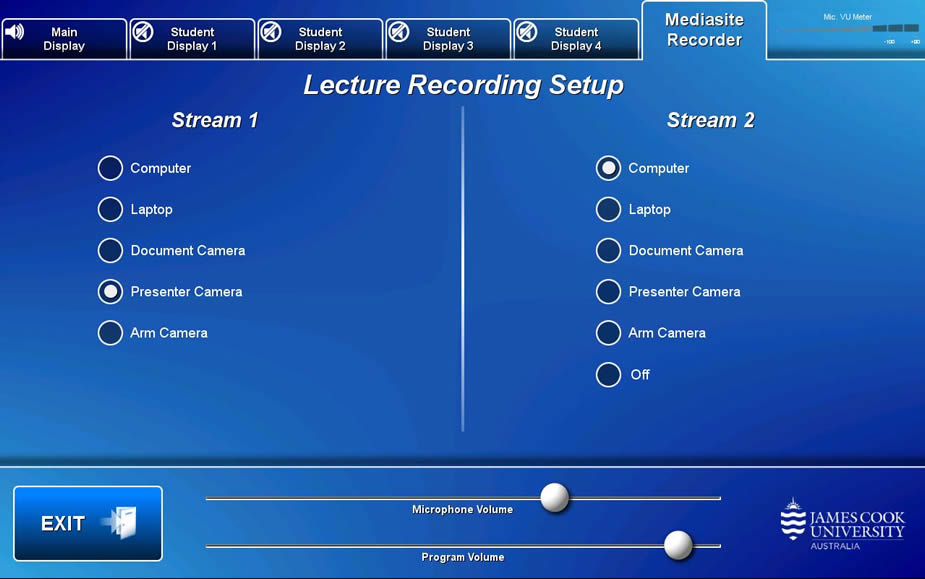
Operation
Combine the streams required for a particular lecture capture recording by touching the source for Stream 1 and Stream 2.
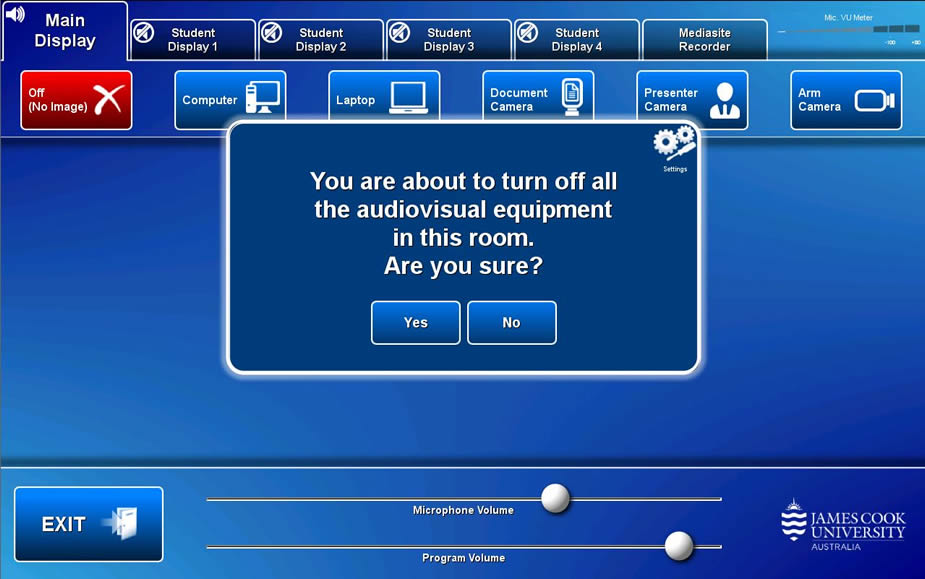
Touch the Exit button and the Yes button to turn off the AV system.
Microbiology/Physiology Lab
Equipment
- 10x large flat panel displays
- Touch panel for all AV control
- Desktop PC
- Document camera
- Presenter camera
- Ceiling mounted speakers
- Microphone (ceiling mounted)
- Microphone (2x wireless lapel) - recommended for use with lecture capture recorder
- HDMI cable with adaptors for connecting a laptop to the AV system
- Infrared hearing assist device
- Lecture capture recording device (Panopto)
Touch the screen to activate the Audio Visual system.
Touch Panel Operation
Operation
- Main Displays - show presentation on all flat panel displays
- Panopto(Mediasite) Recorder - select lecture capture recorder sources
- Microphone Volume - touch and slide to adjust the room voice reinforcement.
- Program Volume - touch and slide to adjust the playback volume of the PC and laptop
- Mic VU meter - bar movement confirms microphone is active
- Exit - turn system off
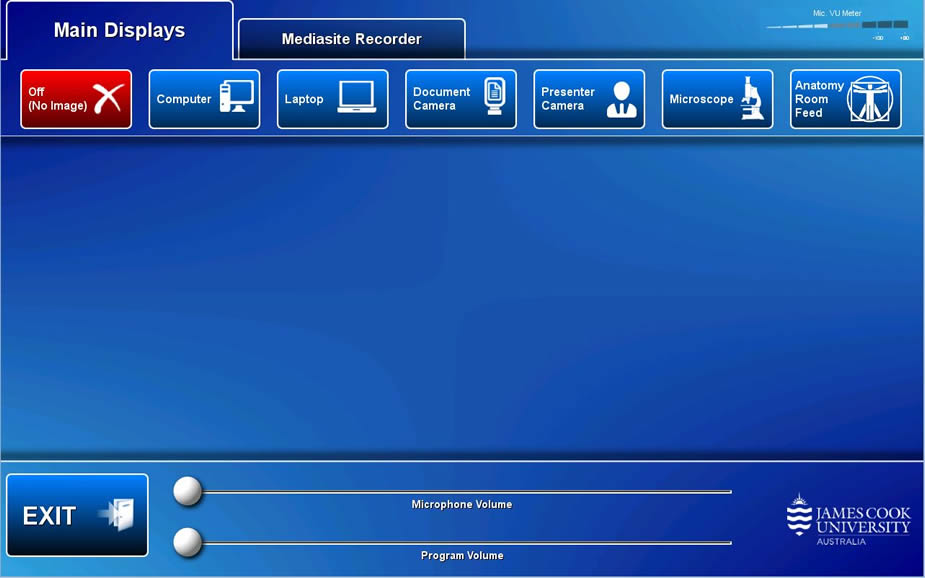
Show Presentation
- Off (No Image) - show nothing.
- Computer - show the desktop PC.
- Laptop - show a laptop connected by the HDMI cable to the AV system.
- Document Camera - show the document camera.
- Presenter Camera - adjust and show the presenter camera.
- Microscope - show the microscope.
- Anatomy Room Feed - duplicate content to the anatomy lab.
Operation
Combine the streams required for a lecture recording by touching the source for Stream 1 and Stream 2.
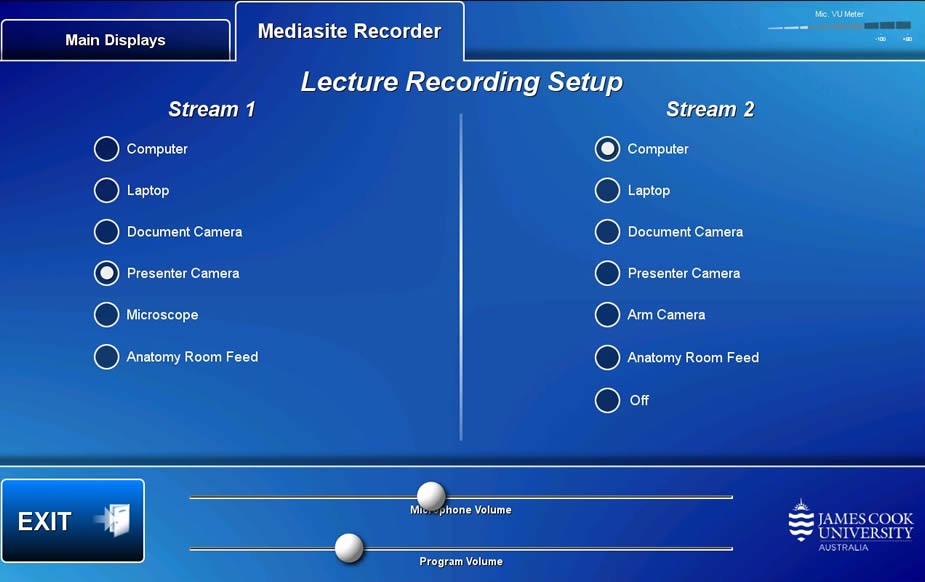
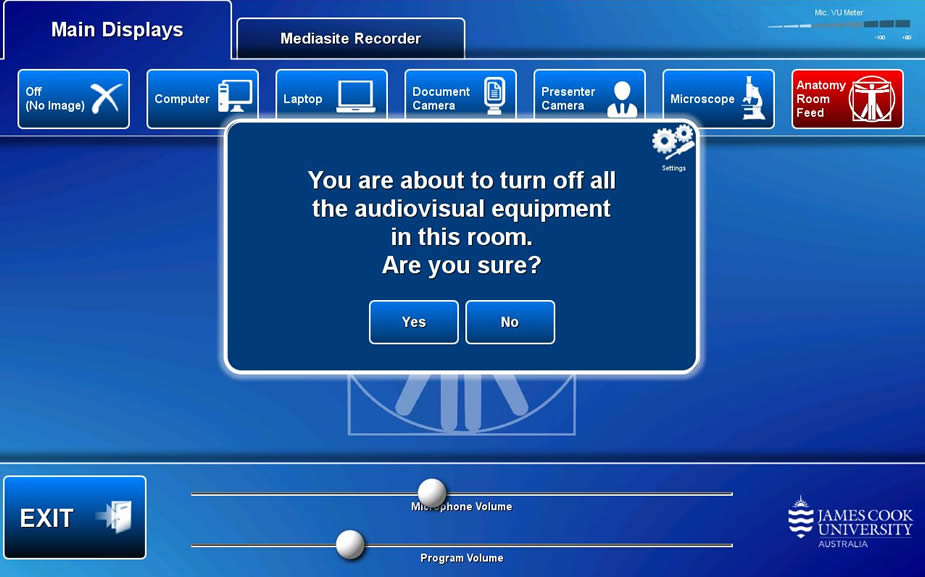
Touch the Exit button and Yes button to turn off the AV system.
Meeting Room (Green)
Equipment
- 1x large main flat panel display
- Touch panel for all AV control
- Desktop PC
- IPTV
- Video camera
- HDMI cable with adaptors for connecting a laptop to the AV system
- Infrared hearing assist device
Touch the screen to activate the Audio Visual system.
Touch Panel Operation
Operation
- Lights & Blinds - adjust the room lighting and blinds.
- Program Volume - touch and slide the Volume button to adjust the playback volume of the PC and laptop.
- Exit - turn system off.
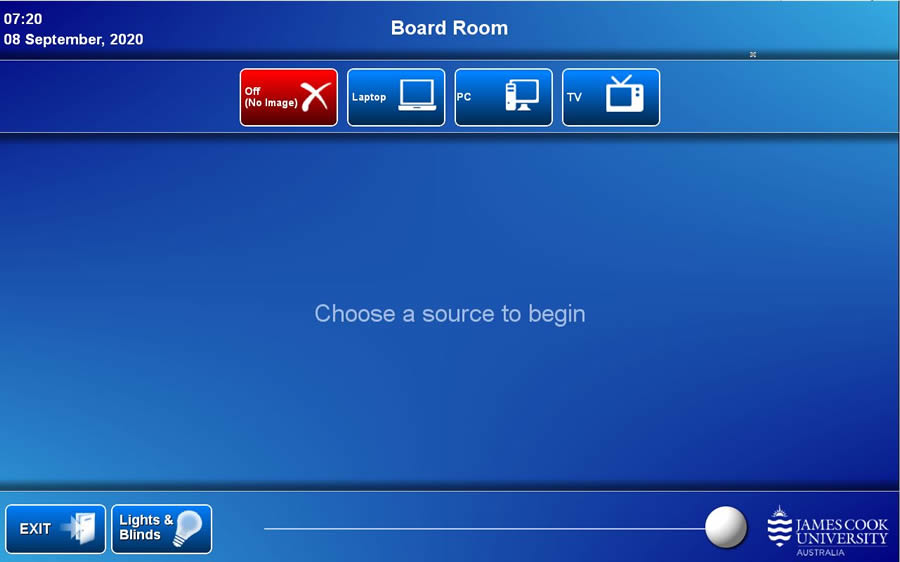
Show Presentation
- Laptop - show a laptop connected by the HDMI cable to the AV system.
- PC - show the desktop PC.
- TV - show free to air television.
Touch the Exit button and Yes button to turn off the AV system.
Electronics Lab
Equipment
- 1x large main flat panel display
- 6x large student flat panel display
- Touch panel for all AV control
- Pendant speakers
- Lectern microphone
- Wireless microphone (wireless hand held and lapel).
- Wireless Collaborator
- HDMI cable with adaptors for connecting a laptop to the AV system
- Infrared hearing assist device
Touch the screen to activate the Audio Visual system.
Touch Panel Operation
Operation
A device connected at the lectern or the wireless presenter is pushed to the main display and shared to selected or all students displays.
- Tables - enables individual laptop displays at each work group table.
- Microphone - adjust the room voice reinforcement.
- Lights & Blinds - adjust the room lighting and blinds.
- Microphone - adjust microphone room reinforcement.
- Program Volume - touch and slide the Volume button to adjust the playback volume of the connected lectern media source.
- Exit - turn system off.
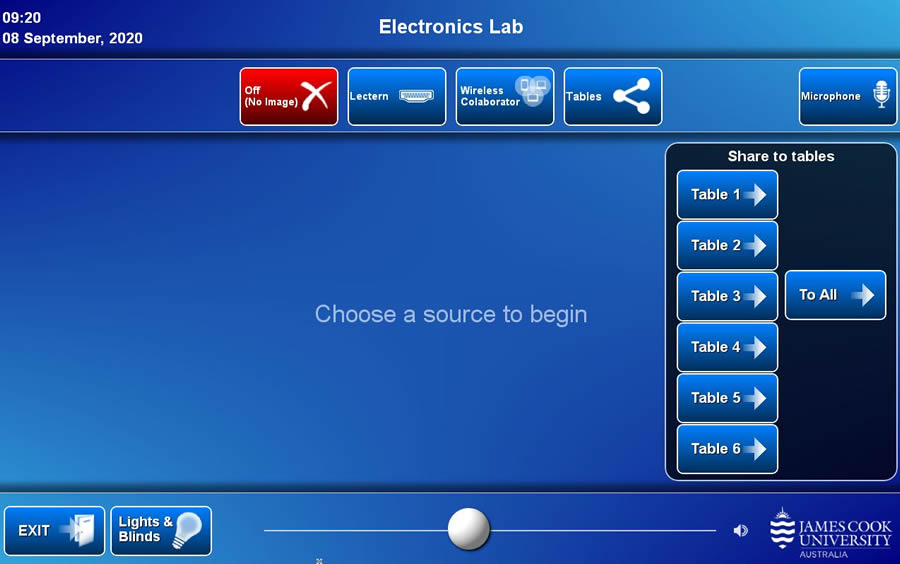
Show Presentation
- Off (No Image) - show nothing.
- Lectern - show device connected at the lectern by the HDMI cable on the main display.
- Wireless Collaborator - show the instructions for how to connect a BYOD (wireless laptop, tablet, smart phone) to the AV system.
Take note of the Room Name (IP address) and Code shown. Peruse this guide for instructions on how to connect. - Table 1...6 - stream presentation to student display table 1...6
Touch the Exit button and Yes button to turn off the AV system.
Equipment
- Video wall
- Touch panel for all AV control
- Desktop PC
- Play Station
- Wireless presenter
- Digital Signage Player
- Television
- Beam steering speakers
- Microphone (wireless hand held and lapel)
- HDMI cable with adaptors for connecting a laptop to the AV system
- Infrared hearing assist device
Touch the screen to activate the Audio Visual system.
Touch Panel Operation
Operation
- Microphone - adjust the room voice reinforcement.
- Program Volume - touch and slide the Volume button to adjust the playback volume of a laptop, PC, play station, signage player and television
- Hub Feed - import and show the content shown in the Hub space
- Exit - turn system off
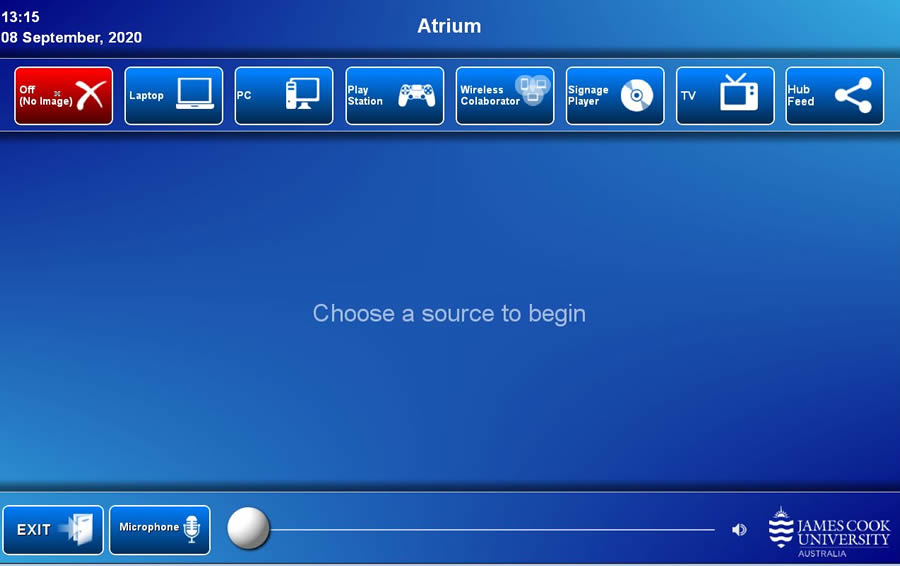
Show Presentation
- Off (No Image) - show nothing.
- Laptop - show a laptop connected by the HDMI cable at the lectern, to the AV system.
- Computer - show the desktop PC.
- Play station - show the play station.
- Wireless Collaborator - show the instructions for how to connect a BYOD (laptop, tablet, smart phone) wirelessly to the AV system.
Take note of the Room Name (IP address) and Code shown. Peruse this guide for instructions on how to connect. - Signage player - show the JCU branded news reel.
- TV - show free to air television
Touch the Exit button and Yes button to turn off the AV system.
Pharmacy Lab (Dry)
Equipment
- 7x medium flat panel displays
- 2x large flat panel displays
- Touch panel for all AV control
- Desktop PC
- Document camera
- Wireless presenter
- Video cameras
- Wall and ceiling mounted speakers
- Ceiling mounted hanging microphone
- Wireless microphone (wireless hand held and lapel)
- HDMI cable with adaptors for connecting a laptop to the AV system
- Infrared hearing assist device
Touch the screen to activate the Audio Visual system.
Touch Panel Operation
Operation
- Left Screen - show a presentation on the left display at the front of the room and all student displays.
- Right Screen - show a presentation on the right display.
- Zoom - start or join a video call
- Program Volume - touch and slide the Volume button to adjust the playback volume of the PC and laptop
- Mic VU Meter - bars confirm microphone is active
- Exit - turn system off
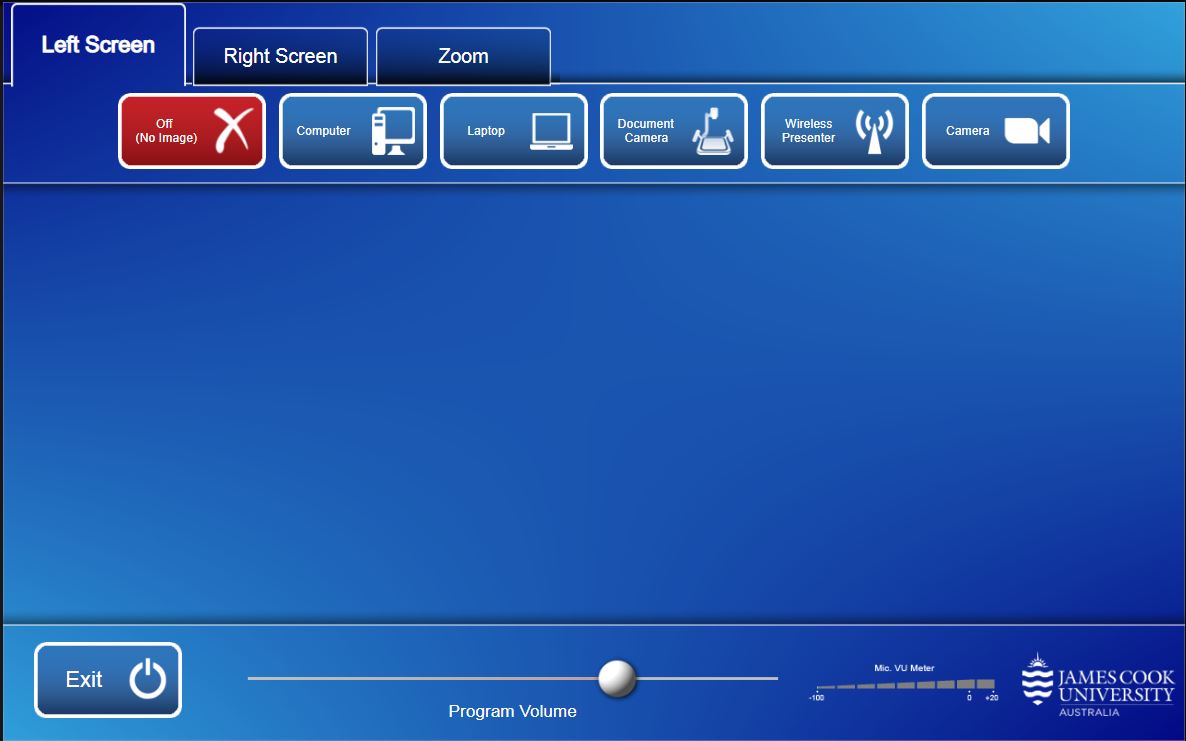
Show Presentation
- Off (No Image) - show nothing.
- Computer - show the desktop PC.
- Laptop - show a laptop connected by the HDMI cable at the lectern, to the AV system.
- Document Camera - show the document camera.
- Wireless Presenter - show the instructions for how to connect a BYOD (wireless laptop, tablet, smart phone) to the AV system.
Take note of the Room Name (IP address) and Code shown. Peruse this guide for instructions on how to connect. - Camera - select and adjust a video camera.
Operations
This is the JCU ZoomRoom video conference interface.
- Meet now - start a new Zoom meeting
- Join - join a current Zoom meeting
- Return - return to the AV touch panel control
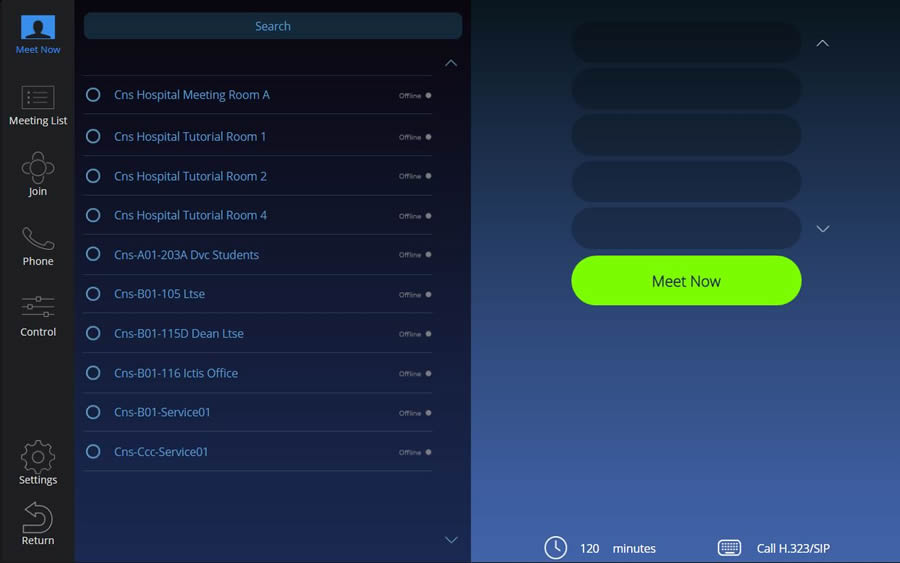
Connection options
- Zoom Meeting (enter meeting ID and passcode)
- Zoom Room (select from the list)
- Cisco endpoint (H.323/SIP) - Connect by IP address or SIP URI
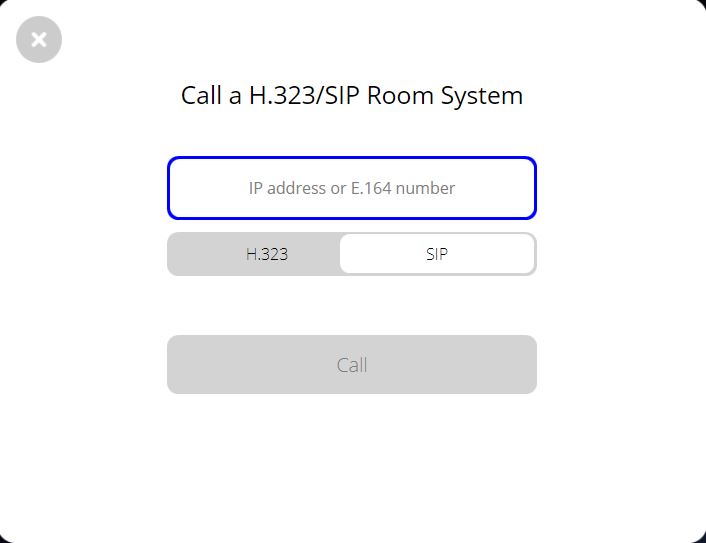
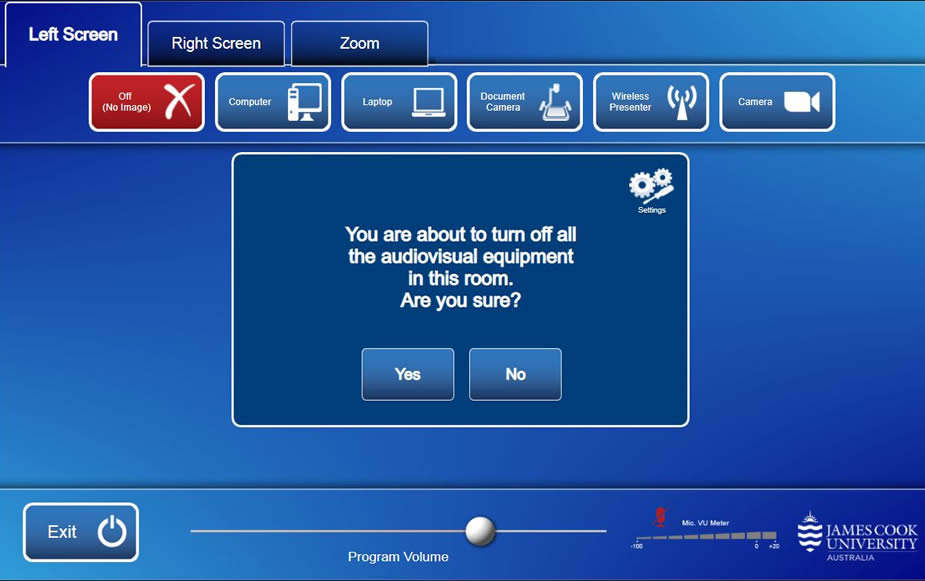
Touch the Exit button and the Yes button to turn off the AV system.
Pharmacy Lab (Wet)
Equipment
- 1x projector
- 2x flat panel displays
- Touch panel for all AV control
- Desktop PC
- Document camera
- Wireless presenter
- Video cameras
- Wall and ceiling mounted speakers
- Wireless microphone (wireless hand held and lapel)
- HDMI cable with adaptors for connecting a laptop to the AV system
- Infrared hearing assist device
Touch the screen to activate the Audio Visual system.
Touch Panel Operation
Operation
- Front Screen - show presentation on the front flat panel display.
- Centre PJ - show presentation on the projector screen.
- Rear Screen - show presentation on the rear flat panel display.
- Zoom - start or join a video call
- Program Volume - touch and slide the Volume button to adjust the playback volume of the PC and laptop.
- Mic VU Meter - bars confirm microphone is active.
- Exit - turn system off
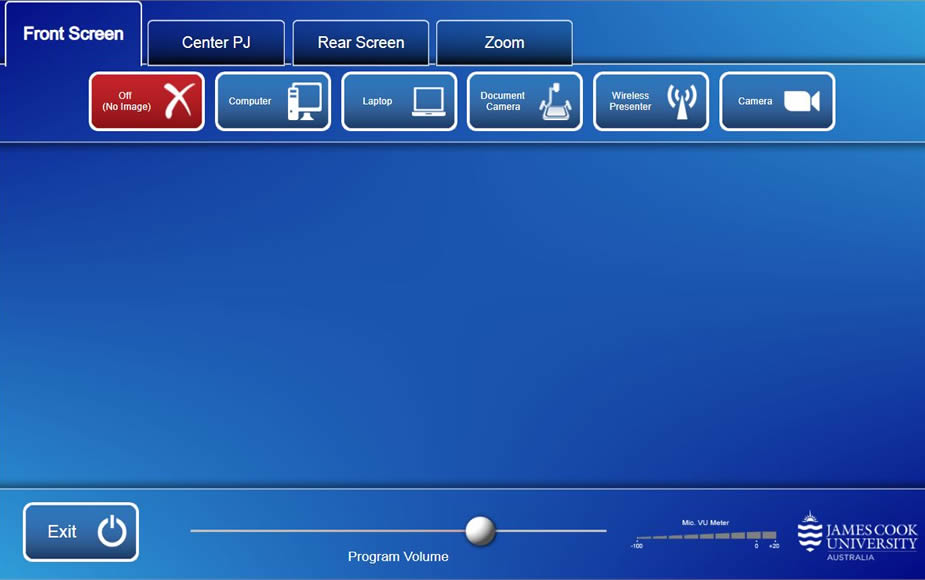
Show Presentation
- Off (No Image) - show nothing.
- Computer - show the desktop PC.
- Laptop - show a laptop connected by the HDMI cable at the lectern, to the AV system.
- Document Camera - show the document camera.
- Wireless Presenter - show the instructions for how to connect a BYOD (wireless laptop, tablet, smart phone) to the AV system.
Take note of the Room Name (IP address) and Code shown. Peruse this guide for instructions on how to connect. - Camera - select and adjust a video camera.
Operations
This is the JCU ZoomRoom video conference interface.
- Meet now - start a new Zoom meeting
- Join - join a current Zoom meeting
- Return - return to the AV touch panel control

Operations
- Meet now - start a new Zoom meeting
- Join - join a current Zoom meeting
- Return - return to the touch panel
Connection options
- Zoom Meeting (enter meeting ID and passcode)
- Zoom Room (select from the list)
- Cisco endpoint (H.323/SIP) - Connect by IP address or SIP URI

Touch the Exit button and Yes button to turn off the AV system
Cairns City Campus Classroom (004)
Equipment
- 5x wall mounted large flat panel displays
- Touch panel for all AV control
- Desktop PC
- Document camera
- Wireless presenter (Kramer VIA) for connecting a BYOD (laptop, tablet, smart phone) to the AV system
- 6x ceiling mounted speakers
- HDMI cable with adaptors for connecting a laptop to the AV system at the lectern
- Video camera
Touch the screen to activate the Audio Visual system.
Touch Panel Operation
Operation
System defaults to showing the desktop PC upon turning it on.
- Student Input - enable students at the work group table push laptop content onto the associated flat panel display by connecting to its associated display by the provided HDMI cable.
- Volume - touch and slide the Volume button to adjust the playback volume of the PC and laptop.
- Exit - turn off the system.
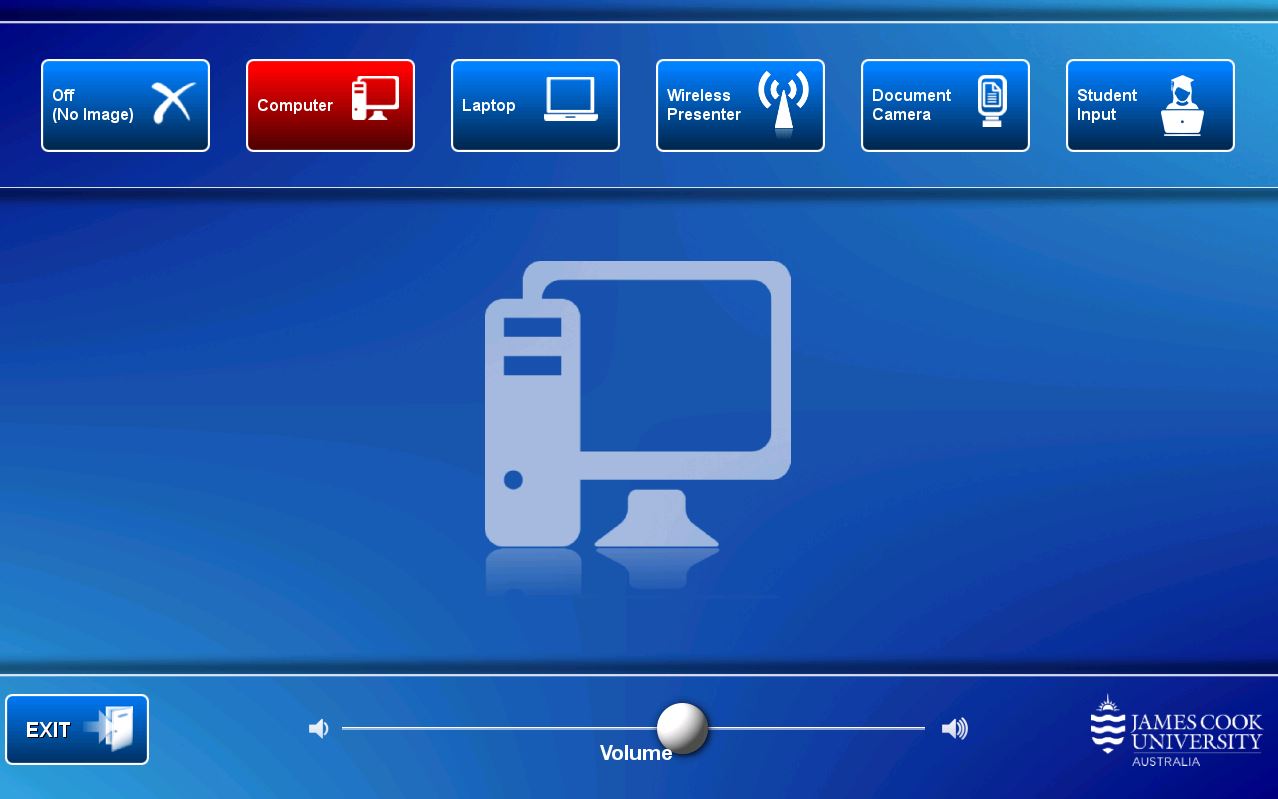
Show Presentation
- Off (No image) - show nothing
- Computer - show desktop PC
- Laptop - show laptop connected to the system by the HDMI cable
- Wireless presenter - show the instructions for how to connect a BYOD (wireless laptop, table, smart phone) to the AV system. Take note of the Room Name (IP address) and Code shown. Use this guide for instructions on how to connect.
- Document Camera - show the document camera.
- Student Input - touch to view the current camera angle.
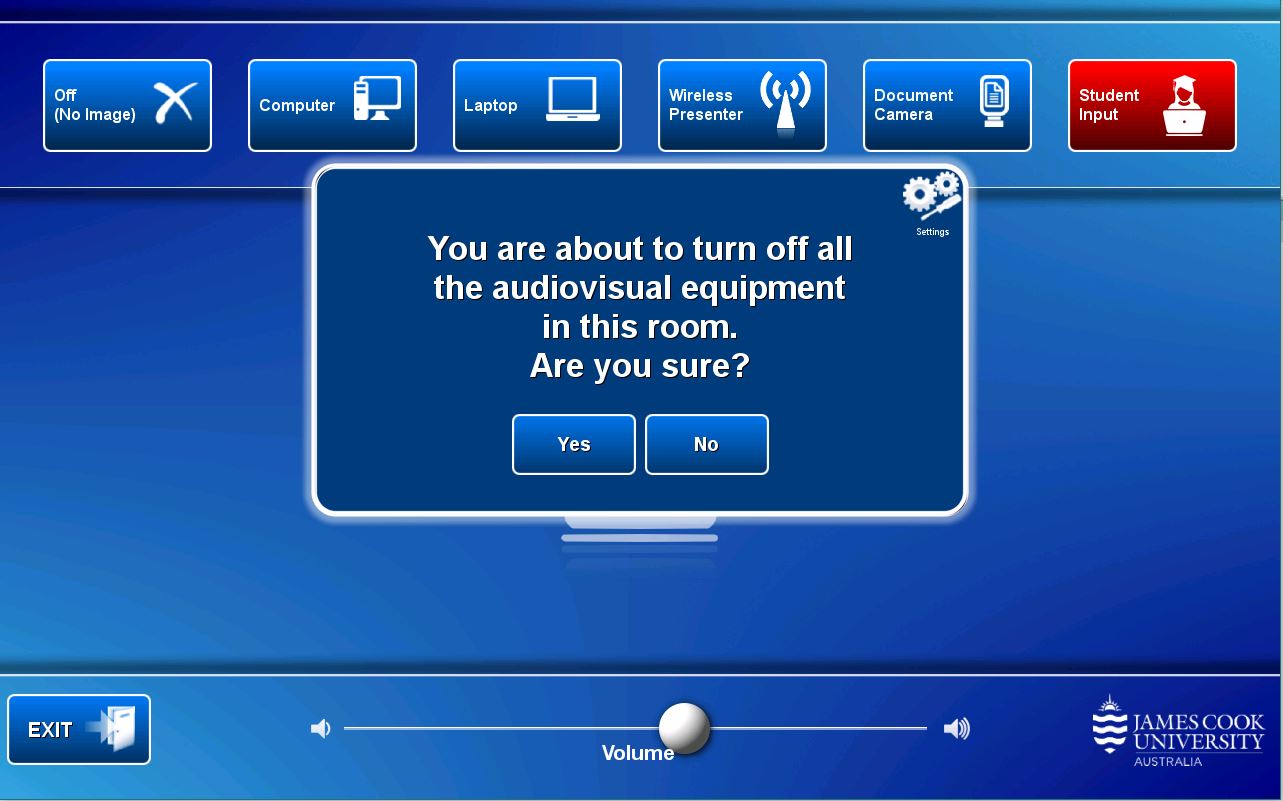
Cairns City Campus Boardroom/Moot Court (111)
The system is designed to run in two different states:
- Boardroom Mode – meeting room style.
- Moot Court Mode – court room style.
The table layout is also arranged accordingly.
Equipment
- 2x large flat panel displays
- 5x monitors
- Touch panel for all AV control
- Video conference codec
- Desktop PC
- Document camera
- Audience camera
- Presenter camera
- Wireless presenter
- Ceiling mounted speakers
- Ceiling mounted microphones
- Wireless microphones
- Lectern microphone
- HDMI cable with adaptors for connecting a laptop to the AV system
- Infrared hearing assist device
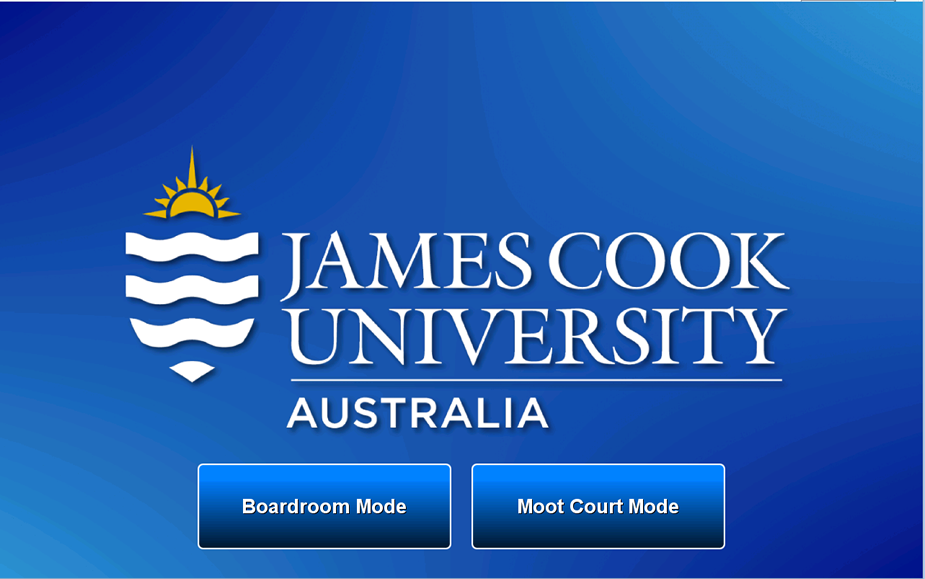
- Touch the "Moot Court Mode" button to activate the Audio Visual system in moot court mode.
- Touch the "Boardroom Mode" button to activate the Audio Visual System in boardroom mode.
Local Presentation Mode
Operation
- Left Monitor - show presentation on the left flat panel display.
- Right Monitor - show presentation on the right flat panel display.
- Bench/Bar Monitor - show presentation on the Bench and Bar monitors.
- Audio - volume control
- Video Conference - set system in video conference mode
- Exit - turn off the AV system
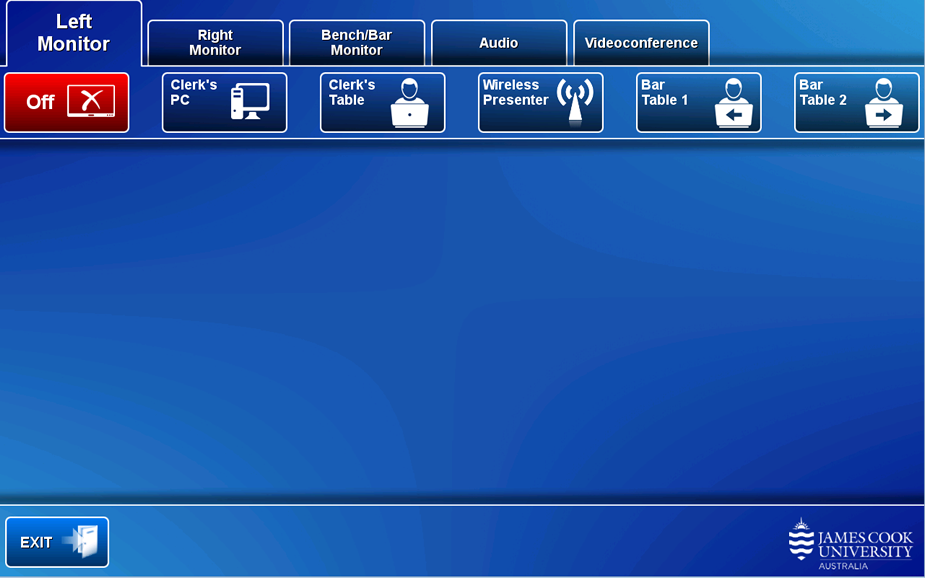
Show Presentation
- Off (No Image) - show nothing.
- Clerk's PC - show the desktop PC.
- Clerk's Table - show a laptop connected to the AV system at Clerk's table.
- Wireless presenter - show the instructions for how to connect a BYOD (wireless laptop, tablet, smart phone) to the AV system
Take note of the Room Name (IP address) and Code shown. Use this guide for instructions on how to connect. - Bar Table 1 - show a laptop connected to the AV system by the HDMI cable at bar table 1.
- Bar Table 2 - show a laptop connected to the AV system by the HDMI cable at bar table 2.
Operation
Sound must be routed to the display where the presentations is shown.
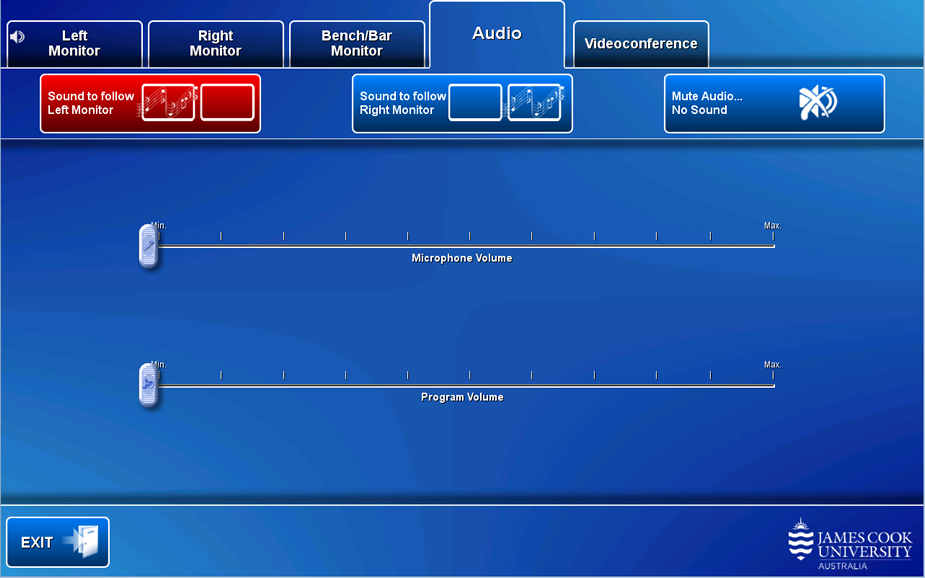
- Sound to follow Left Monitor - route sound to the left display.
- Sound to follow Right Monitor - route sound to the right display.
- Mute Audio - No Sound - turn off audio from presentation sources.
- Microphone Volume - touch and slide the Microphone Volume button to adjust the room voice reinforcement.
- Program Volume - touch and slide the Program Volume button to adjust the playback volume of the PC and laptop.
Videoconference mode is pre-requisite for all video calls including Zoom.
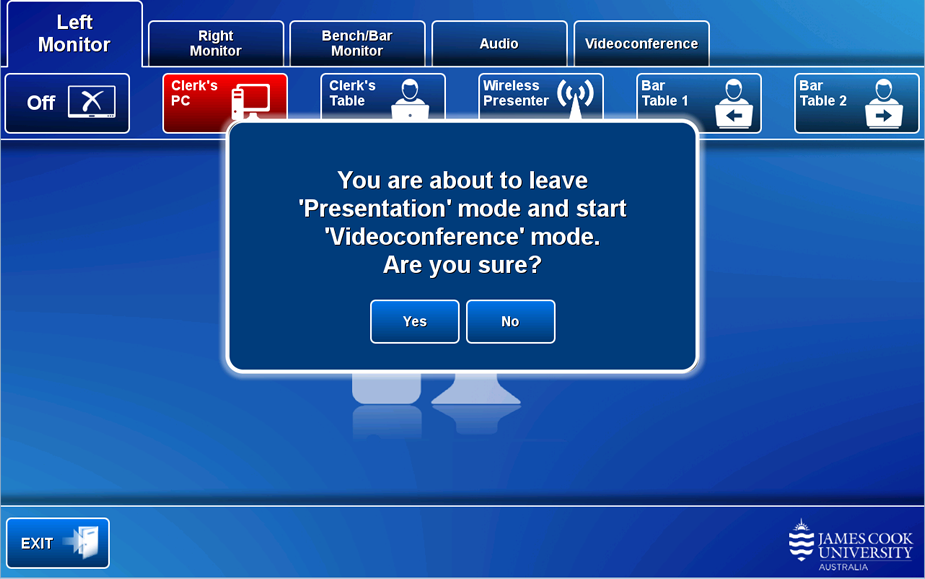
Touch the Videoconference tab and Yes button to proceed to video conference mode.
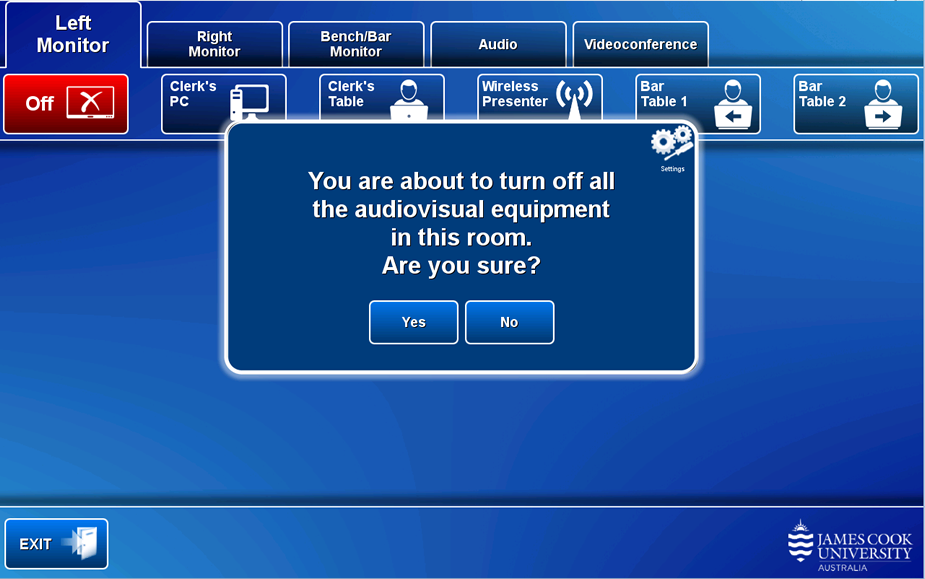
Touch the Exit button and Yes button to turn off the AV system.
Videoconference Mode
Operation
VC Main Image
- Camera 1 (or 2) - select and adjust the camera to be used by touching the pan, tilt and zoom controls.
Please ensure you are visible to the far end participants irrespective of movements. - Mute - turn off microphone.
- Selfview - touch to view the current camera angle.
- Layout - change the video and presentation screen composition.
- Exit - leave video conference mode.
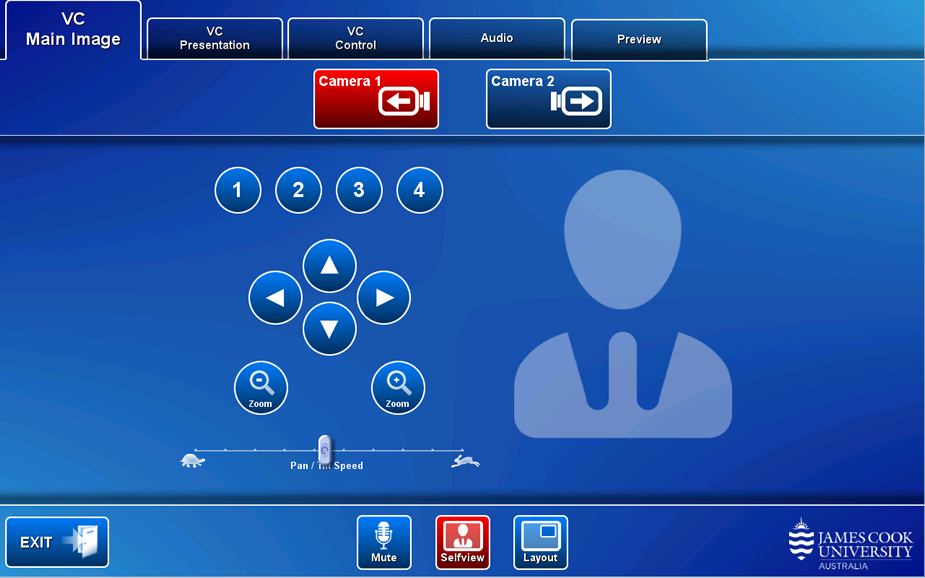
Once the video call is connected, select a presentation source.
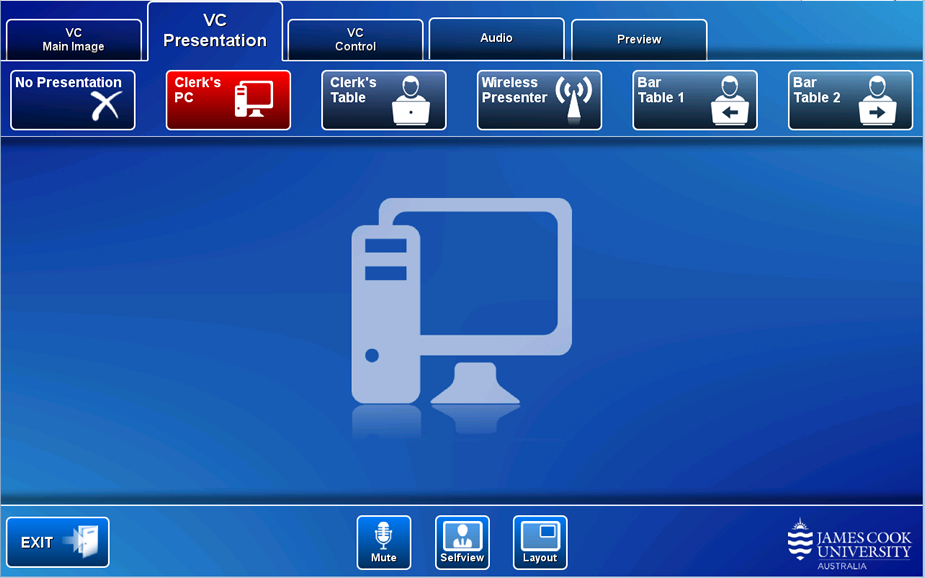
Show Presentation
- Off (No Image) - show nothing.
- Clerk's PC - show the desktop PC.
- Clerk's Table - show a laptop connected to the AV system at Clerk's table.
- Wireless presenter - show the instructions for how to connect a BYOD (wireless laptop, tablet, smart phone) to the AV system
Take note of the Room Name (IP address) and Code shown. Use this guide for instructions on how to connect. - Bar Table 1 - show a laptop connected to the AV system by the HDMI cable at bar table 1.
- Bar Table 2 - show a laptop connected to the AV system by the HDMI cable at bar table 2.
Operation
- Far End Camera control (not available in all rooms) - control the camera at the far end.
- Dial/Keypad - connect a conference call manually
- Contacts/Hang Up - Access the directory or disconnect the from a video call.
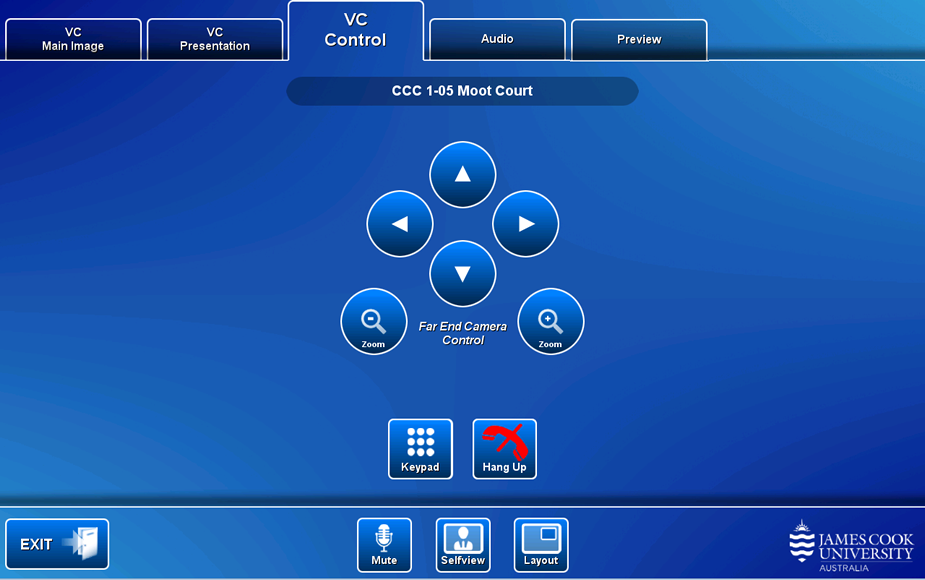
Manually connect video call
- Dial/keypad - connect a video call manually by entering an IP address or SIP URI.
- Contacts - locate an endpoint and touch the Call button.
Connect to Zoom
- Touch the Contacts button.
- Locate and touch the Zoom meeting entry.
- Touch the Zoom Meeting Bridge (SIP) entry.
- Touch the Call button.
- Touch the Keypad button (appears once the call has connected to the Zoom Bridge).
- Enter the Zoom meeting ID followed by the #-key.
- Enter the passcode followed by the #-key.
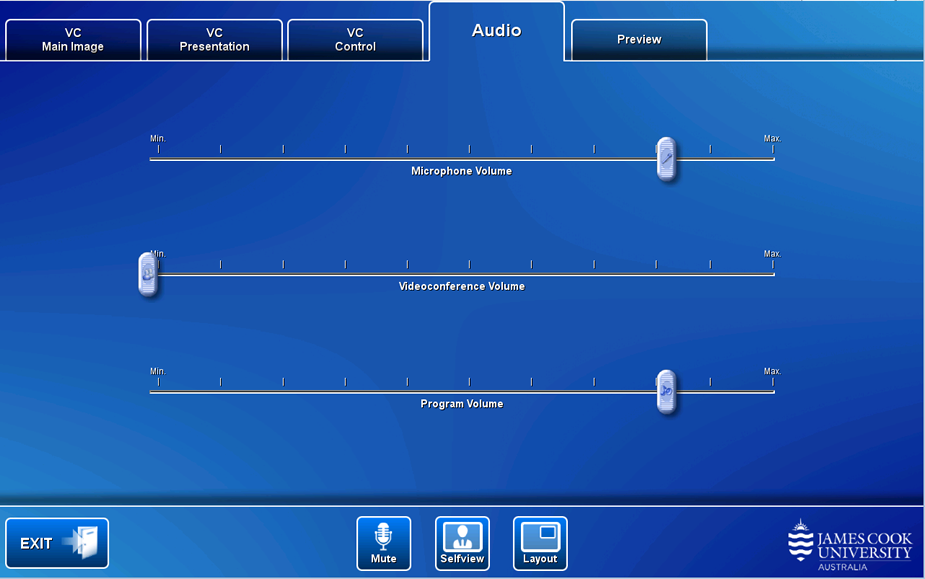
Operation
- Microphone Volume - touch and slide the Microphone Volume button to adjust the room voice reinforcement.
- Videoconference Volume - touch and slide the Videoconference Volume button to adjust the volume of the far end.
- Program Volume - touch and slide the Program Volume button to adjust the playback volume of the PC and laptop.
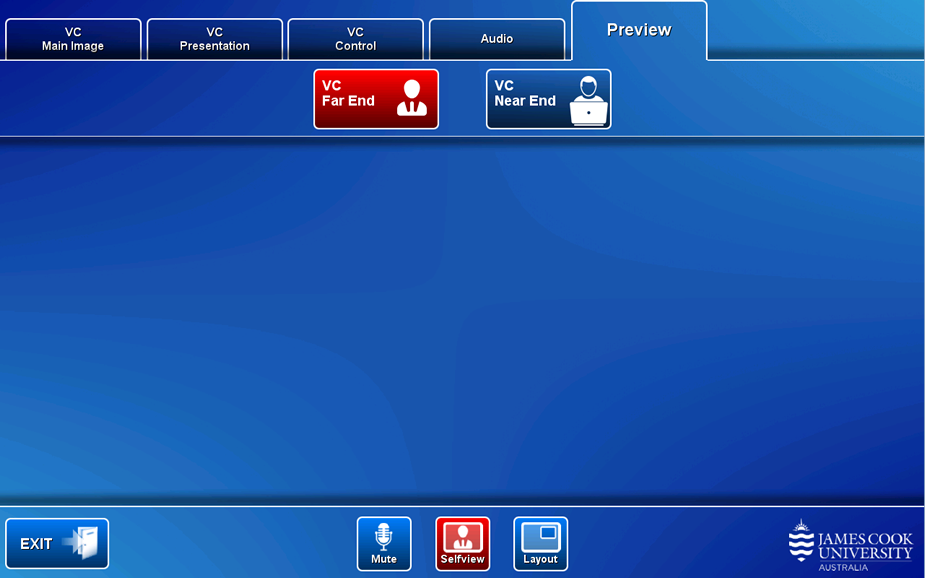
Touch the Preview tab and view the VC Far End button or VC Near End button.
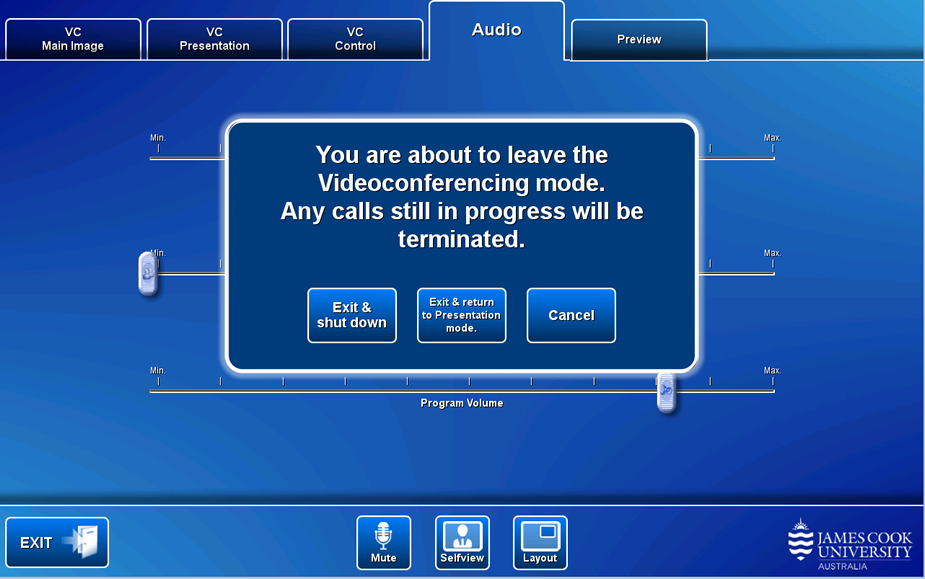
- Exit & shut down – turn off the AV system.
- Exit & return to Presentation mode – leave video conference mode and continue in local presentation mode.
- Cancel the exit action and continue in video conferencing mode.
Cairns City Campus Boardroom (111)
The system is designed to run in two different states:
- Boardroom Mode – local court session.
- Moot Court Mode – court session linked by video conference to remote courts or rooms.
The table layout is also arranged accordingly.
Equipment
- 2x large flat panel displays
- 5x monitors
- Touch panel for all AV control
- Video conference codec
- Desktop PC
- Document camera
- Audience camera
- Presenter camera
- Wireless presenter
- Ceiling mounted speakers
- Ceiling mounted microphones
- Wireless microphones
- Lectern microphone
- HDMI cable with adaptors for connecting a laptop to the AV system
- Infrared hearing assist device
System is Off
Touch the "Boardroom" button to activate the Audio Visual system in Boardroom mode.
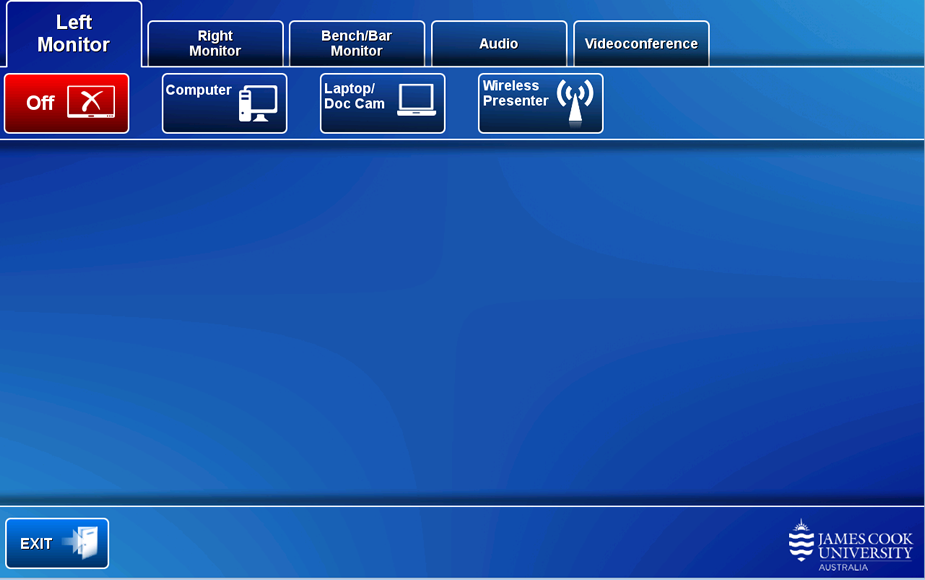
System is On
Operation
- Left Monitor - show presentation on the left flat panel display.
- Right Monitor - show presentation on the right flat panel display.
- Audio - volume control
- Video Conference - set system in video conference mode
- Exit - turn off the AV system
Presentation
- Off (No Image) - show nothing.
- Computer - show the desktop PC.
- Laptop/Doc Cam - show a laptop or document camera connected by the HDMI cable to the AV system.
- Wireless presenter - show the instructions for how to connect a BYOD (wireless laptop, tablet, smart phone) to the AV system.
Take note of the Room Name (IP address) and Code shown. Use this guide for instructions on how to connect.
Audio
Sound must be routed to the monitor where the presentation is shown.
- Sound to follow Left Monitor - Sound is routed to the left display.
- Sound to follow Right Monitor - Sound is routed to the right display.
- Mute Audio - No Sound - turn off audio from presentation sources.
- Microphone Volume - adjust the microphone room reinforcement.
- Program Volume - adjust the playback volum e of the PC and laptop.
Turn off system
Touch Exit button and Yes button to turn off the AV system.
Goto Video Conference Mode
Set the system in video conference mode for all video calls including Zoom.
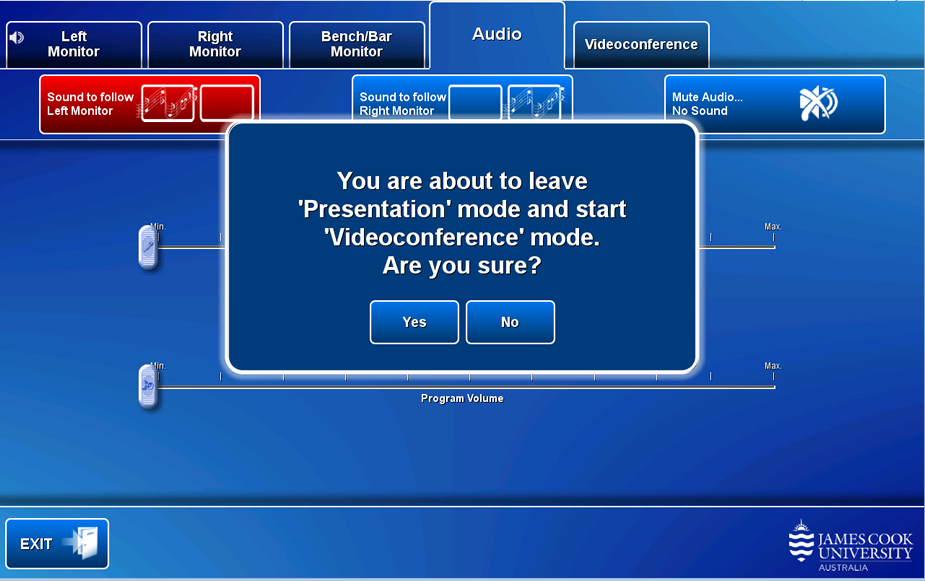
Touch the Videoconference tab and the Yes button
Video Conference Mode
Operation
VC Main Image
- Camera 1 (or 2) - select and adjust the camera to be used by touching the pan, tilt and zoom controls.
The presenter should be visible to the far end participants at all times, hence adjusting the presenter camera to the anticipated movements is recommended. - Mute - turn off microphone.
- Selfview - touch to view the current camera angle.
- Layout - change the video and presentation screen composition.
- Exit - leave video conference mode.
VC Presentation
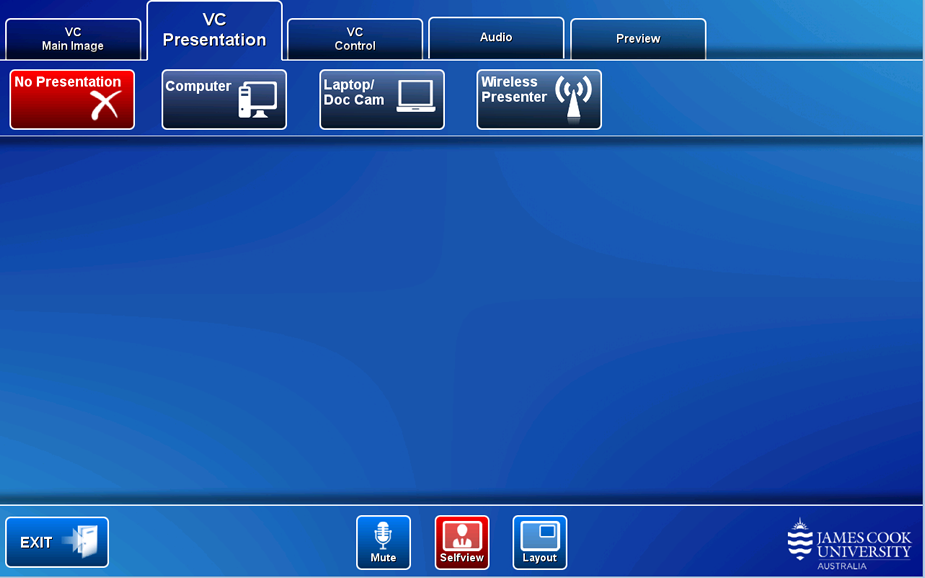
Once the video call is connected, select a presentation source.
VC Control
VC Control
- Far End Camera Control (not available in all rooms) - control the camera settings of the connected room (Far End).
- Dial/Keypad - Connect a conference call manually.
- Contacts/Hang Up - Access the directory or disconnect the from a video call.
Manually connect video call
- Dial/keypad - connect a video call manually by dialling an IP address or SIP URI.
- Contacts - locate an endpoint and touch the Call button.
Connect to Zoom
- Touch the Contacts button.
- Locate and touch the Zoom meeting entry.
- Touch the Zoom Meeting Bridge (SIP) entry.
- Touch the Call button.
- Touch the Keypad button (appears once the call has connected to the Zoom Bridge).
- Enter the Zoom meeting ID followed by the #-key.
- Enter the passcode followed by the #-key.
Audio
- Microphone Volume - adjust the microphone room reinforcement.
- Videoconference Volume - adjust the volume of the far end room(s).
- Program volume - adjust the playback volume of the PC or laptop.
Preview
Touch the Preview tab and view the Far end or Near end by touching the respective buttons.
Turn off system
- Exit & shut down – turn off the AV system.
- Exit & return to Presentation mode – leave video conference mode and continue in local presentation mode.
- Cancel the exit action and continue in video conferencing mode.
Cairns City Campus Collaborative Room (103)
Equipment
- 18x large flat panel displays
- Touch panel for all AV control
- Video conference codec
- Desktop PC
- Document camera
- Audience camera
- Presenter camera
- Wireless presenter
- Ceiling mounted speakers
- Lectern microphone
- Wireless microphones (lapel and hand held) - recommended for use with lecture capture recorder
- HDMI cable with adaptors for connecting a laptop to the AV system
- Infrared hearing assist device
- Lecture capture recording device (Panopto)
Touch the screen to turn the system on.
Local Presentation Mode
Operation
Presentation shown on bottom and top screens can be the same or different but only the bottom screen is recorded to Panopto.
- Bottom Screen - show presentation on bottom display.
- Top Screen - show presentation on top display.
- Preview - preview a source on the touch panel
- Audio - adjust volume.
- Videoconference - set system in video conference mode.
- Exit - turn off the system.
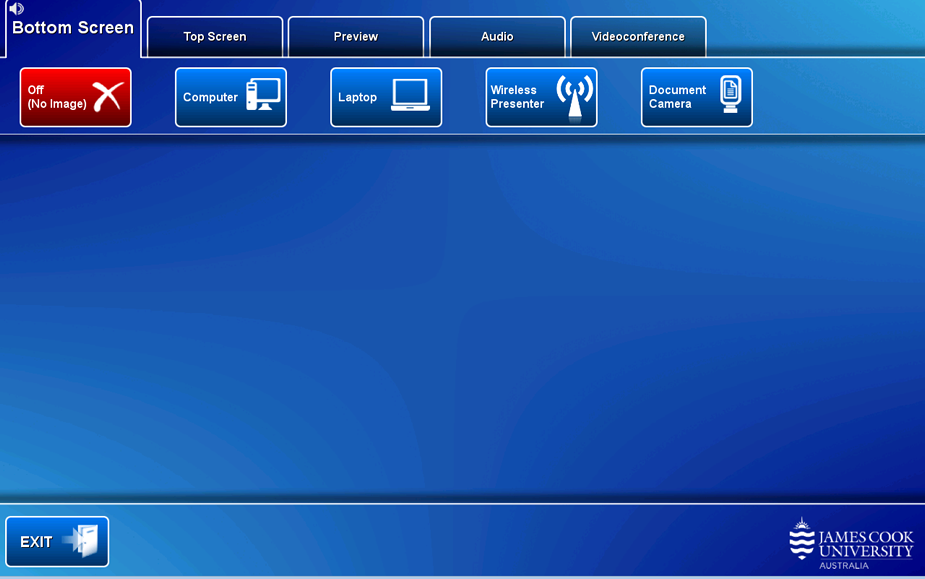
Show Presentation
- Computer - show the desktop PC.
- Laptop - show a laptop connected by the HDMI cable at the lectern to the AV system.
- Wireless presenter - show the instructions for how to connect a BYOD (wireless laptop, table, smart phone) to the AV system. Take note of the Room Name (IP address) and Code shown. Use this guide for instructions on how to connect.
- Document Camera - show the document camera.
Adjust the camera
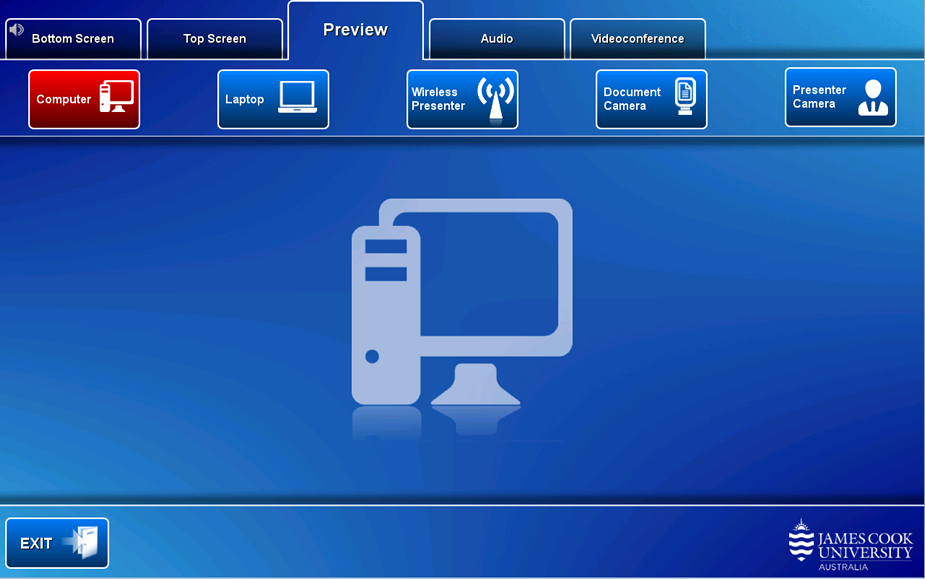
- Touch the Preview tab
- Touch the Presenter Camera button
- Make adjustment to the camera to ensure you are visible at all times irrespective of movements.
- Clip on the wireless lapel microphone and body pack
- Turn on the wireless microphone
- Touch the Bottom Screen tab (only the bottom screen presentation is recorded).
- Touch a media source button to show and record the presentation
- The recording light turns green on the hour, indicating the recording is under way
Preview media prior to pushing it to the room displays - this is particularly useful when setting up the cameras (document, presenter and audience).
Touch the Preview tab and a media button to view it on the touch panel
Sound must be routed to the display where the presentations is shown.
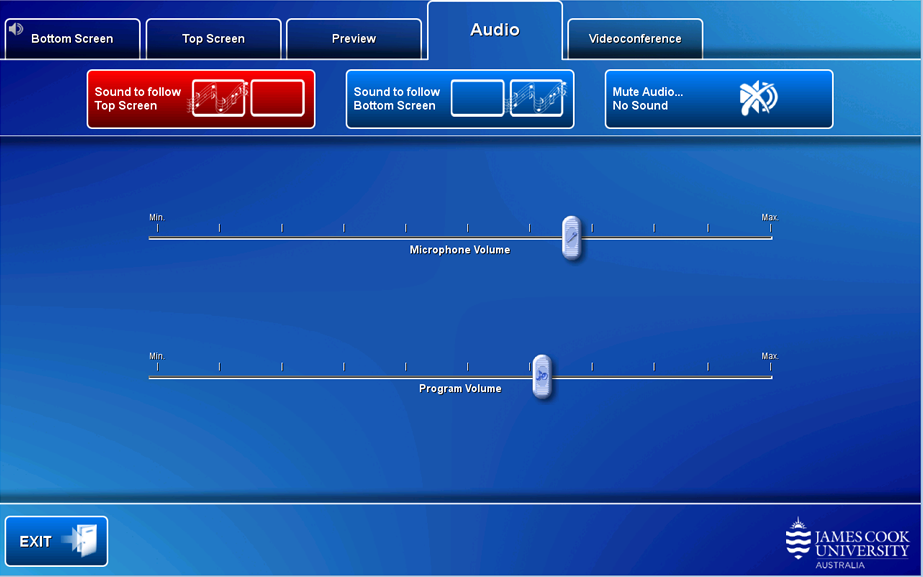
- Sound to follow Top Screen - route sound to the top screens.
- Sound to follow Bottom Screen - route sound to the bottom screens.
- Mute Audio - No Sound - turn off audio from presentation sources.
- Microphone Volume - touch and slide the Microphone Volume button to adjust the room voice reinforcement.
- Program Volume - touch and slide the Program Volume button to adjust the playback volume of the PC and laptop.
Videoconference mode is a pre-requisite for all video calls including Zoom
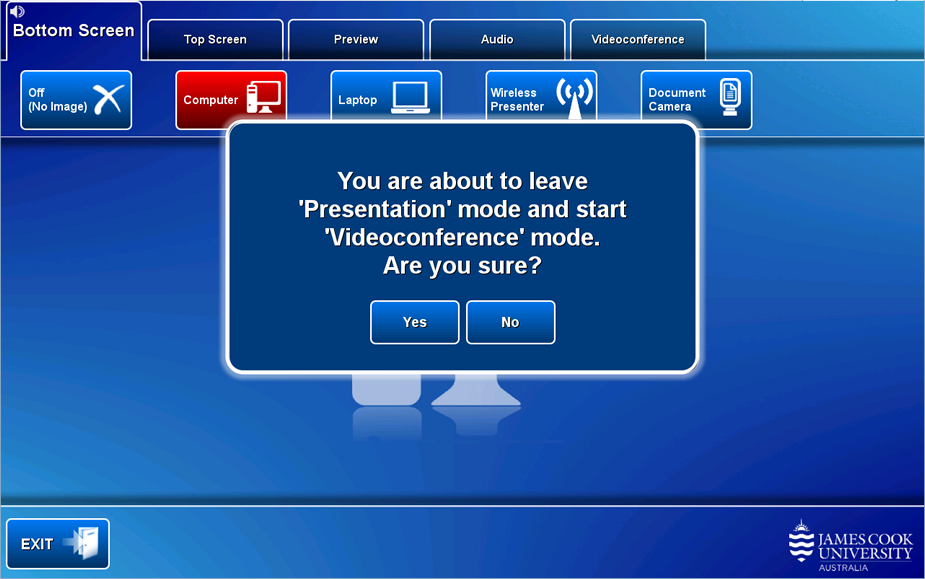
Touch the EXIT button and Yes button to turn off the system
Videoconference Mode
Operation
- VC Main Image - touch the Presenter Camera or Audience Camera button to select and adjust the room cameras. Ensure you are visible to the far end participants at all times irrespective of movements.
- VC Presentation - show presentation.
- VC Control - connect a video call manually.
- Audio - volume control.
- Mute - turn off microphone.
- Selfview - touch to view the current camera angle.
- Layout - change the video and presentation screen composition.
- Exit - leave video conference mode.
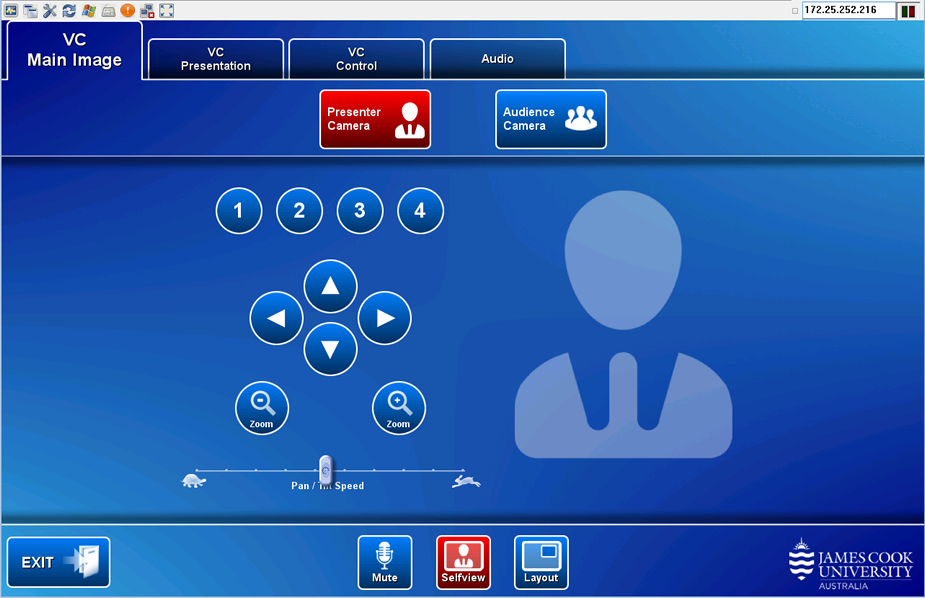
Adjust the camera
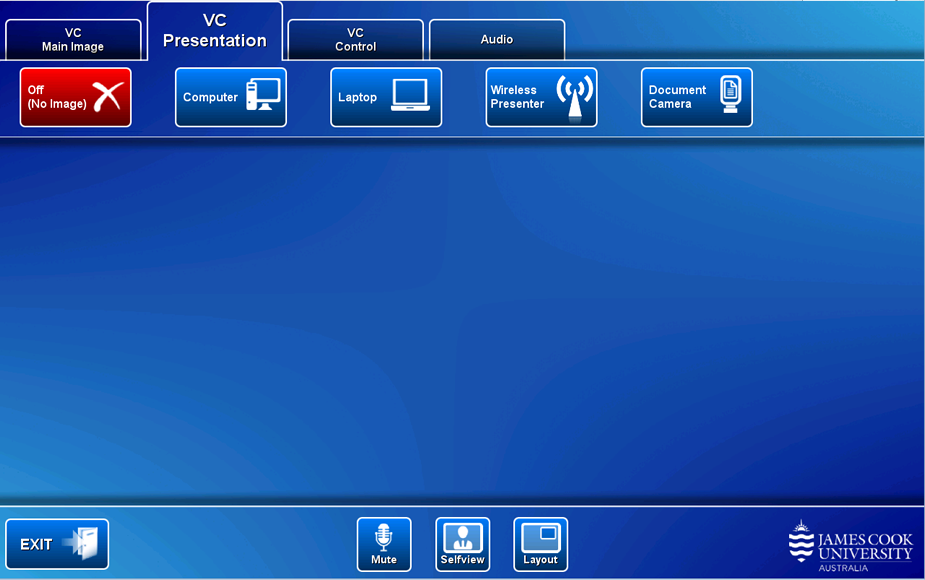
- Touch the VC Main Image tab
- Touch the Presenter Camera button
- Make adjustment to the camera to ensure you are visible at all times irrespective of movements.
- Clip on the wireless lapel microphone and body pack
- Turn on the wireless microphone
- Once the video call connects at 5 minutes to the hour, touch a media source button to show the presentation.
- The recording light turns green on the hour, indicating the recording is under way
Once the call is connected, touch one of the media source buttons to show a presentation.
- Computer - show the desktop PC.
- Laptop - show a laptop connected by the HDMI cable at the lectern to the AV system.
- Wireless presenter - show the instructions for how to connect a BYOD (wireless laptop, table, smart phone) to the AV system. Take note of the Room Name (IP address) and Code shown. Use this guide for instructions on how to connect.
- Document Camera - show the document camera.
- Far End Camera control (not available in all rooms) - control the camera settings at the far end.
- Dial/Keypad - connect a video call manually
- Contacts/Hang Up - disconnect the video call.
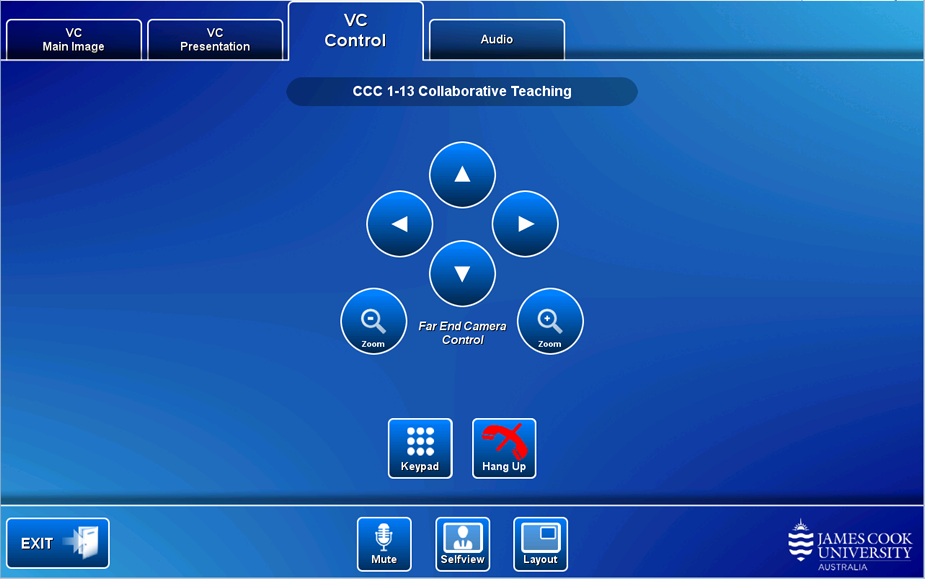
Manually connect video call
- Dial/keypad - connect a video call manually by entering an IP address or SIP URI.
- Contacts - locate an endpoint and touch the Call button.
Connect to Zoom
- Touch the Contacts button.
- Locate and touch the Zoom meeting entry.
- Touch the Zoom Meeting Bridge (SIP) entry.
- Touch the Call button.
- Touch the Keypad button (appears once the call has connected to the Zoom Bridge).
- Enter the Zoom meeting ID followed by the #-key.
- Enter the passcode followed by the #-key.
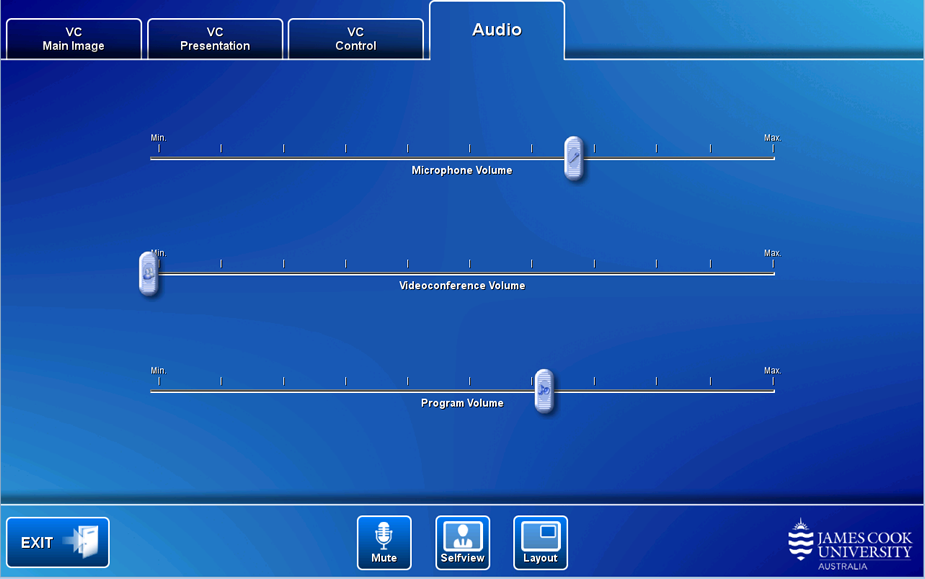
- Microphone Volume - touch and slide the Microphone Volume button to adjust the room voice reinforcement.
- Videoconference Volume - touch and slide the Videoconference Volume button to adjust the volume of the far end.
- Program Volume - touch and slide the Program Volume button to adjust the playback volume of the PC and laptop.
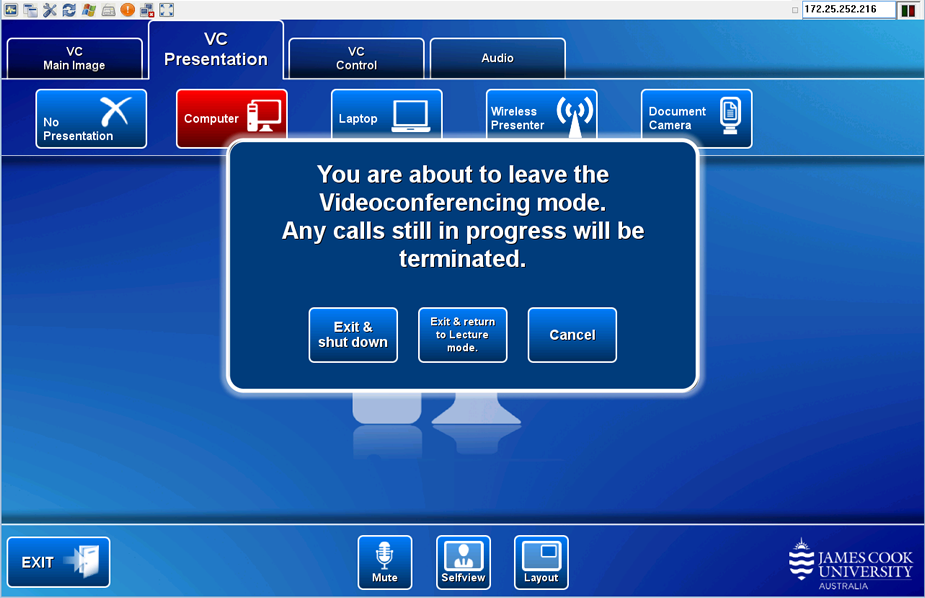
- Exit & shut down – turn off the AV system.
- Exit & return to Presentation mode – leave video conference mode and continue in local presentation mode.
- Cancel the exit action and continue in video conferencing mode.
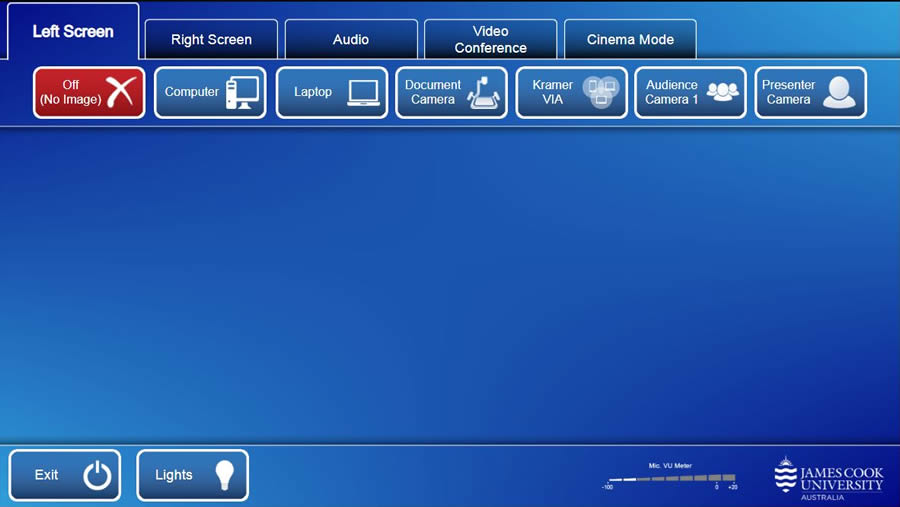
Touch the Cinema Mode tab
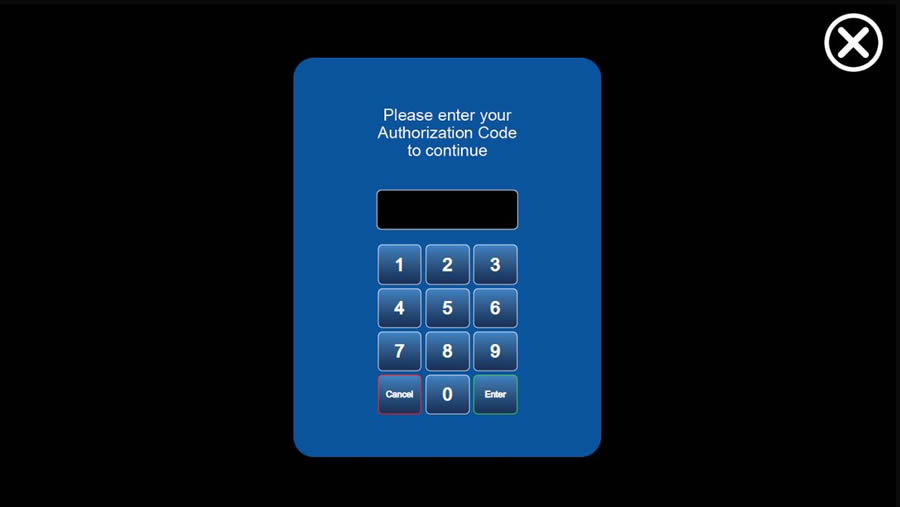
Enter the Authorization Code (available by contacting VAVS) and touch the Enter key
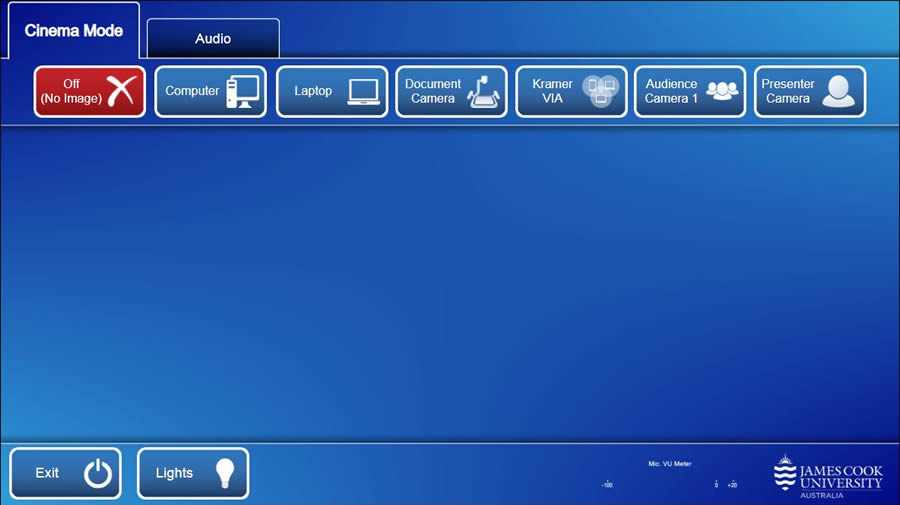
The film is best played back using VLC available on
- the in-room desktop AIO PC
- a laptop connected by the Kramer VIA (wireless presenter) or the provided HDMI cable
- or a portable media player connected by the provided HDMI cable
Turn down the room lighting and press play!
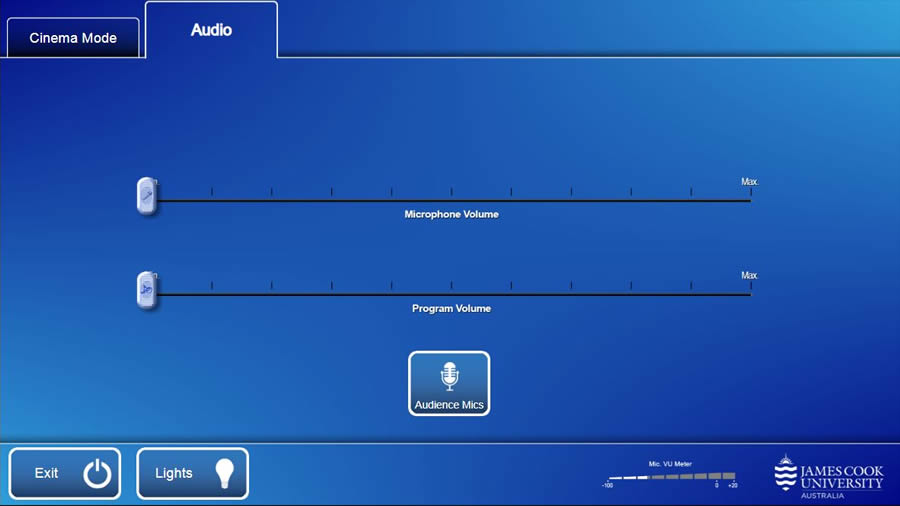
Volume Control
Touch the Audio tab to access the volume control in cinema mode.
- Microphone Volume - mute while screening.
- Audience Mics - mute while screening
- Program Volume - adjust the playback volume of the film.
Equipment
- 2x large wall mounted TV/monitors
- 1x SONY TV remote control
- X-Box
- Nintendo
- Free-To-Air (FTA) Television
- HDMI connector for laptop (wall plate)
Touch the screen to activate the Audio Visual system.
Touch Panel Operation
The touch panel controls the content shown on the two large TV/monitors in Games Area and the Lounge.
The device audio (X-Box, Nintendo, laptop and Television) is played through the TV/monitors
Operation
The TV/monitors in the Games Area and Lounge work independently.
- Lounge - select the TV/monitor in the lounge area
- Games Area - select the TV/monitor in the digital games area
- X-Box/Nintendo - devices are stored in the digital games area
- Laptop - connect a laptop by HDMI cable directly to the TV/monitor
- Television - watch Free-To-Air (FTA) television channels
- Exit - turn system off
Connect power and HDMI cable to the device
- Connect the laptop by an HDMI cable
- Ensure the laptop is set to duplicate display
- Touch the Laptop button
- Touch the Television button
- Select a FTA channel from the touch panel station matrix
Touch and slide the Volume button to adjust the audio level
- Sound off - no sound playing
- Monitor Sound - stream sound through TV/monitor speakers
- Background Music - selected music streaming from the Admin Office through ceiling speakers
- Bluetooth Audio - Pair a BYOD to stream audio
Please turn off the system when not in use
Equipment
- 1x ceiling mounted projector
- Free-To-Air (FTA) Television
- HDMI connector for laptop
Touch the screen to activate the Audio Visual system.
Touch Panel Operation
- The touch panel controls what is shown on the projector screen.
- Inputs are available for Free-To-Air (FTA) television and BYOD device (laptop etc)..
- Audio is streamed through four hi-fi wall mounted pillar speakers.
Operation
A ceiling mounted projector shows streamed content on a large screen
- Laptop - show laptop content by connecting device to the AV system by the provided HDMI cable
- Television - show Free-To-Air (FTA) television channels
- Exit - turn system off
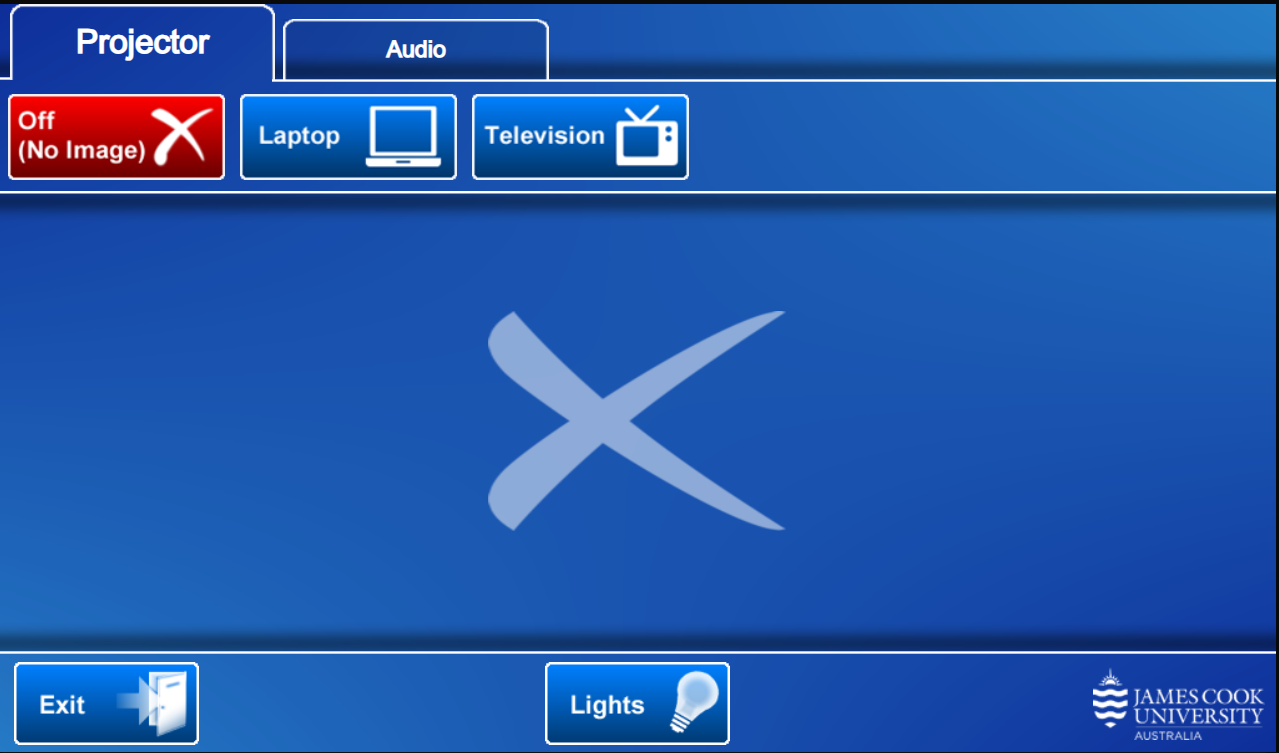
- Connect the laptop by the provided HDMI cable
- Ensure the laptop display is set to duplicate
- Touch the Laptop button
- Touch the Television button
- Select a FTA channel from the touch panel station matrix
- Touch the Audio tab
- Touch and slide the Projector Volume button to adjust the audio level
- Touch Projector Sound On or Off as required
- Touch the Lights button
- Select Low, Medium or High intensity as required
Turn off the AV system when not in use.
Equipment
- 1x large wall mounted TV/monitors
- Zoom Mini PC with wireless keyboard and mouse
- HD USB Camera
- Free-To-Air (FTA) Television
- Wall mounted speakers
- HDMI connector for laptop (wall plate)
Touch the screen to activate the Audio Visual system.
Operation
- Monitor - show content on the wall mounted TV/monitor
- Zoom - start or join a zoom meeting
- Laptop - connect a laptop by HDMI cable directly to the TV/monitor
- Television - watch Free-To-Air (FTA) television channels
- Exit - turn system off
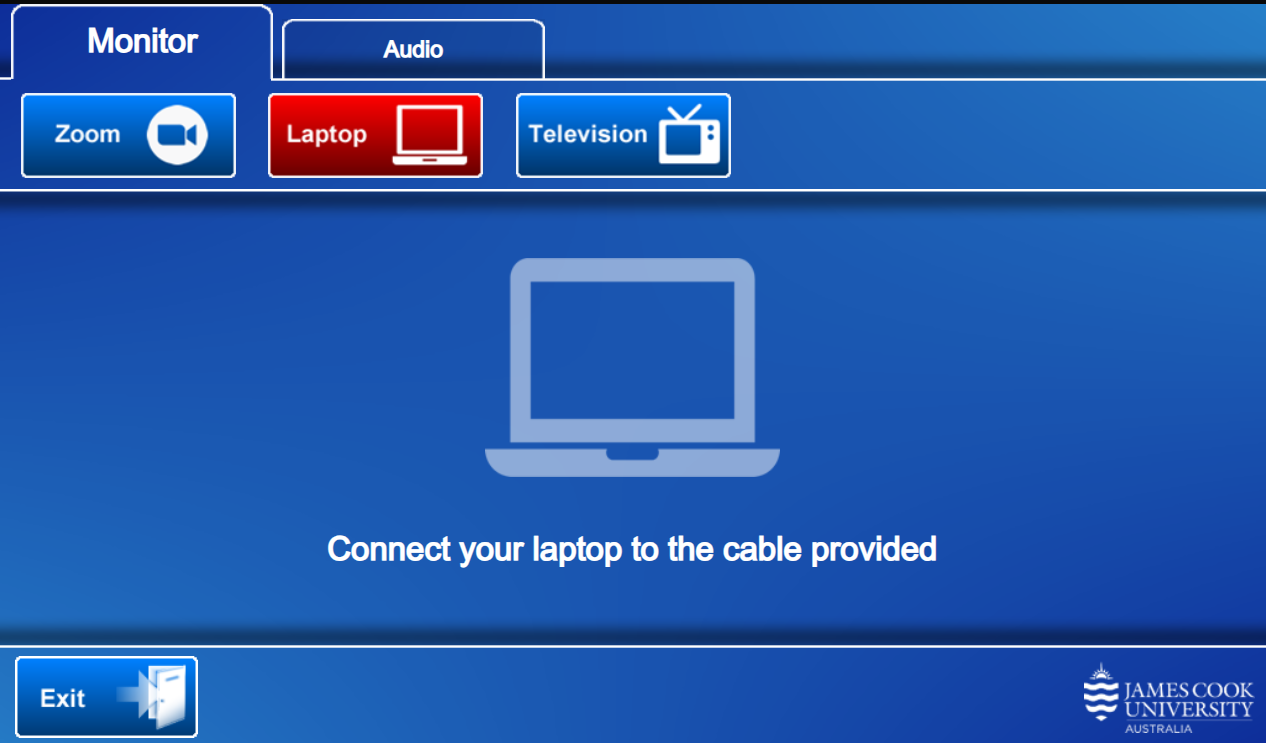
- The Zoom desktop application is installed on the Mini PC..
- Touch the Zoom button.
- Use the wireless keyboard and mouse to launch the Zoom app.
- Connect the laptop by the provided HDMI cable
- Ensure the laptop display is set to duplicate
- Touch the Laptop button
- Touch the Audio tab
- Touch and slide the Monitor Volume button to adjust the audio level
Turn system off when not in use.
Equipment
- 2x large wall mounted TV/monitors
- 1x SONY TV remote control
- X-Box
- Nintendo
- Free-To-Air (FTA) Television
- HDMI connector for laptop (wall plate)
Touch the screen to activate the Audio Visual system.
Touch Panel Operation
The touch panel controls the content shown on the two large TV/monitors in Games Area and the Lounge.
The device audio (X-Box, Nintendo, laptop and Television) is played through the TV/monitors
Operation
The TV/monitors in the Games Area and Lounge work independently.
- Lounge - select the TV/monitor in the lounge area
- Games Area - select the TV/monitor in the digital games area
- X-Box/Nintendo - devices are stored in the digital games area
- Laptop - connect a laptop by HDMI cable directly to the TV/monitor
- Television - watch Free-To-Air (FTA) television channels
- Exit - turn system off
Connect power and HDMI cable to the device
- Connect the laptop by an HDMI cable
- Ensure the laptop is set to duplicate display
- Touch the Laptop button
- Touch the Television button
- Select a FTA channel from the touch panel station matrix
Touch and slide the Volume button to adjust the audio level
- Sound off - no sound playing
- Monitor Sound - stream sound through TV/monitor speakers
- Background Music - selected music streaming from the Admin Office through ceiling speakers
- Bluetooth Audio - Pair a BYOD to stream audio
Please turn off the system when not in use
Equipment
- 1x wall mounted TV/monitor
- Free-To-Air (FTA) Television
- HDMI connector for laptop
Touch the screen to activate the Audio Visual system.
The touch panel controls the content shown on the TV/monitor
Operation
A wall mounted TV/monitor shows the streamed content.
- Laptop - show laptop content by connecting device to the AV system by the provided HDMI cable
- Television - show Free-To-Air (FTA) television channels
- Exit - turn system off
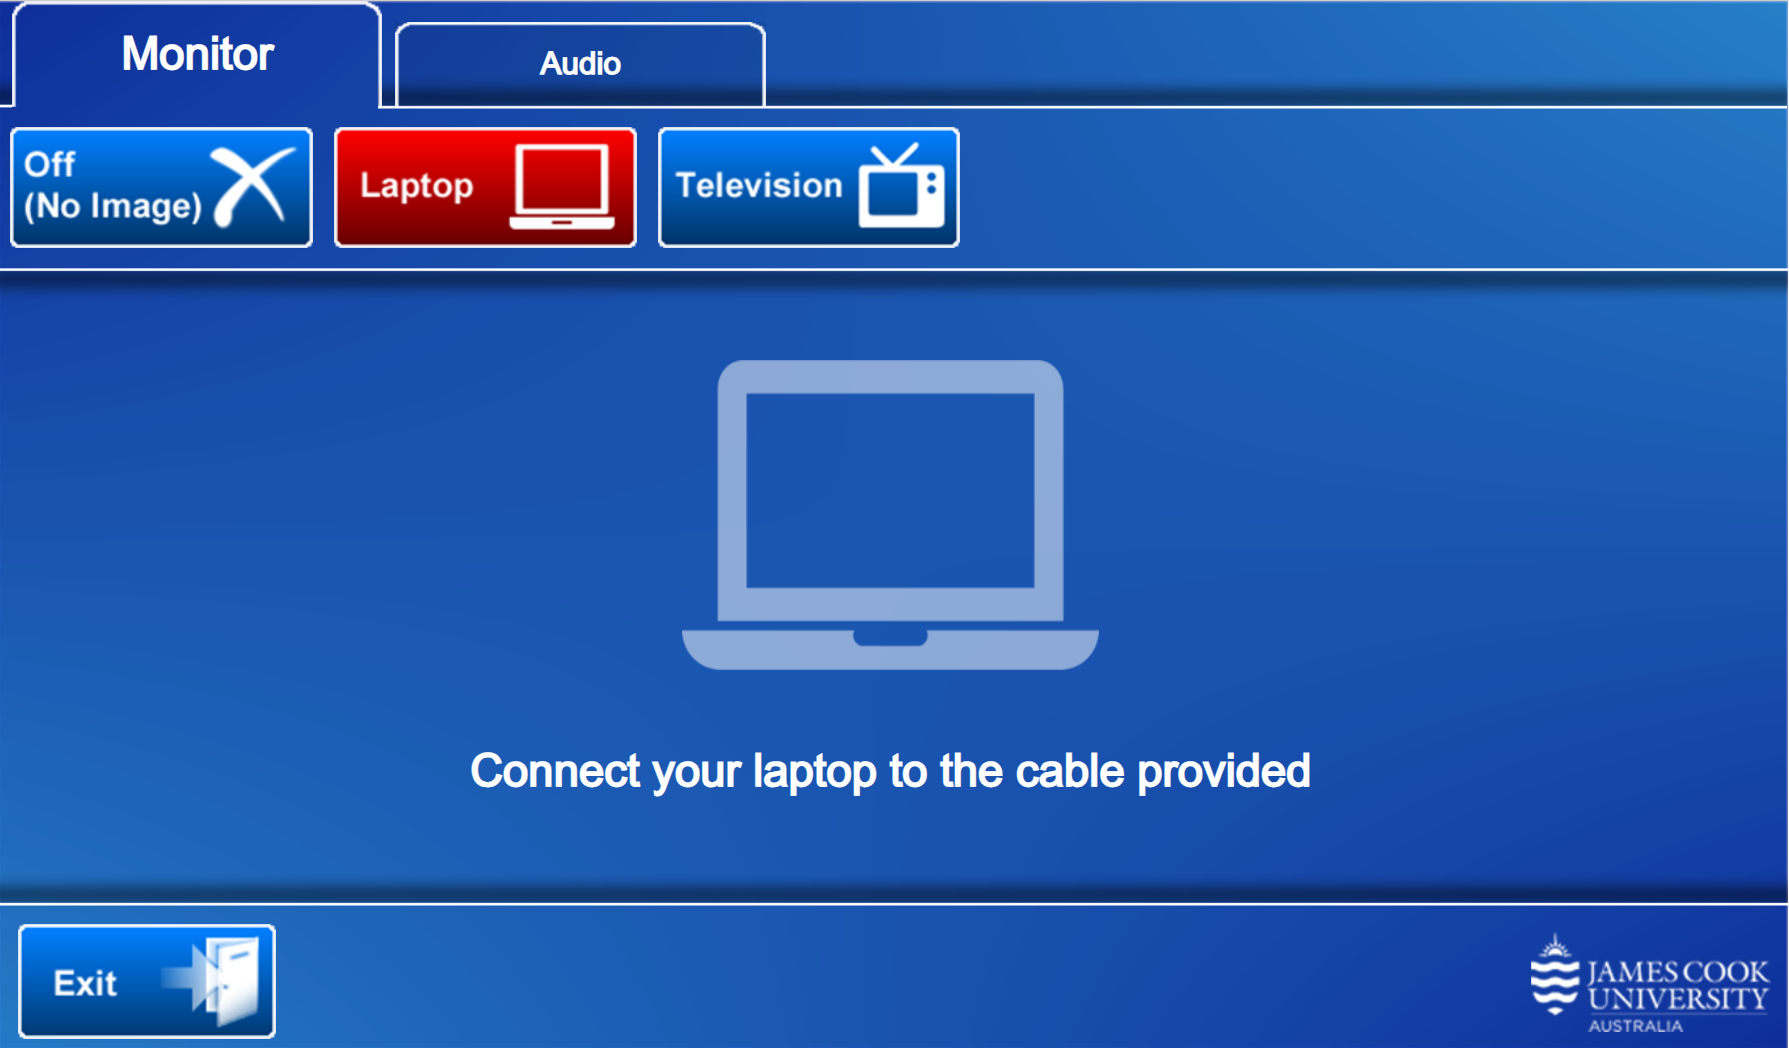
- Connect the laptop by the provided HDMI cable
- Ensure the laptop display is set to duplicate
- Touch the Laptop button
- Touch the Television button
- Select a FTA channel from the touch panel station matrix
- Touch the Audio tab
- Touch and slide the Monitor Volume button to adjust the audio level
- Touch Monitor Sound On or Off as required
Turn off the AV system when not in use.
Touch panel operation
Equipment
- AV presenter mini PC
- Flat panel display
- Hearing assist infrared
- Presenter camera HD
- Speakers
- Touch panel for AV control
- Wireless microphones
- Wireless BYOD presenter
Operation
- Displays - show presentation on large flat panel display
- Preview - show presentation on preview monitor
- Audio - adjust microphone voice uplift and presentation playback volume
- Exit - turn off the AV system

Presentation
- Off (No image) - show nothing on the display system.
- Computer - show the PC.
- Laptop- show a laptop connected by cable
- Kramer Via - show the instructions for how to connect a BYOD (wireless laptop, tablet, smart phone) to the AV system.
Take note of the Room Name (IP address) and Code shown. Peruse this guide for further instructions on how to connect.
- Touch and slide the Microphone 1 button to adjust the room voice uplift for the wireless handheld microphone
- Touch and slide the Microphone 2 button to adjust the room voice uplift for the wireless lapel microphone
- Touch and slide the Program Audio button to adjust the playback volume of the PC and laptop
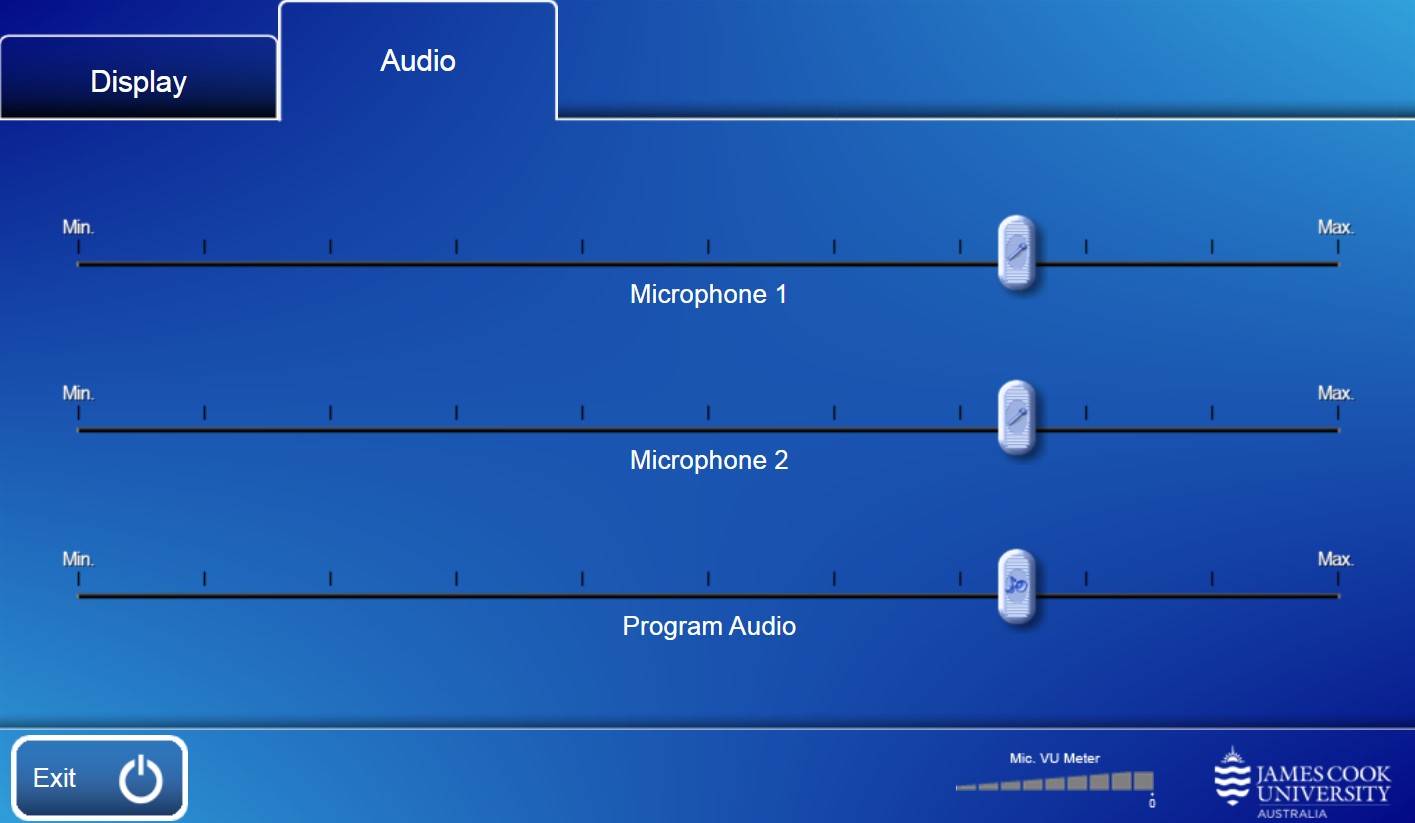
Mic VU Meter - the meter moves to show the microphone is active and at what level.
Touch panel operation
Equipment
- AV presenter mini PC
- Document camera
- Flat panel displays
- Hearing assist infrared
- Lecture capture recorder
- Preview monitor
- Touch panel for AV control
- Wireless BYOD presenter
- Wireless microphones
- Zoom control Logitech tap
Operation
- Displays - show presentation on flat panel displays
- Preview - show presentation on preview monitor
- Maker Studio (formerly Project Space) - share presentation to Maker Studio, room 506-003
- Audio - adjust microphone voice uplift and presentation playback volume
- Exit - turn off the AV system
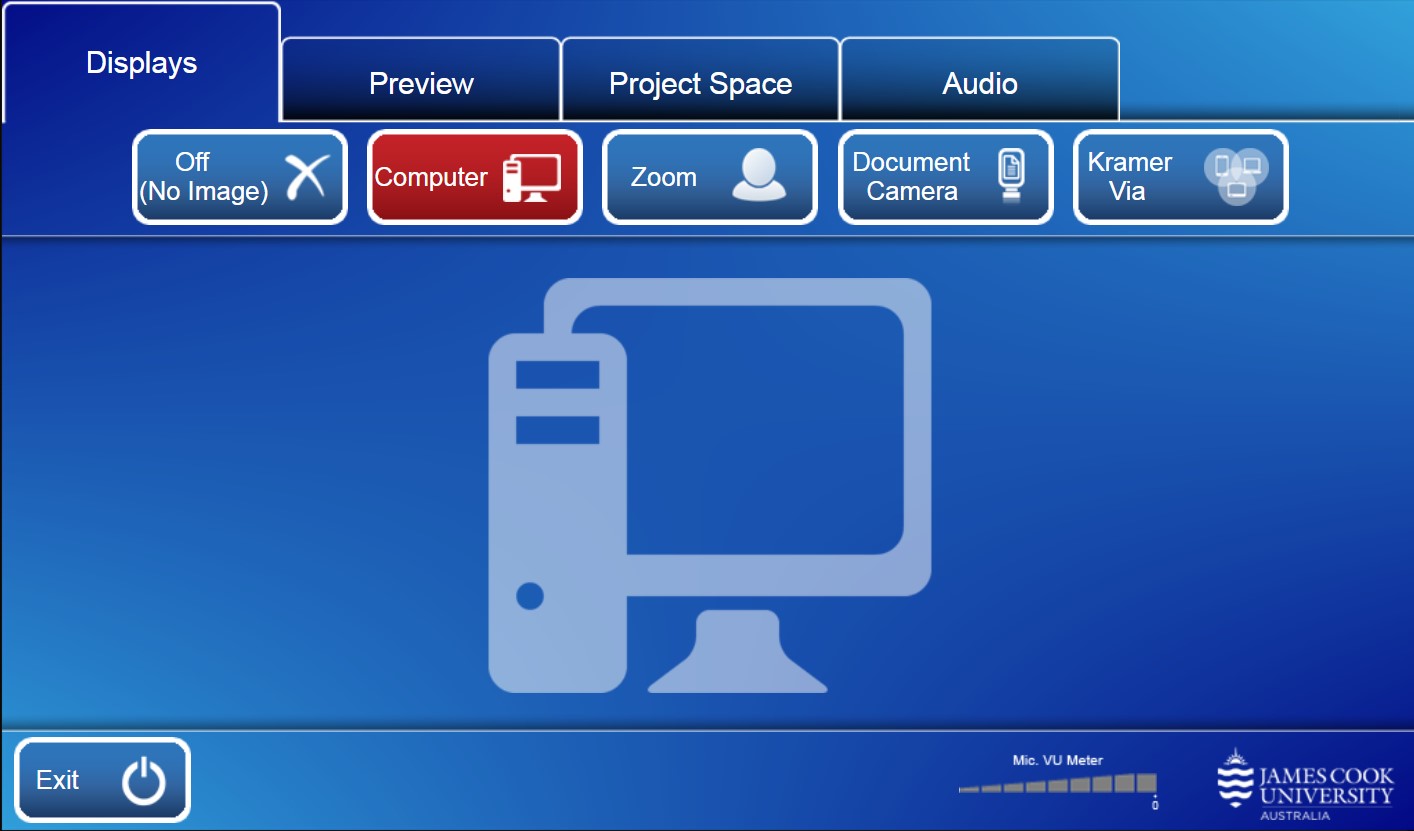
Presentation
- Off (No image) - show nothing on the display system.
- Computer - show the desktop PC.
- Zoom - show a presentation while in a Zoom meeting
- Document Camera - show object or document
- Kramer Via - show the instructions for how to connect a BYOD (wireless laptop, tablet, smart phone) to the AV system.
Take note of the Room Name (IP address) and Code shown. Peruse this guide for further instructions on how to connect.
- Touch and slide the Microphone 1 button to adjust the room voice uplift for the wireless handheld microphone
- Touch and slide the Microphone 2 button to adjust the room voice uplift for the wireless lapel microphone
- Touch and slide the Program Audio button to adjust the playback volume of the PC and laptop
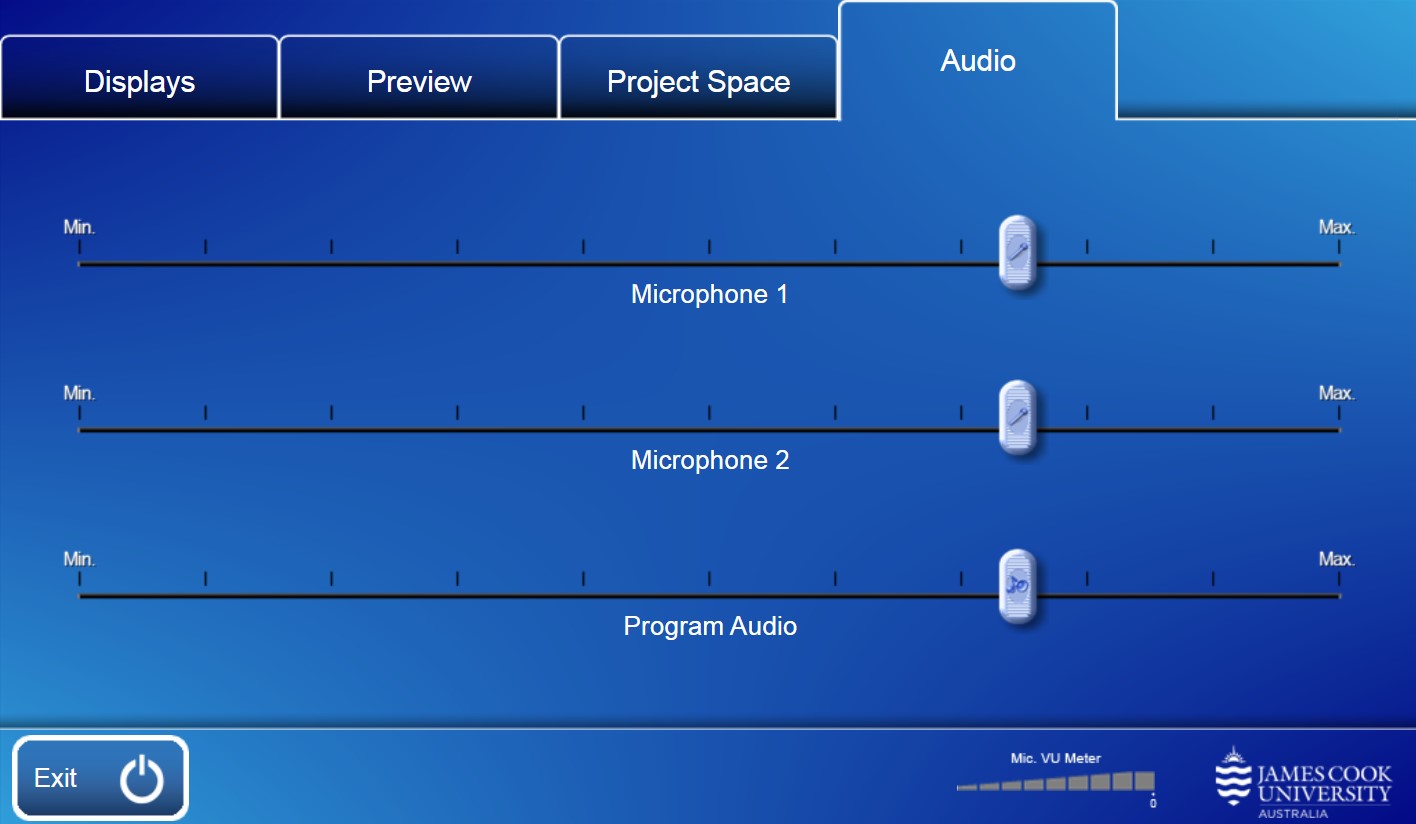
Mic VU Meter - the meter moves to show the microphone is active and at what level.
- Zoom meetings are automatically connected provided the host has invited the Outlook Calendar resource TSV-506-002@jcu.edu.au to the event.
- The Zoom interface is a Logitech Tap, which is used for connecting manually to a Zoom meeting and for making adjustments to the camera.
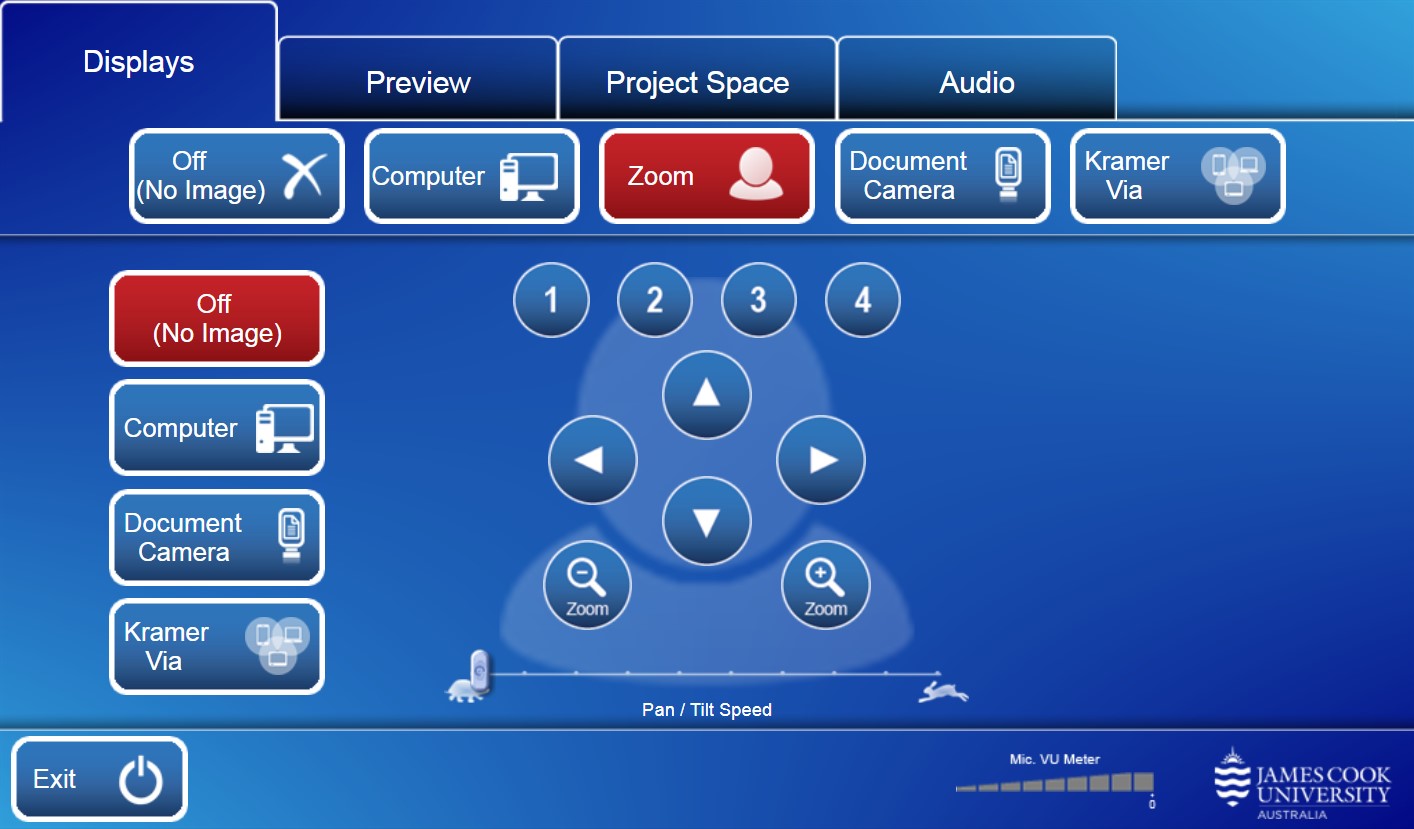
Touch panel operation
Equipment
- AV presenter mini PC
- Ceiling microphones
- Document camera
- Flat panel display
- Hearing assist infrared
- Presenter camera HD
- Preview monitor
- Touch panel for AV control
- Wireless BYOD presenter
Operation
- Displays - show presentation on flat panel displays
- Preview - show presentation on preview monitor
- Maker Studio (formerly Project Space) - share presentation to Maker Studio, room 506-003
- Audio - adjust microphone voice uplift and presentation playback volume
- Exit - turn off the AV system
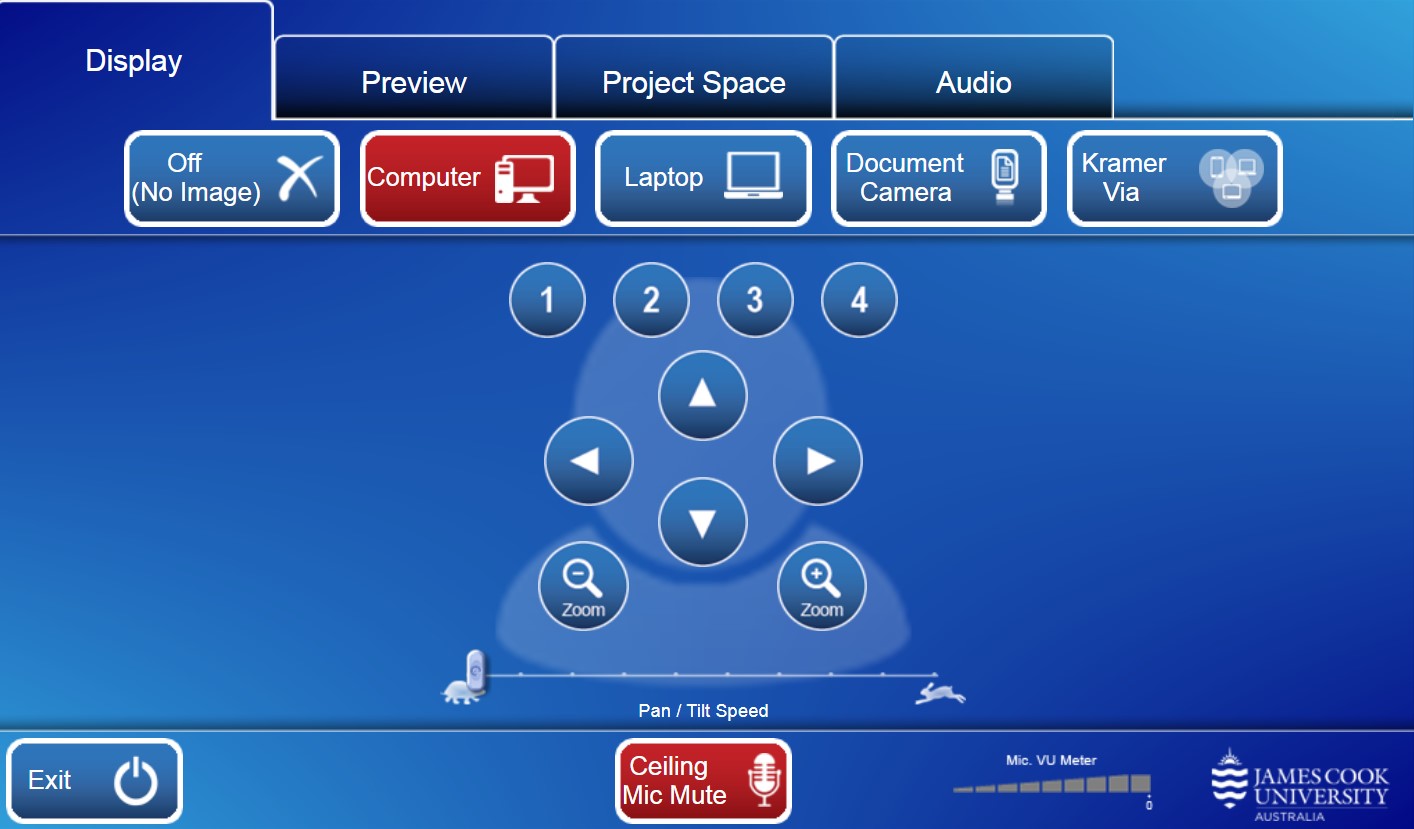
Presentation
- Off (No image) - show nothing on the display system.
- Computer - show the PC.
- Laptop - show laptop connected by cable
- Document Camera - show object or document
- Kramer Via - show the instructions for how to connect a BYOD (wireless laptop, tablet, smart phone) to the AV system.
Take note of the Room Name (IP address) and Code shown. Peruse this guide for further instructions on how to connect.
- Touch and slide the Program Audio button to adjust the playback volume of the PC and laptop
- For privacy reasons, touch the Ceiling Mic Mute button
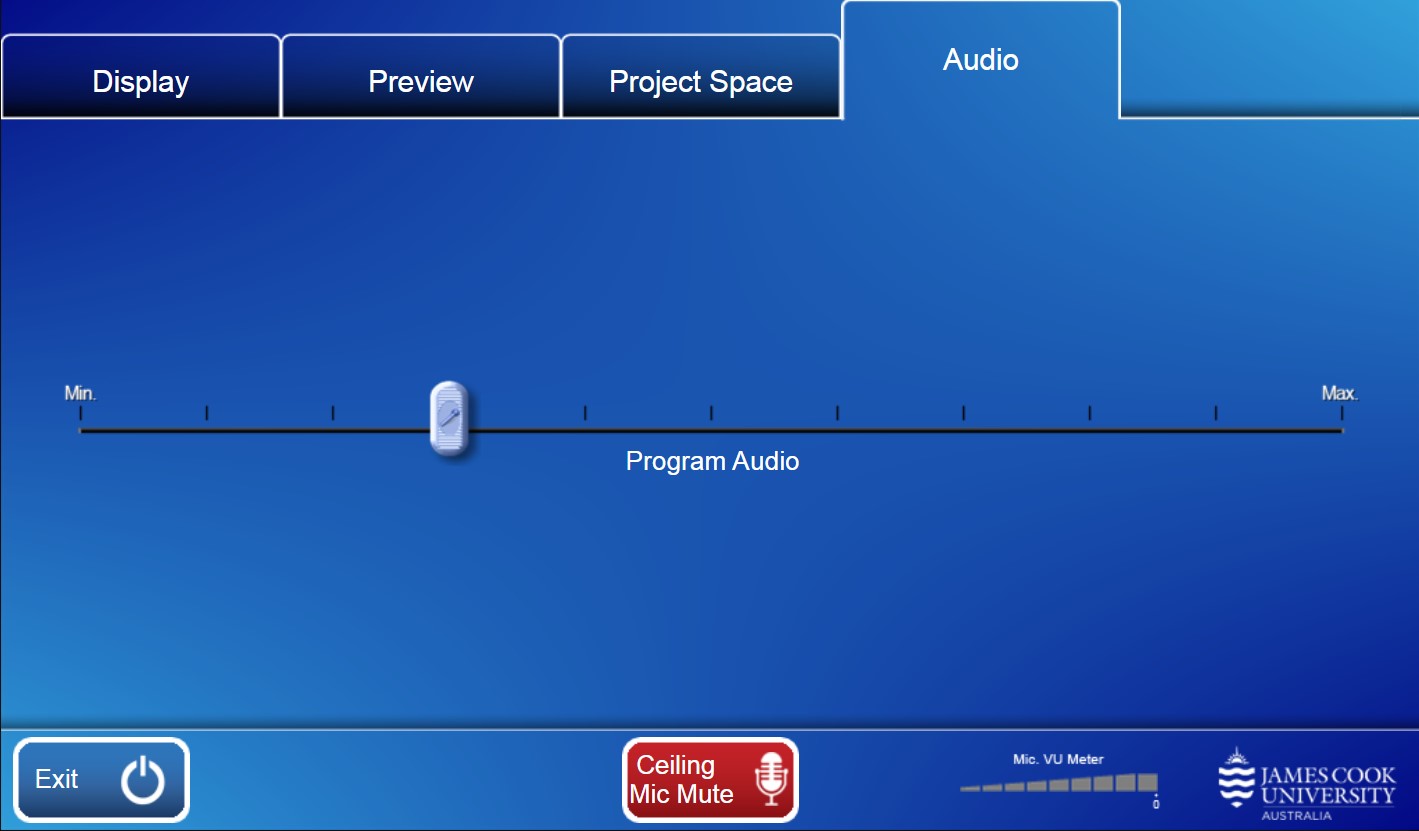
Mic VU Meter - the meter moves to show the microphone is active and at what level.
Touch panel operation
Equipment
- AV presenter mini PC
- Document camera
- Flat panel displays
- Hearing assist infrared
- Lecture capture recorder
- Microscope
- Presenter camera HD
- Preview monitor
- Touch panel for all AV control
- Wireless microphones
- Wireless BYOD presenter
Operation
- Displays - show presentation on flat panel displays
- Preview - show presentation on preview monitor
- Maker Studio (formerly Project Space) - share presentation to Maker Studio, room 506-003
- Audio - adjust microphone voice uplift and presentation playback volume
- Exit - turn off the AV system
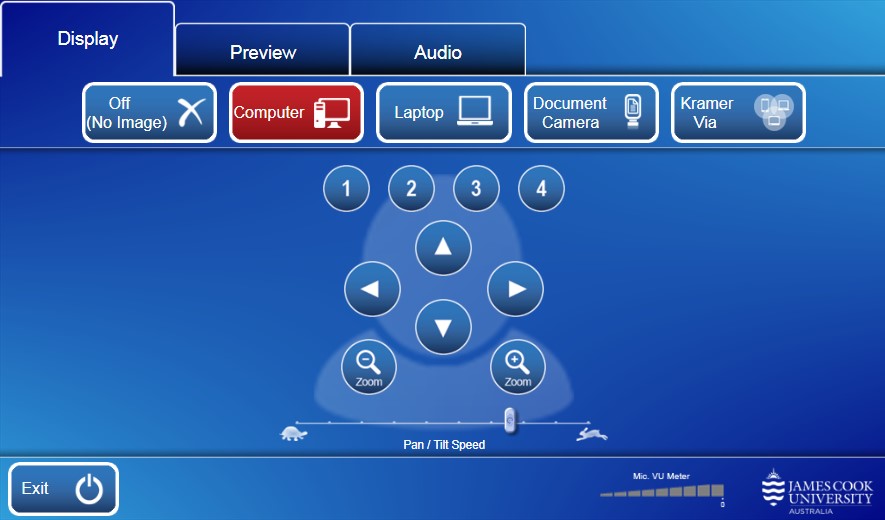
Presentation
- Off (No image) - show nothing on the display system.
- Computer - show the PC.
- Laptop - show laptop connected by cable
- Document Camera - show object or document
- Kramer Via - show the instructions for how to connect a BYOD (wireless laptop, tablet, smart phone) to the AV system.
Take note of the Room Name (IP address) and Code shown. Peruse this guide for further instructions on how to connect.
- Touch and slide the Microphone 1 button to adjust the room voice uplift for the wireless handheld microphone
- Touch and slide the Microphone 2 button to adjust the room voice uplift for the wireless lapel microphone
- Touch and slide the Program Audio button to adjust the playback volume of the PC and laptop
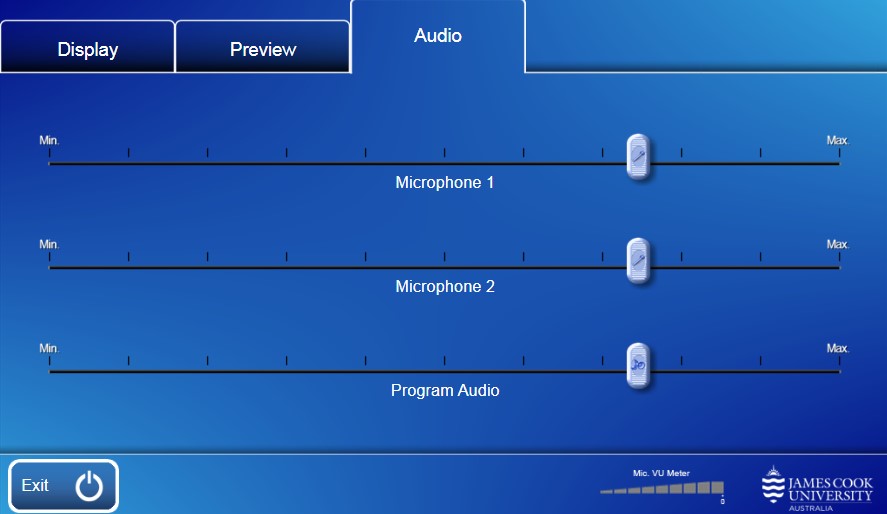
Mic VU Meter - the meter moves to show the microphone is active and at what level.
- Zoom meetings are automatically connected provided the host has invited the Outlook Calendar resource
TSV-506-002@jcu.edu.au to the event. - The Zoom interface is a Logitech Tap, which is used for connecting manually to a Zoom meeting and for making adjustments to the camera.
Touch panel operation
Equipment
- AV presenter mini PC
- Document camera
- Flat panel displays
- Hearing assist infrared
- Presenter camera HD
- Preview monitor
- Touch panel for AV control
- Wireless microphones
- Wireless BYOD presenter
Operation
- Front Displays - show presentation on flat panel displays at the front
- Back Displays - show presentation on flat panel displays at the back
- Preview - show presentation on preview monitor
- Audio - adjust microphone voice uplift and presentation playback volume
- Exit - turn off the AV system
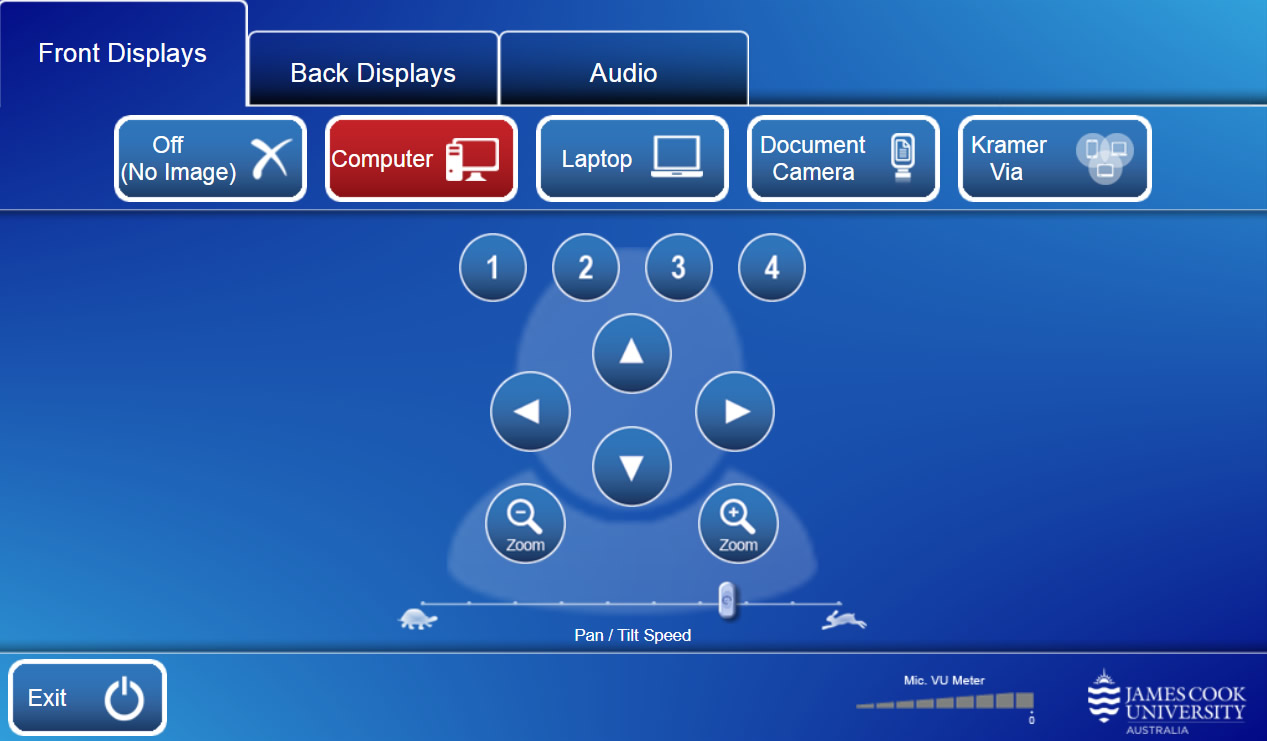
Presentation
- Off (No image) - show nothing on the display system.
- Computer - show the PC.
- Laptop - show laptop connected by cable
- Document Camera - show object or document
- Kramer Via - show the instructions for how to connect a BYOD (wireless laptop, tablet, smart phone) to the AV system.
Take note of the Room Name (IP address) and Code shown. Peruse this guide for further instructions on how to connect.
Audio must be routed to the same set of displays where the presentation is shown
- Touch and slide the Microphone 1 button to adjust the room voice uplift for the wireless handheld microphone
- Touch and slide the Microphone 2 button to adjust the room voice uplift for the wireless lapel microphone
- Touch and slide the Program Audio button to adjust the playback volume of the PC and laptop
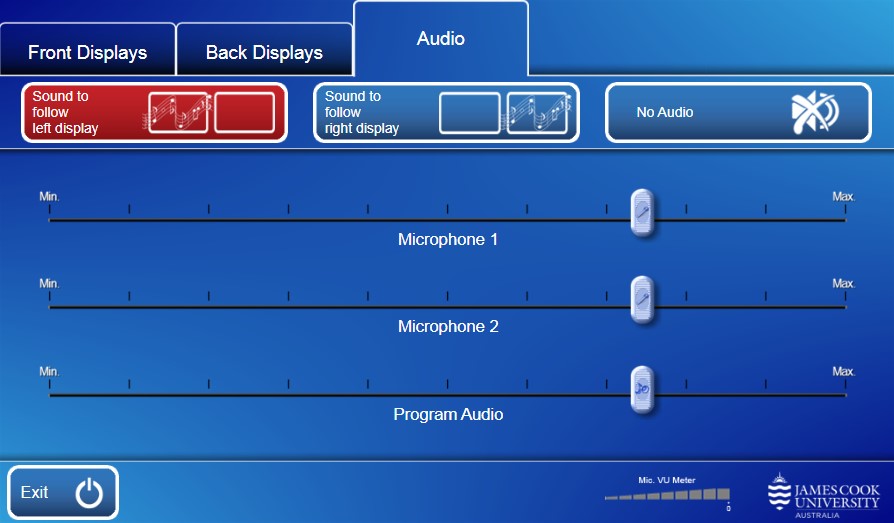
Mic VU Meter - the meter moves to show the microphone is active and at what level.
Touch panel operation
Equipment
- AV presenter mini PC
- Flat panel display
- Preview monitor
- Soundbar & camera
- Touch panel for AV control
- Wireless microphones
- Wireless BYOD presenter
Operation
- Display- show presentation on flat panel display
- Audio - adjust microphone voice uplift and presentation playback volume
- Exit - turn off the AV system

Presentation
- Off (No image) - show nothing on the display system.
- Computer - show the PC.
- Computer Display 2 - show
- Computer Ctrl Room - show
- Kramer Via - show the instructions for how to connect a BYOD (wireless laptop, tablet, smart phone) to the AV system.
Take note of the Room Name (IP address) and Code shown. Peruse this guide for further instructions on how to connect.
- Touch and slide the Program Audio button to adjust the playback volume of the PC and laptop
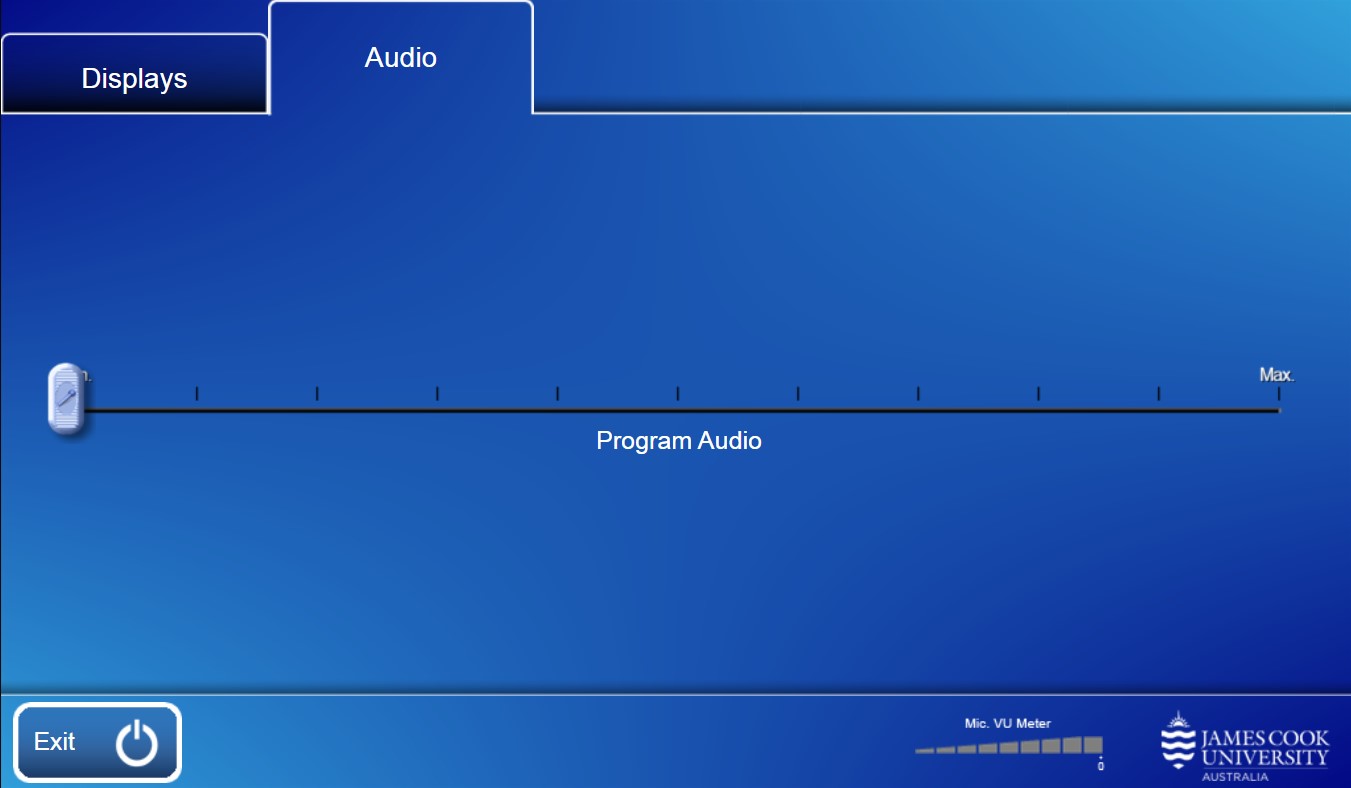
Mic VU Meter - the meter moves to show the microphone is active and at what level.
Touch panel operation
Equipment
- AV presenter mini PC
- Flat panel display
- Presenter camera HD
- Preview monitor
- Touch panel for AV control
Operation
- Display 1 - show presentation on flat panel display 1
- Display 2- show presentation on flat panel display 2
- Display 3 - how presentation on flat panel display 3
- Audio - adjust microphone voice uplift and presentation playback volume
- Exit - turn off the AV system
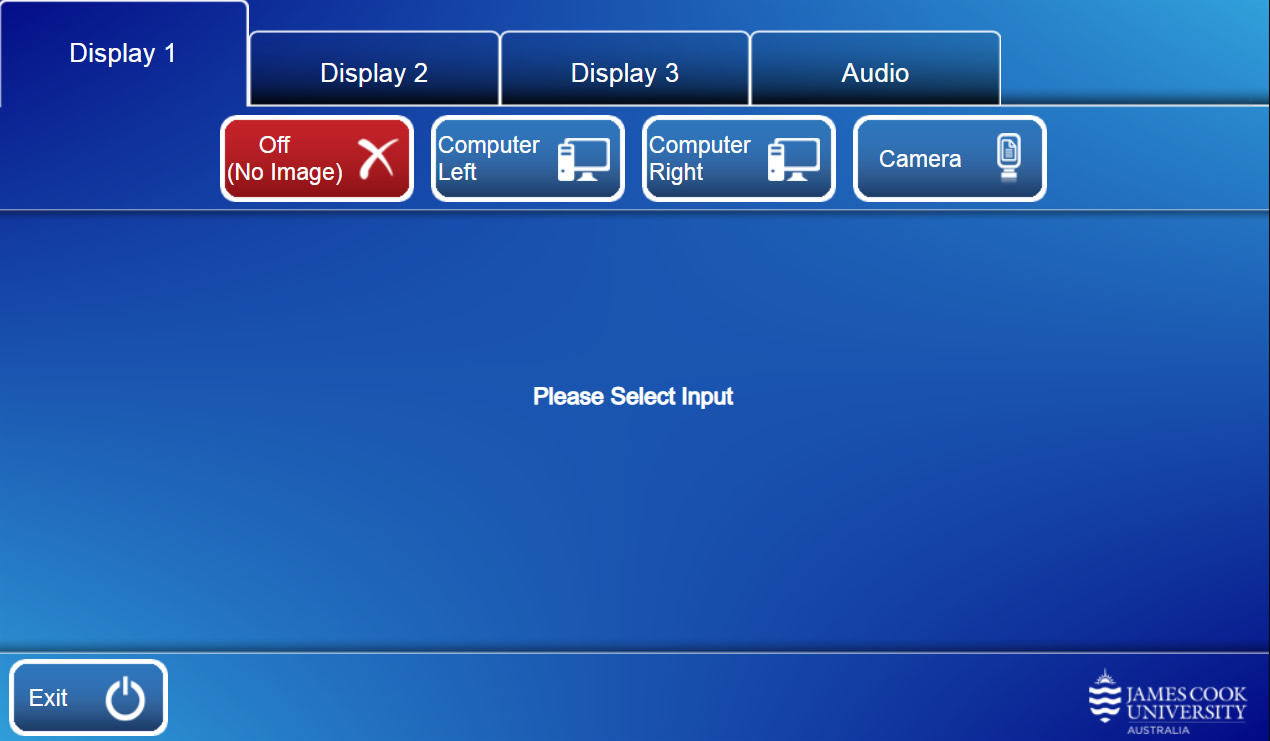
Presentation
- Off (No image) - show nothing
- Computer Left - show the left PC
- Computer Right - show the right PC
- Camera - adjust and show PTZ camera
- Touch and slide the Program Audio button to adjust the playback volume of the PC and laptop
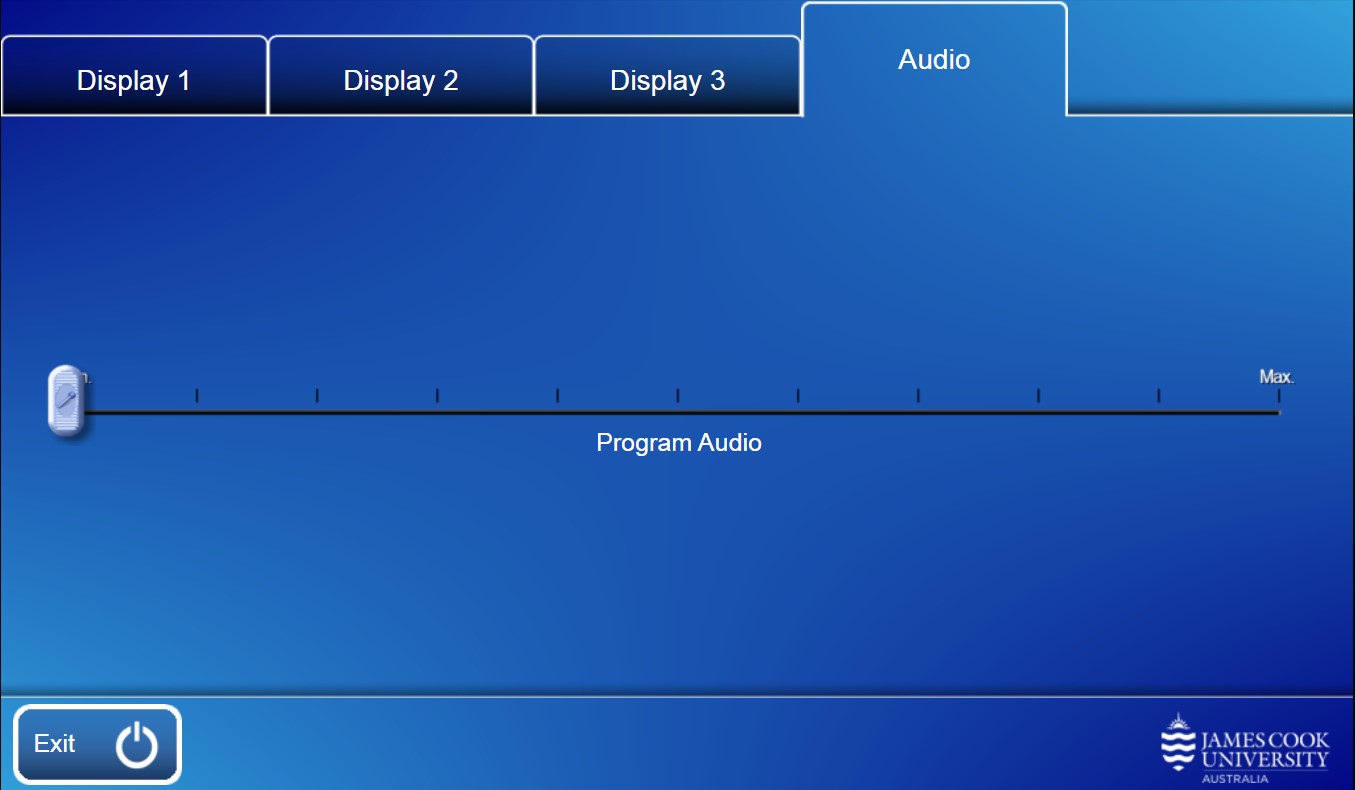
Touch panel operation
Equipment
- AV presenter mini PC
- Document camera
- Flat panel display
- Hearing assist infrared
- Lecture capture recorder
- Presenter camera HD
- Preview monitor
- Touch panel for AV control
- Video conference Zoom Room
- Wireless microphones
- Wireless BYOD presenter
- Zoom control Logitech tap
Operation
- Displays - show presentation on flat panel displays
- Preview - show presentation on preview monitor
- Audio - adjust microphone voice uplift and presentation playback volume
- Exit - turn off the AV system
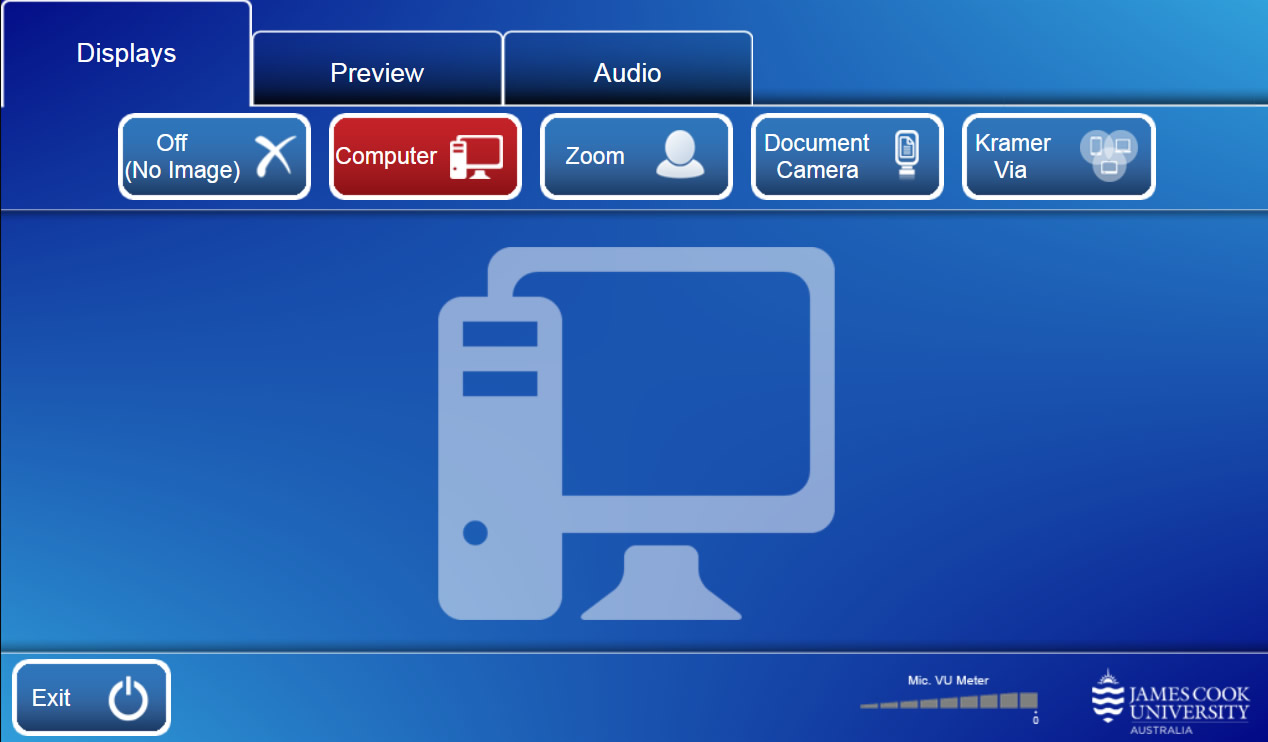
Presentation
- Off (No image) - show nothing on the display system
- Computer - show the PC
- Zoom - select a media source to share in a zoom meeting
- Document camera -show an object or document
- Kramer Via - show the instructions for how to connect a BYOD (wireless laptop, tablet, smart phone) to the AV system
Take note of the Room Name (IP address) and Code shown. Peruse this guide for further instructions on how to connect
- Touch and slide the Microphone 1 button to adjust the room voice uplift for the wireless handheld microphone
- Touch and slide the Microphone 2 button to adjust the room voice uplift for the wireless lapel microphone
- Touch and slide the Program Audio button to adjust the playback volume of the PC and laptop
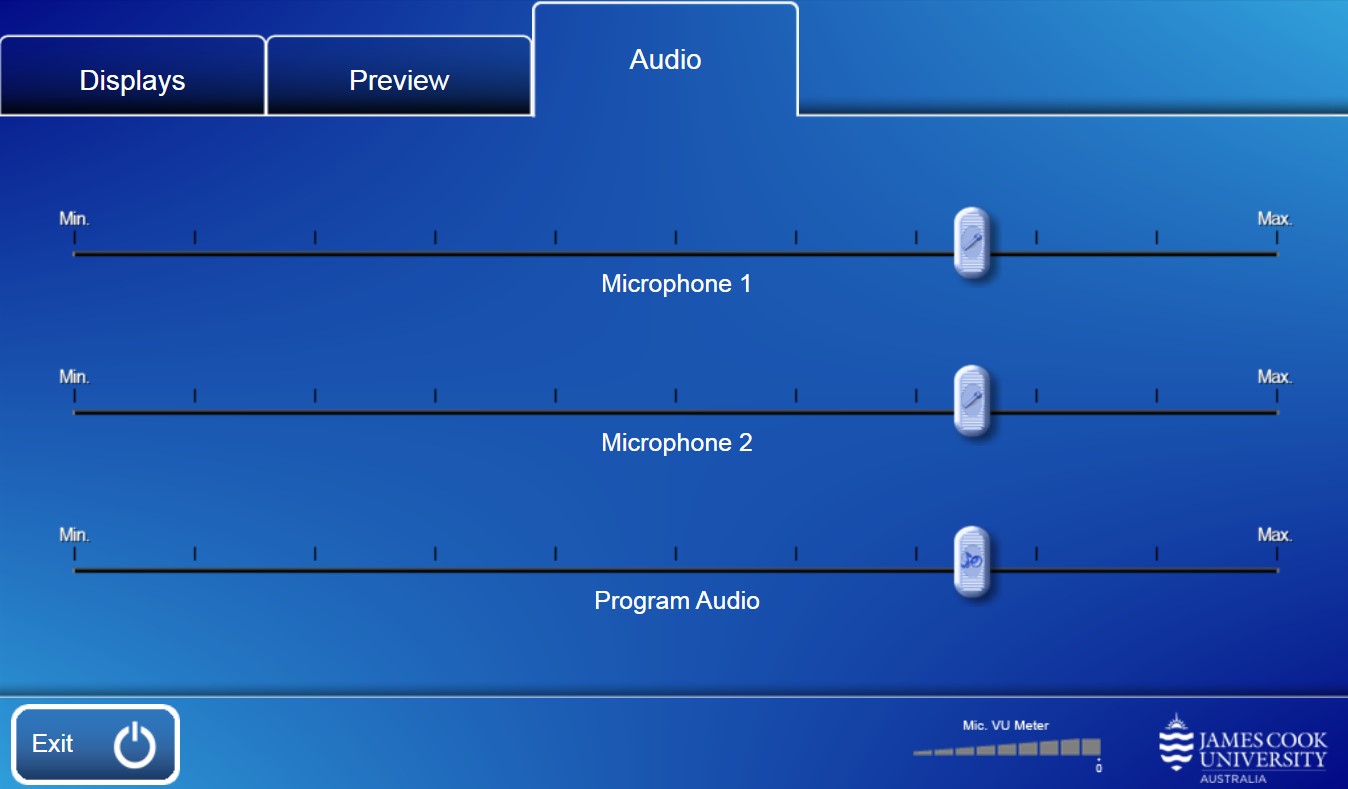
Mic VU Meter - the meter moves to show the microphone is active and at what level.
- Zoom meetings are automatically connected provided the host has invited the Outlook Calendar resource TSV-506-021@jcu.edu.au to the event.
- The Zoom interface is a Logitech Tap, which is used for connecting manually to a Zoom meeting and for making adjustments to the camera.
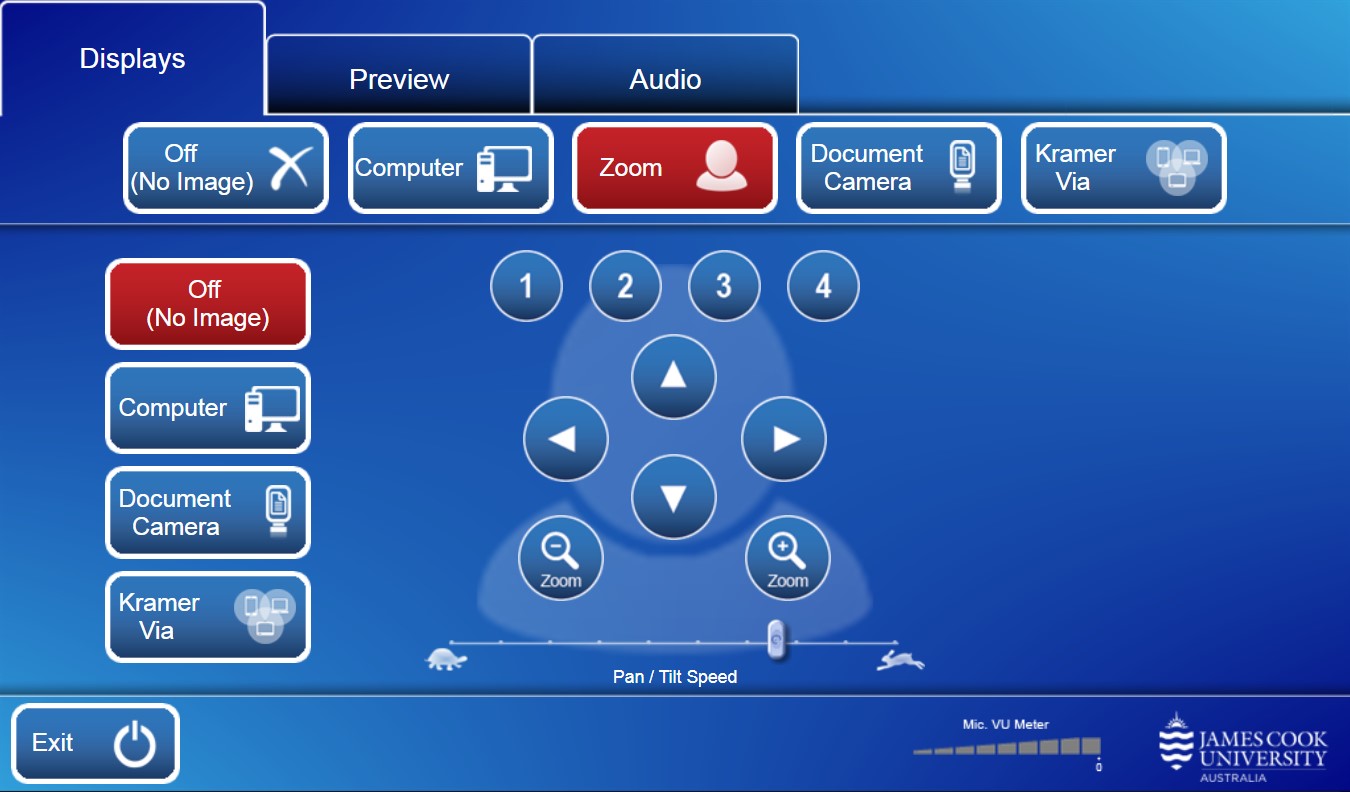
Touch panel operation
Equipment
- AV presenter mini PC
- Document camera
- Flat panel display
- Hearing assist infrared
- Lecture capture recorder
- Presenter camera HD
- Preview monitor
- Touch panel for AV control
- Video conference Zoom Room
- Wireless microphones
- Wireless BYOD presenter
- Zoom control Logitech tap
Operation
- Display - show presentation on flat panel displays
- Preview - show presentation on preview monitor
- Audio - adjust microphone voice uplift and presentation playback volume
- Exit - turn off the AV system
Presentation
- Off (No image) - show nothing on the display system
- Computer - show the PC
- Zoom - select a media source to share in a zoom meeting
- Document camera -show an object or document
- Kramer Via - show the instructions for how to connect a BYOD (wireless laptop, tablet, smart phone) to the AV system
Take note of the Room Name (IP address) and Code shown. Peruse this guide for further instructions on how to connect
- Touch and slide the Microphone 1 button to adjust the room voice uplift for the wireless handheld microphone
- Touch and slide the Microphone 2 button to adjust the room voice uplift for the wireless lapel microphone
- Touch and slide the Program Audio button to adjust the playback volume of the PC and laptop
Mic VU Meter - the meter moves to show the microphone is active and at what level.
- Zoom meetings are automatically connected provided the host has invited the Outlook Calendar resource TSV-506-021@jcu.edu.au to the event.
- The Zoom interface is a Logitech Tap, which is used for connecting manually to a Zoom meeting and for making adjustments to the camera.
Touch panel operation
Equipment
- AV presenter mini PC
- Document camera
- Flat panel displays
- Hearing assist infrared
- Lecture capture recorder
- Microphone ceiling mounted
- Presenter camera HD
- Preview monitor
- Touch panel for AV control
- Wireless BYOD presenter
Operation
- Displays - show presentation on flat panel displays
- Preview - show presentation on preview monitor
- Audio - adjust presentation playback volume
- Exit - turn off the AV system
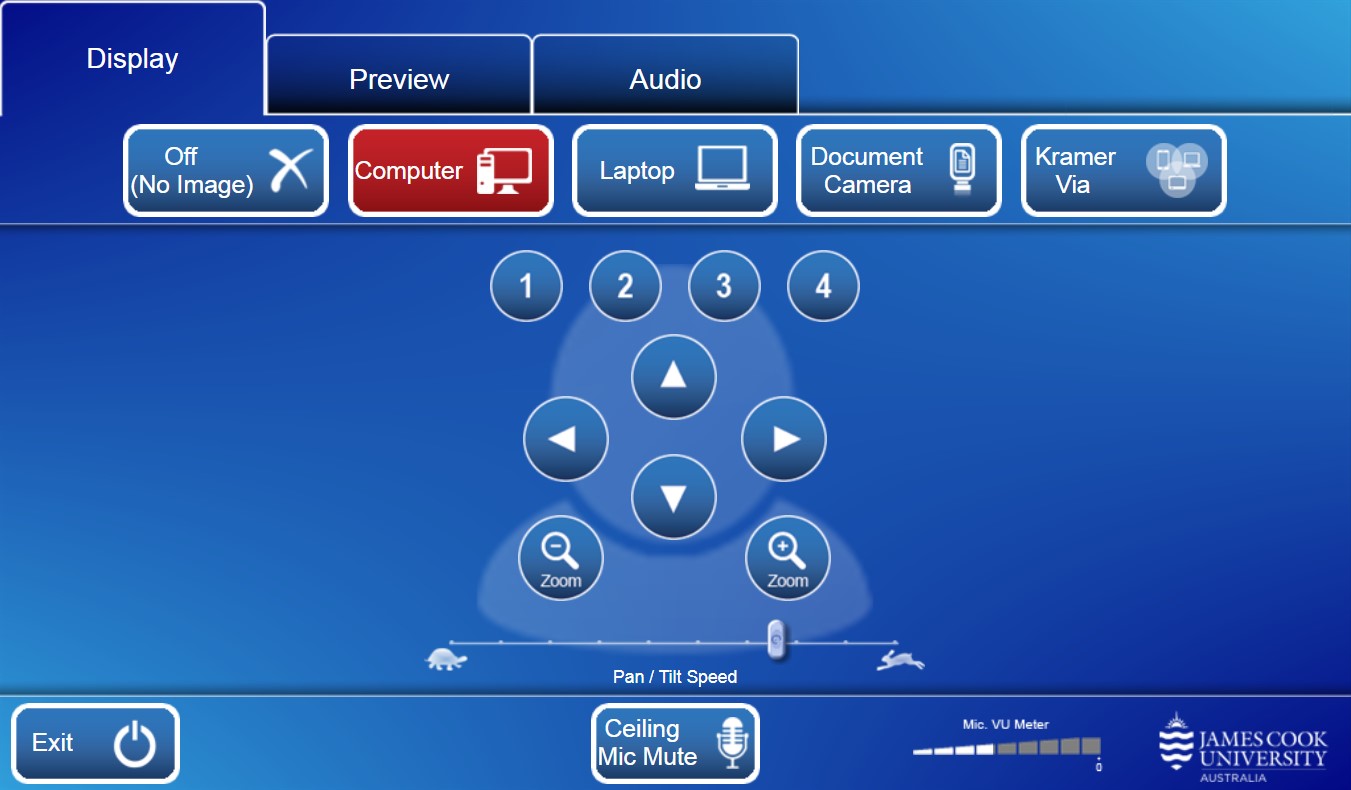
Presentation
- Off (No image) - show nothing on the display system.
- Computer - show the PC.
- Laptop - show laptop connected by cable
- Document Camera - show object or document
- Kramer Via - show the instructions for how to connect a BYOD (wireless laptop, tablet, smart phone) to the AV system.
Take note of the Room Name (IP address) and Code shown. Peruse this guide for further instructions on how to connect.
- Touch and slide the Program Audio button to adjust the playback volume of the PC and laptop
- For privacy reasons, touch the Ceiling Mic Mute button
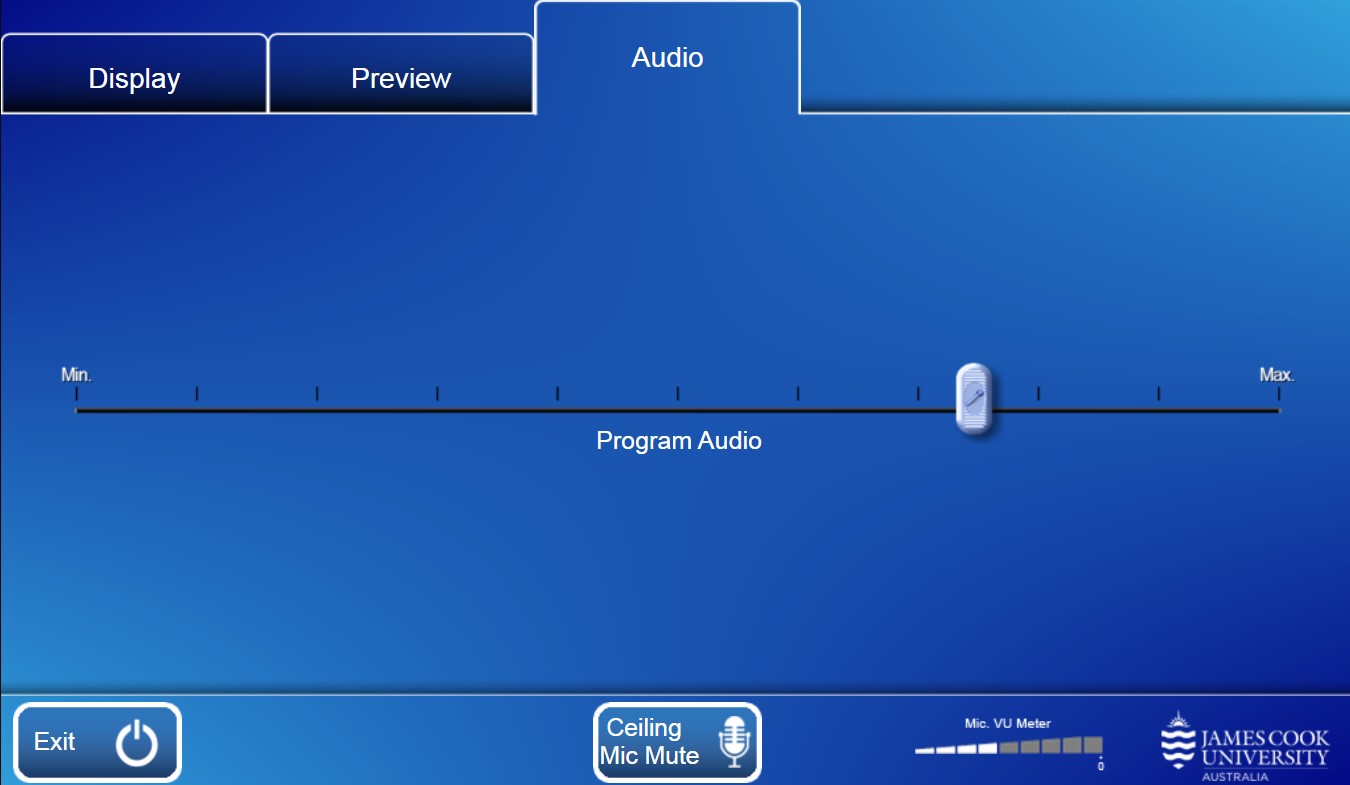
Mic VU Meter - the meter moves to show the microphone is active and at what level.
Touch panel operation
Equipment
- AV presenter mini PC
- Document camera
- Flat panel display
- Hearing assist infrared
- Lecture capture recorder
- Presenter camera HD
- Preview monitor
- Touch panel for AV control
- Video conference Zoom Room
- Wireless microphones
- Wireless BYOD presenter
- Zoom control Logitech tap
Operation
- Video Wall L - show presentation on left video wall
- Video Wall R - show presentation on right video wall
- Preview - show presentation on preview monitor
- Camera - select and adjust cameras
- Audio - adjust microphone voice uplift and presentation playback volume
- Exit - turn off the AV system
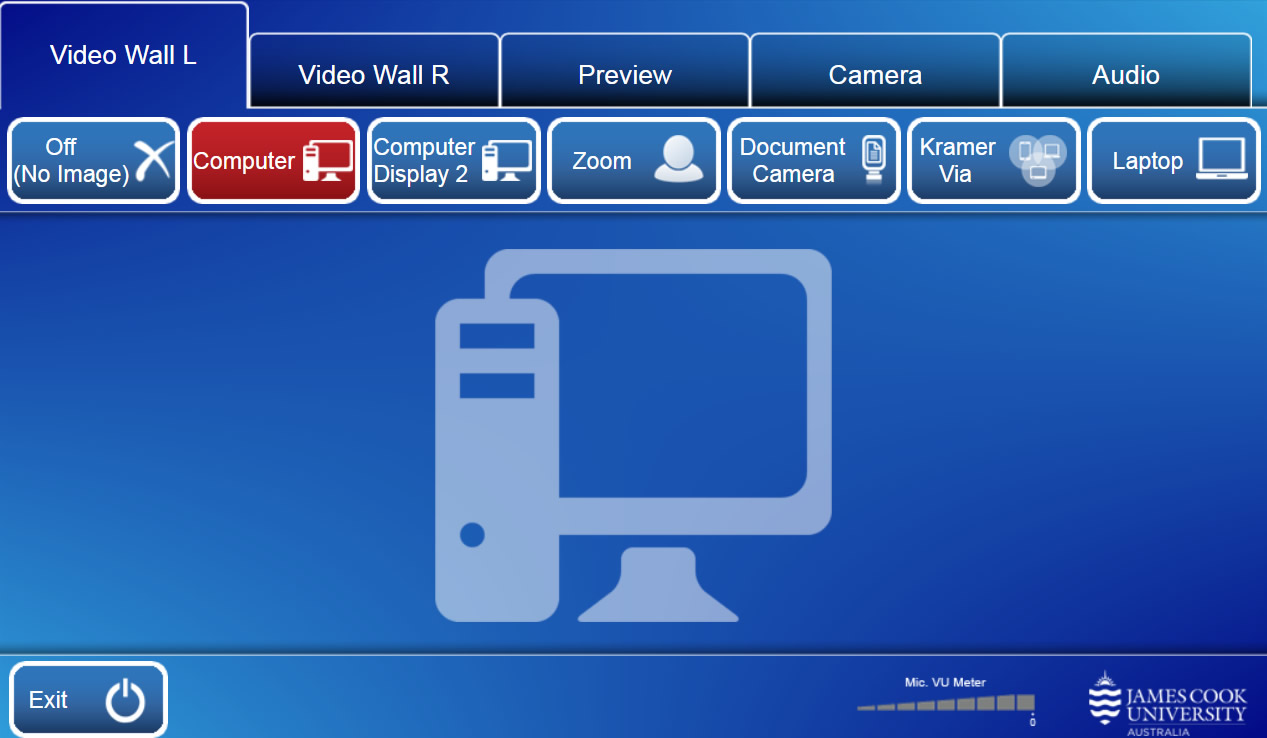
Presentation
- Off (No image) - show nothing on the display system
- Computer - show the left PC
- Computer Display 2 - show the right PC
- Zoom - select a media source to share in a zoom meeting
- Document camera - show an object or document
- Kramer Via - show the instructions for how to connect a BYOD (wireless laptop, tablet, smart phone) to the AV system
Take note of the Room Name (IP address) and Code shown. Peruse this guide for further instructions on how to connect - Laptop - show aa laptop connected by cable
Sound must be routed to (follow) the display where the presentation is shown
Touch and slide the Microphone 1 button to adjust the room voice uplift for the wireless handheld microphone on left lectern
Touch and slide the Microphone 2 button to adjust the room voice uplift for the wireless lapel microphone on left lectern
Touch and slide the Microphone 3 button to adjust the room voice uplift for the wireless handheld microphone on right lectern
Touch and slide the Microphone 4 button to adjust the room voice uplift for the wireless lapel microphone on right lectern
Touch and slide the Program Audio button to adjust the playback volume of the PC and laptop
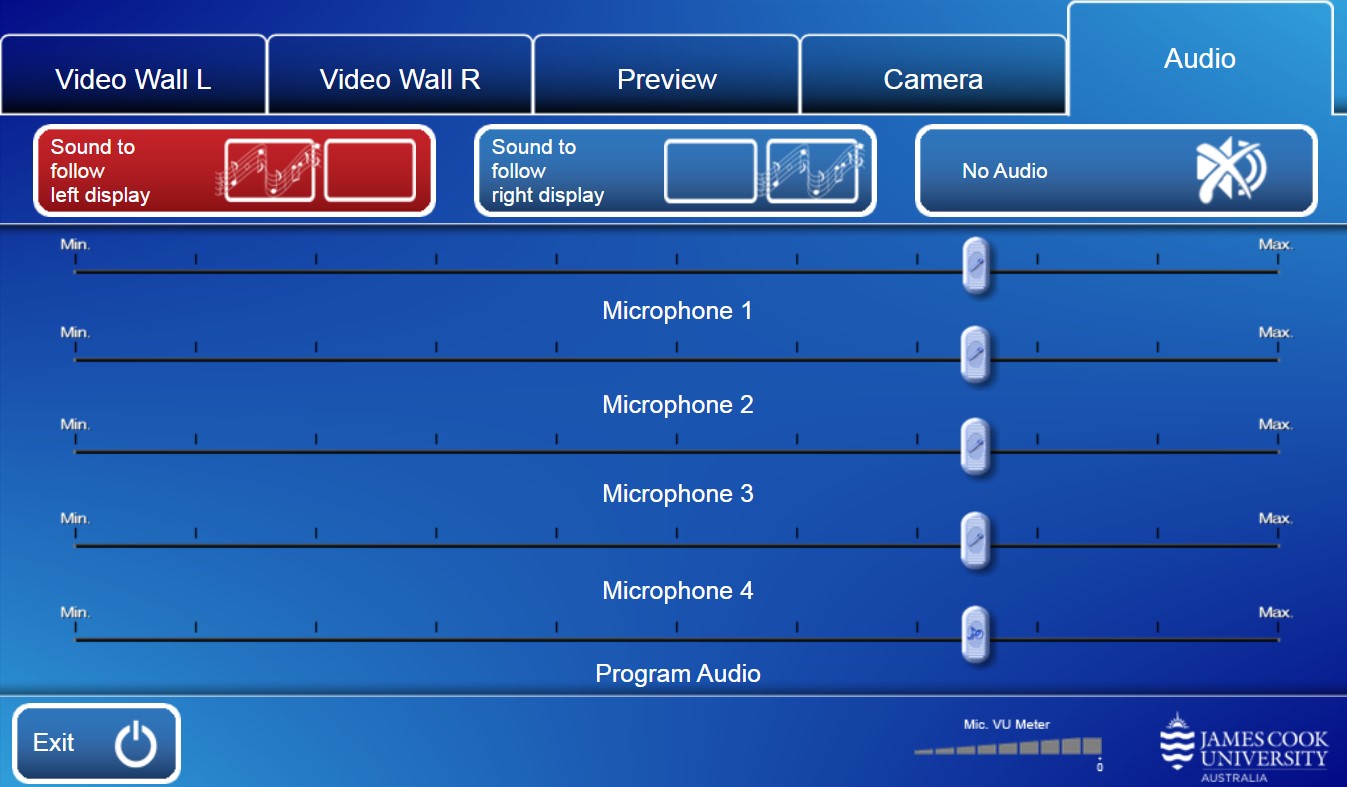
Mic VU Meter - the meter moves to show the microphone is active and at what level.
- Zoom meetings are automatically connected provided the host has invited the Outlook Calendar resource TSV-506-117N@jcu.edu.au to the event.
- The Zoom user interface is a Logitech Tap, which is used for connecting manually to a Zoom meeting and for making adjustments to the camera.
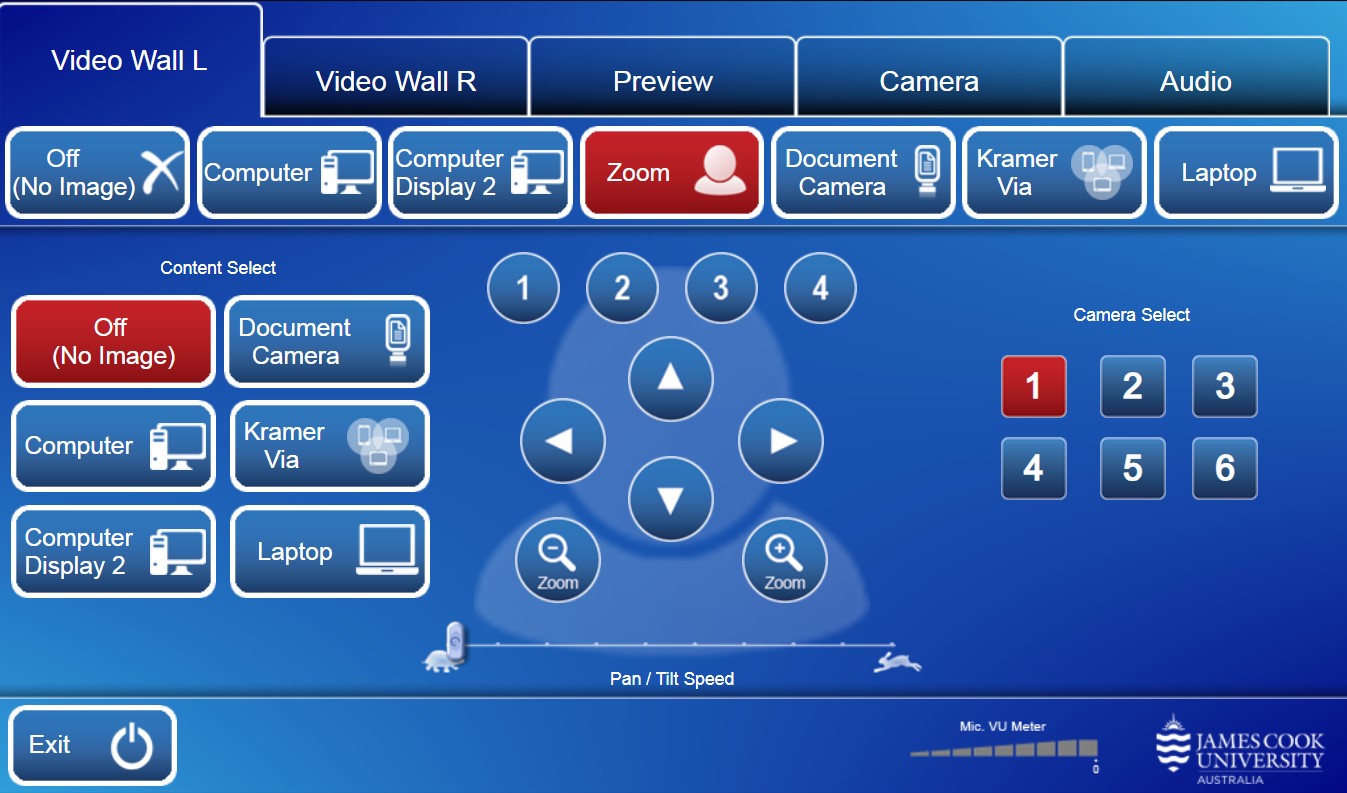
Touch panel operation
Equipment
- AV presenter mini PC
- Flat panel displays
- Hearing assist infrared
- Microphone ceiling mounted
- Presenter camera HD
- Touch panel for AV control
- Wireless BYOD presenter
Operation
- Exit - turn off the AV system
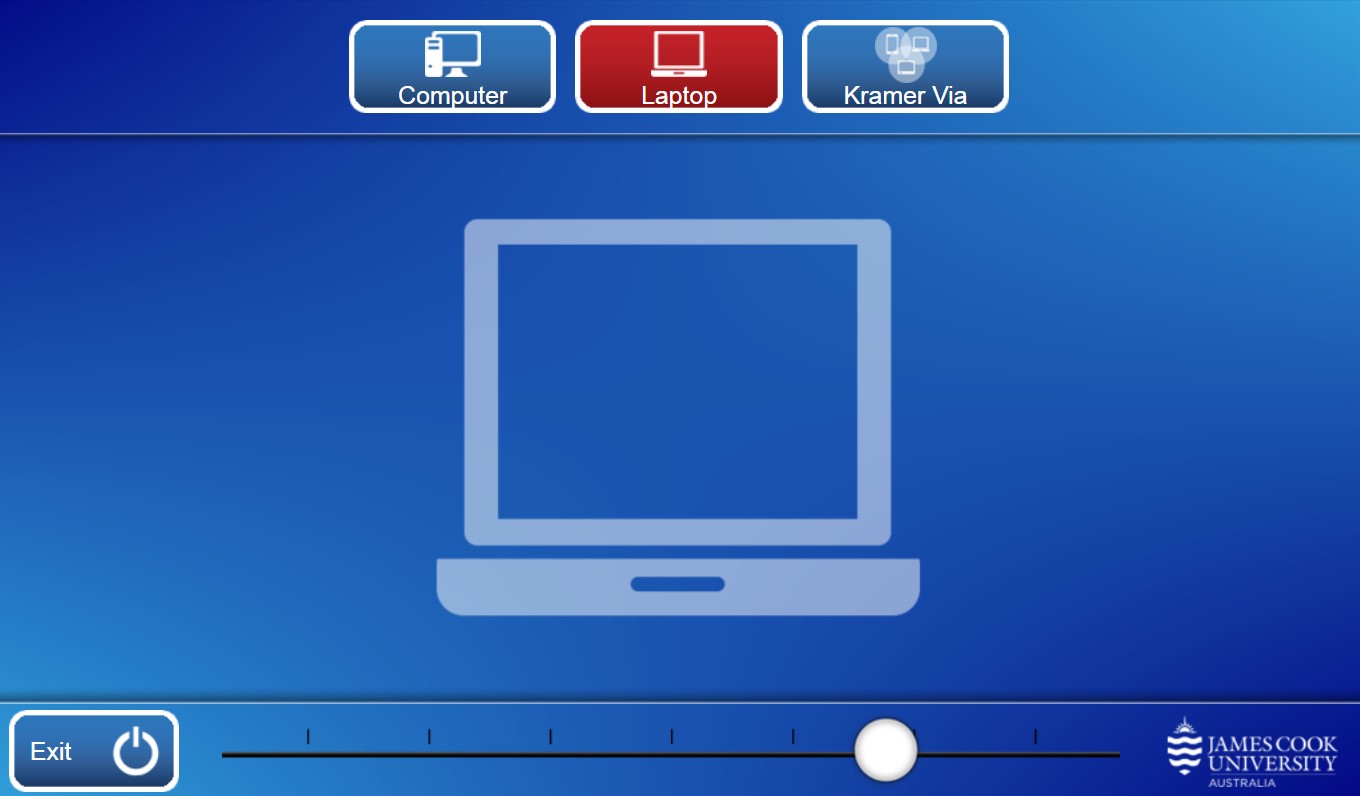
Presentation
- Computer - show the PC
- Laptop - show laptop connected by cable
- Kramer Via - show the instructions for how to connect a BYOD (wireless laptop, tablet, smart phone) to the AV system.
Take note of the Room Name (IP address) and Code shown. Peruse this guide for further instructions on how to connect. - Touch and slide the round button to adjust the volume
- Touch and slide the Program Audio button to adjust the playback volume of the PC and laptop
- For privacy reasons, touch the Ceiling Mic Mute button
Mic VU Meter - the meter moves to show the microphone is active and at what level.
Touch panel operation
Equipment
- AV presenter mini PC
- Flat panel displays
- Hearing assist infrared
- Microphone ceiling mounted
- Presenter camera HD
- Touch panel for AV control
- Wireless BYOD presenter
Operation
- Multipurpose camera control - pan, tilt, zoom and presets
- Exit - turn off the AV system
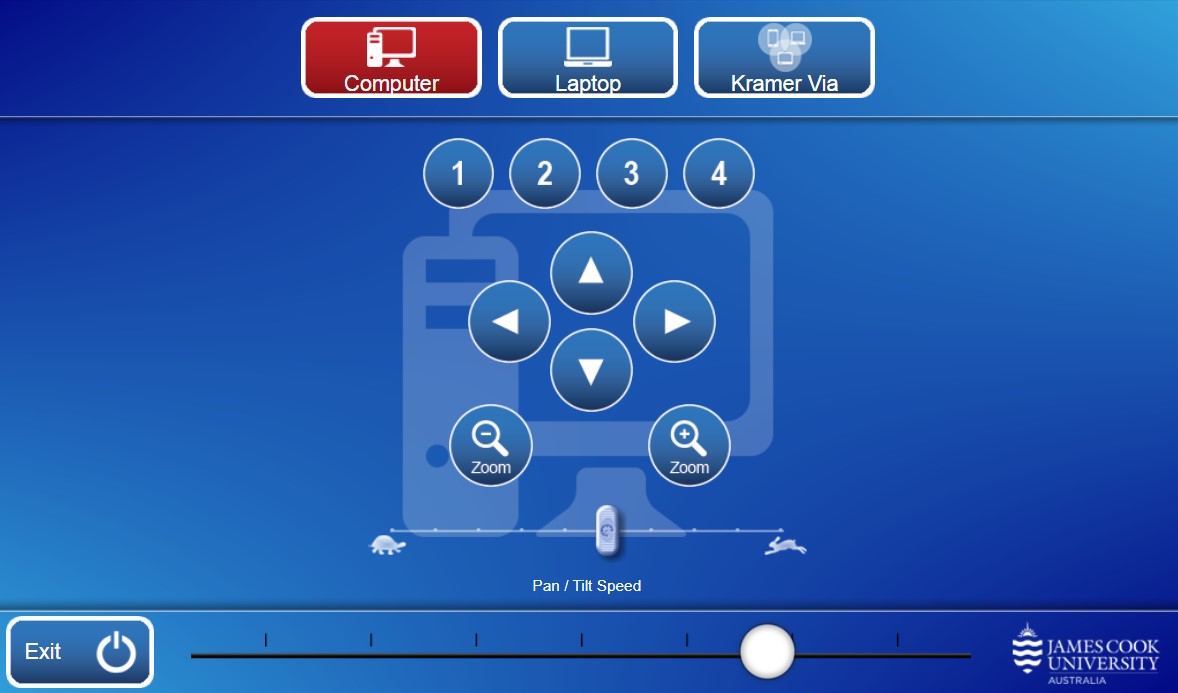
Presentation
- Computer - show the PC
- Laptop - show laptop connected by cable
- Kramer Via - show the instructions for how to connect a BYOD (wireless laptop, tablet, smart phone) to the AV system.
Take note of the Room Name (IP address) and Code shown. Peruse this guide for further instructions on how to connect. - Audio - touch and slide the round button to adjust the volume
Touch panel operation
Equipment
- AV presenter mini PC
- Flat panel displays
- Hearing assist infrared
- Microphone ceiling mounted
- Presenter camera HD
- Touch panel for AV control
- Wireless BYOD presenter
Operation
- Multipurpose camera control - pan, tilt, zoom and presets
- Exit - turn off the AV system
Presentation
- Computer - show the PC
- Laptop - show laptop connected by cable
- Kramer Via - show the instructions for how to connect a BYOD (wireless laptop, tablet, smart phone) to the AV system.
Take note of the Room Name (IP address) and Code shown. Peruse this guide for further instructions on how to connect. - Audio - touch and slide the round button to adjust the volume
Touch panel operation
Equipment
- AV presenter mini PC
- Flat panel display
- Hearing assist infrared
- Microphone ceiling mounted
- Presenter camera HD
- Preview monitor
- Touch panel for AV control
- Wireless BYOD presenter
Operation
- Display - show presentation on large flat panel display
- Preview - show presentation on preview monitor
- Audio - adjust microphone voice uplift and presentation playback volume
- Exit - turn off the AV system

resentation
- Off (No image) - show nothing on the display system.
- Computer - show the PC.
- Laptop- show a laptop connected by cable
- Kramer Via - show the instructions for how to connect a BYOD (wireless laptop, tablet, smart phone) to the AV system.
Take note of the Room Name (IP address) and Code shown. Peruse this guide for further instructions on how to connect.
- Touch and slide the Program Audio button to adjust the playback volume of the PC and laptop
- For privacy purposes, touch the Ceiling Mic Mute button to turn the microphone off

Mic VU Meter - the meter moves to show the microphone is active and at what level.
Touch panel operation
Equipment
- AIO desktop PC
- Cameras
- Document
- PTZ Presenter HD
- Control
- Touch panel for AV
- Logitech tap for Zoom
- Flat panel displays
- Hearing assist infrared
- Lecture capture recorder
- Microphones
- Audience (ceiling mounted hanging)
- Fixed desk
- Wireless (handheld and lapel)
- Touch panel for AV control
- Video conference Zoom Room
- Wireless BYOD presenter
Operation
- Display L - show presentation on left hand side flat panels (front and wall mounted)
- Display R - show presentation on right hand side flat panels (front and wall mounted)
- Audio - adjust the wireless microphone voice uplift and presentation playback volume
- Exit - turn off the AV system
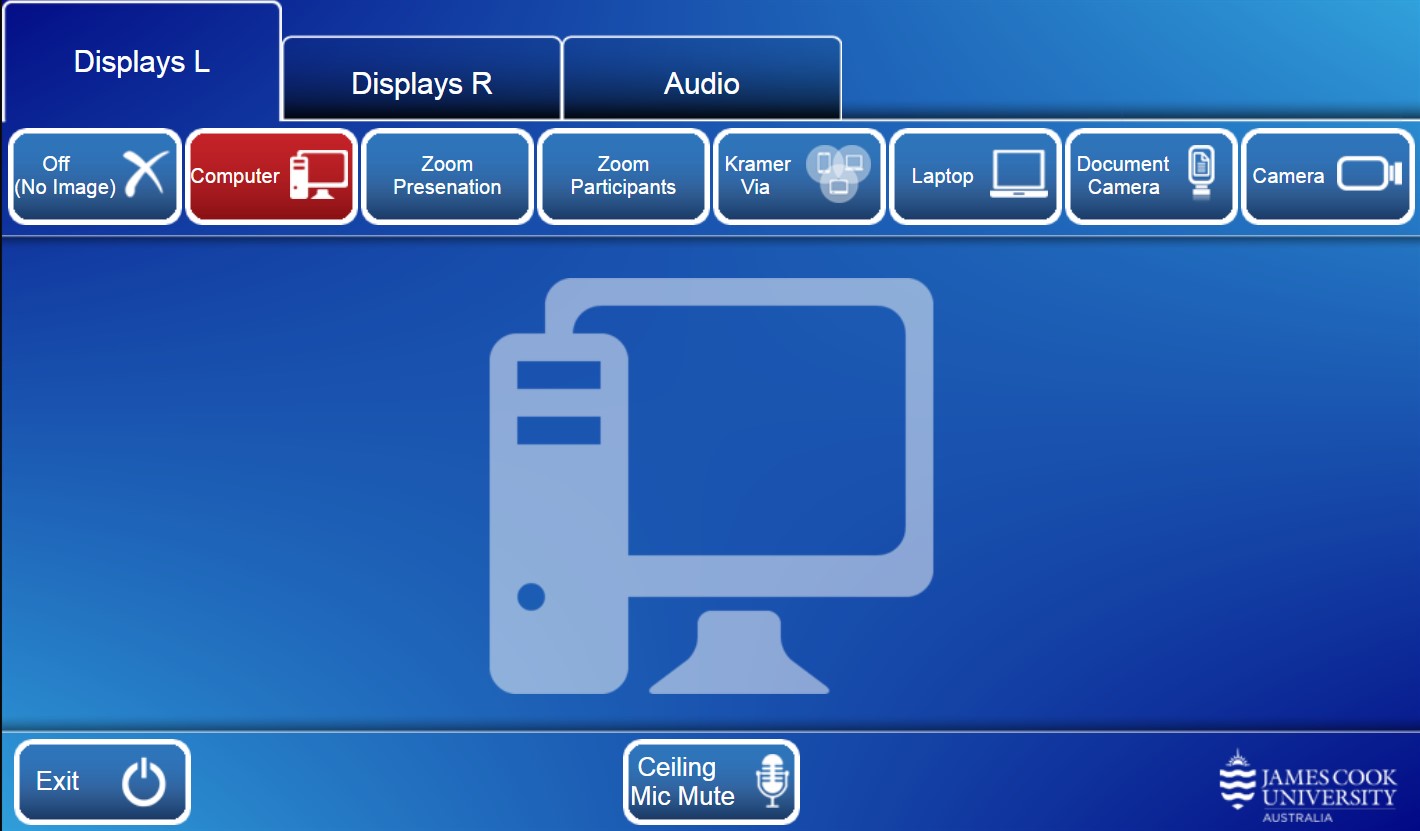
Presentation
- Off (No image) - show nothing on the display system
- Computer - show the PC
- Zoom Presentation - select a media source to share in a zoom meeting
- Zoom Participants -show zoom meeting participants - the Owl camera is used for zoom meetings
- Kramer Via - show the instructions for how to connect a BYOD (wireless laptop, tablet, smart phone) to the AV system
Take note of the Room Name (IP address) and Code shown. Peruse this guide for further instructions on how to connect - Laptop - show laptop connected by cable
- Document camera - show an object or document
- Camera - show PTZ camera ( camera used for lecture capture recordings)
- Touch and slide the Microphone 1 button to adjust the room voice uplift for the wireless handheld microphone
- Touch and slide the Microphone 2 button to adjust the room voice uplift for the wireless lapel microphone
- Touch and slide the Program Audio button to adjust the playback volume of the PC and laptop.
Ensure sound (program audio) is routed to the same display (follow) where the presentation is shown - Touch the Ceiling Mic Mute button to turn off the ceiling mounted audience microphones
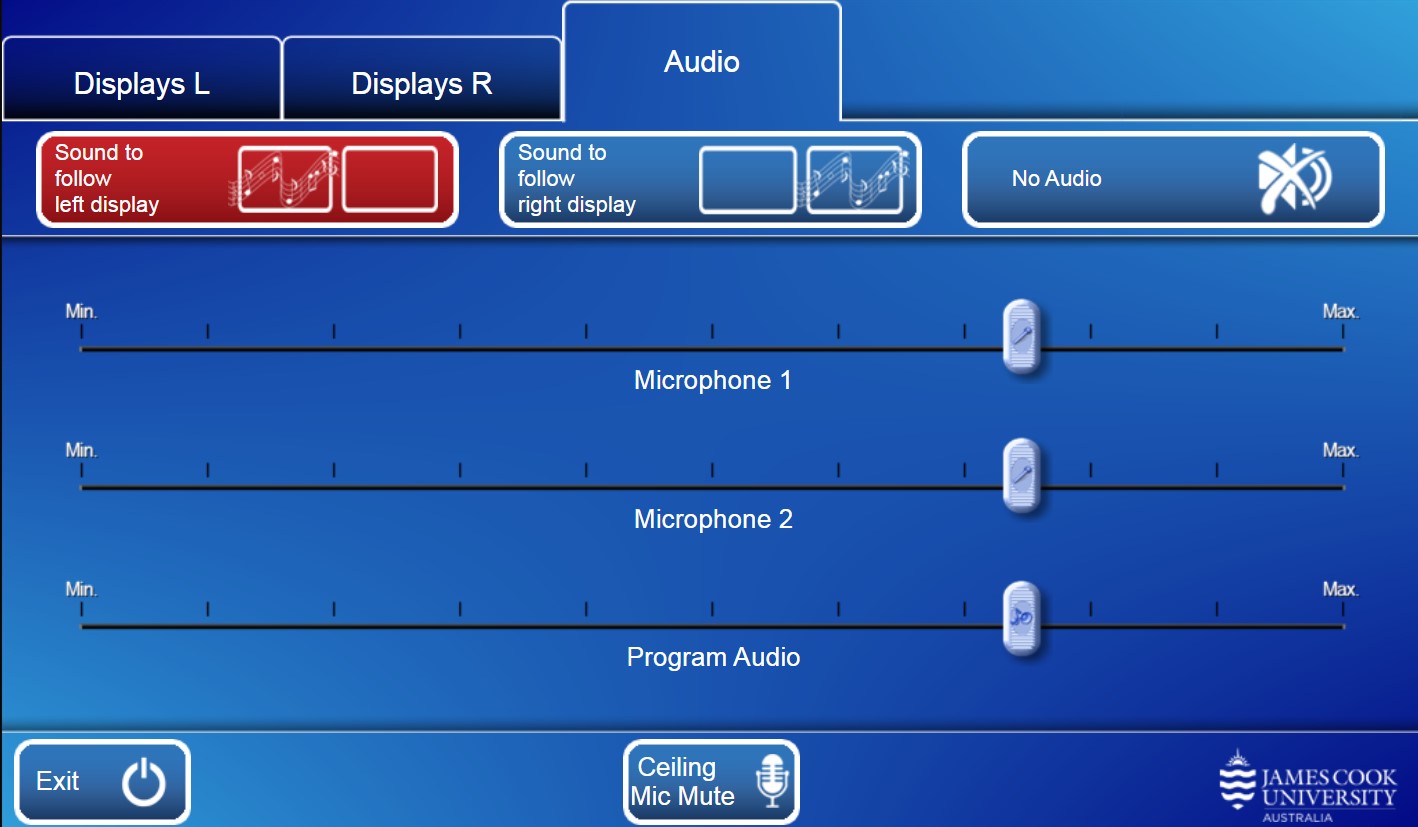
Mic VU Meter - the meter moves to show the microphone is active and at what level.
- The ceiling mounted Owl camera is used for Zoom meetings
- Zoom meetings are automatically connected provided the host has invited the Outlook Calendar resource TSV-027-002@jcu.edu.au to the event.
- The Zoom interface is a Logitech Tap, which is used for connecting manually to a Zoom meeting.
Zoom Presentation from room
- Touch the Displays L tab
- Touch the Zoom Participants button
- Touch the Displays R tab
- Touch the Zoom Presentation button on the touch panel
- Touch the media to be shared on the touch panel (Computer, Document Camera, Kramer Via or Laptop)
- Touch the Share Presentation button on the Logitech Tap
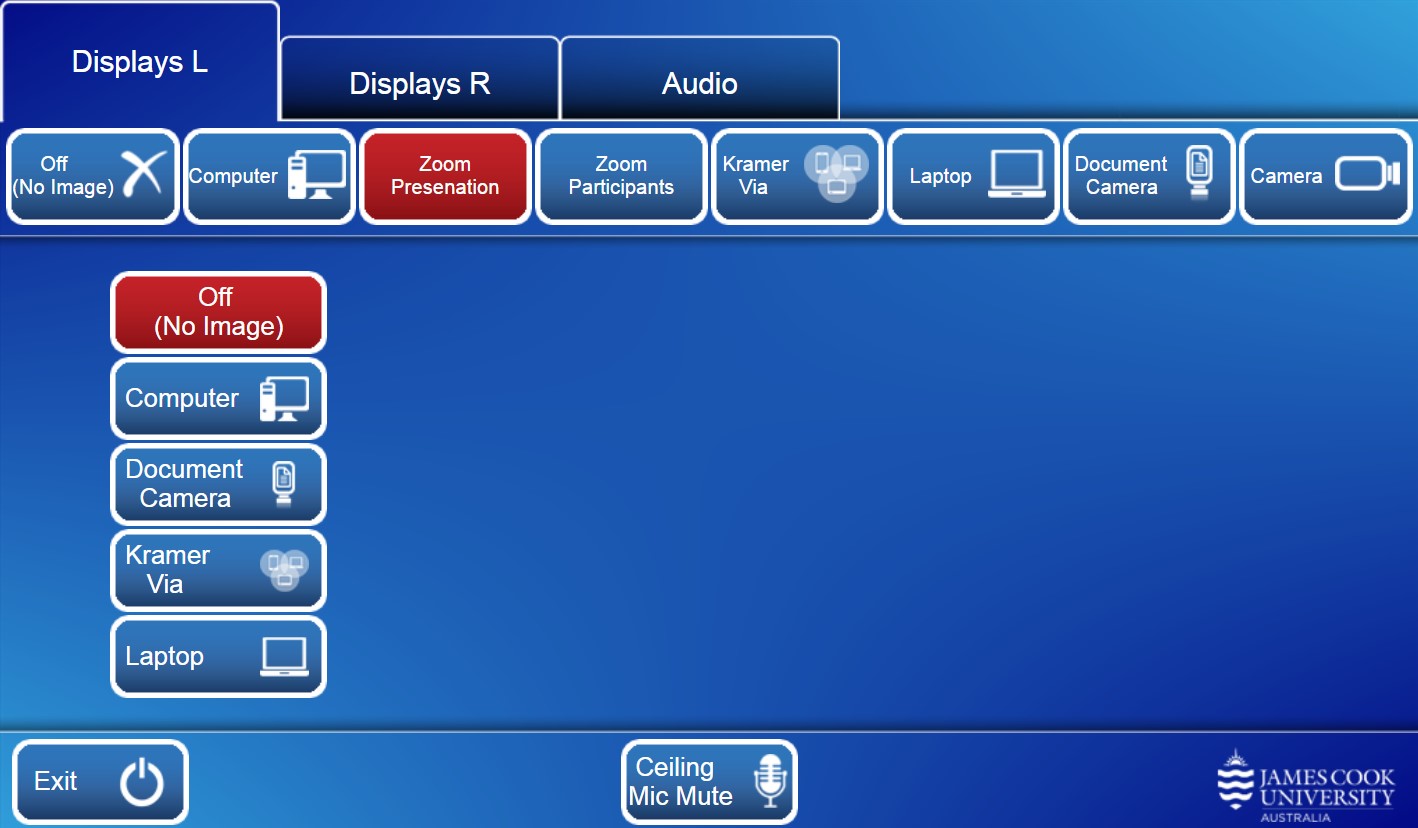
Zoom Presentation from far end
- Touch the Displays L tab
- Touch the Zoom Participants tab
- Touch the Off (No Image) button on the touch panel
- Touch the Stop Share Presentation button on the Logitech Tap
Touch the Camera button to access the pan, tilt, zoom and preset buttons for the ceiling mounted PTZ camera which is used for lecture capture recordings.
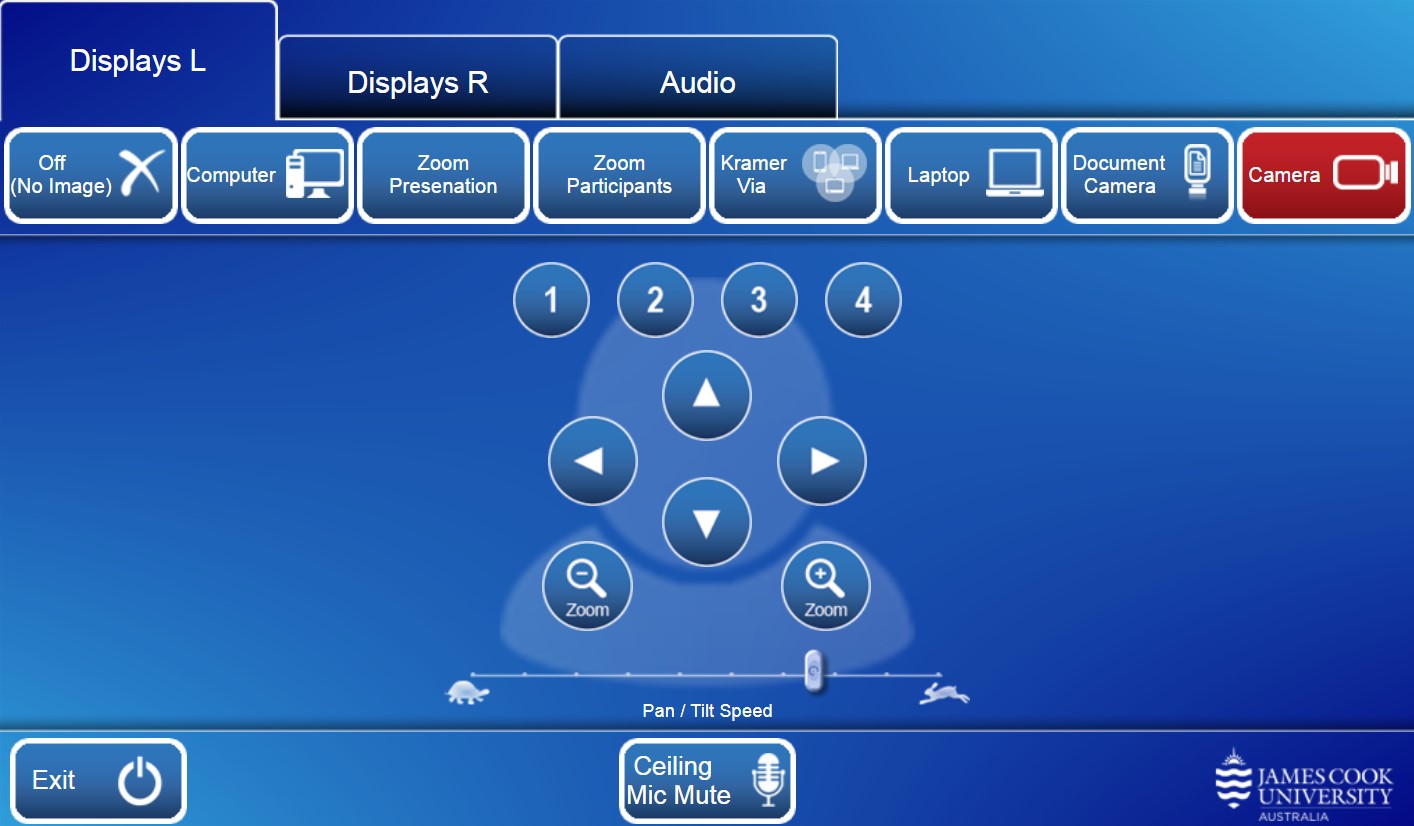
Touch panel operation
Equipment
- AIO desktop PC
- Cameras
- Document
- PTZ Presenter HD
- Control
- Touch panel for AV
- Logitech tap for Zoom
- Flat panel displays
- Hearing assist infrared
- Lecture capture recorder
- Microphones
- Audience (ceiling mounted hanging)
- Fixed desk
- Wireless (handheld and lapel)
- Touch panel for AV control
- Video conference Zoom Room
- Wireless BYOD presenter
Operation
- Display L - show presentation on left hand side flat panels (front and wall mounted)
- Display R - show presentation on right hand side flat panels (front and wall mounted)
- Audio - adjust the wireless microphone voice uplift and presentation playback volume
- Exit - turn off the AV system
Presentation
- Off (No image) - show nothing on the display system
- Computer - show the PC
- Zoom Presentation - select a media source to share in a zoom meeting
- Zoom Participants -show zoom meeting participants - the Owl camera is used for zoom meetings
- Kramer Via - show the instructions for how to connect a BYOD (wireless laptop, tablet, smart phone) to the AV system
Take note of the Room Name (IP address) and Code shown. Peruse this guide for further instructions on how to connect - Laptop - show laptop connected by cable
- Document camera - show an object or document
- Camera - show PTZ camera ( camera used for lecture capture recordings)
- Touch and slide the Microphone 1 button to adjust the room voice uplift for the wireless handheld microphone
- Touch and slide the Microphone 2 button to adjust the room voice uplift for the wireless lapel microphone
- Touch and slide the Program Audio button to adjust the playback volume of the PC and laptop.
Ensure sound (program audio) is routed to the same display (follow) where the presentation is shown - Touch the Ceiling Mic Mute button to turn off the ceiling mounted audience microphones
Mic VU Meter - the meter moves to show the microphone is active and at what level.
- The ceiling mounted Owl camera is used for Zoom meetings
- Zoom meetings are automatically connected provided the host has invited the Outlook Calendar resource TSV-027-003@jcu.edu.au to the event.
- The Zoom interface is a Logitech Tap, which is used for connecting manually to a Zoom meeting.
Zoom Presentation from room
- Touch the Displays L tab
- Touch the Zoom Participants button
- Touch the Displays R tab
- Touch the Zoom Presentation button on the touch panel
- Touch the media to be shared on the touch panel (Computer, Document Camera, Kramer Via or Laptop)
- Touch the Share Presentation button on the Logitech Tap
Zoom Presentation from far end
- Touch the Displays L tab
- Touch the Zoom Participants tab
- Touch the Off (No Image) button on the touch panel
- Touch the Stop Share Presentation button on the Logitech Tap
Touch the Camera button to access the pan, tilt, zoom and preset buttons for the ceiling mounted PTZ camera which is used for lecture capture recordings.
Touch panel operation
Equipment
- AIO desktop PC
- Cameras
- Document
- PTZ Presenter HD
- Control
- Touch panel for AV
- Logitech tap for Zoom
- Flat panel displays
- Hearing assist infrared
- Lecture capture recorder
- Microphones
- Audience (ceiling mounted hanging)
- Fixed desk
- Wireless (handheld and lapel)
- Touch panel for AV control
- Video conference Zoom Room
- Wireless BYOD presenter
Operation
- Display L - show presentation on left hand side flat panels (front and wall mounted)
- Display R - show presentation on right hand side flat panels (front and wall mounted)
- Audio - adjust the wireless microphone voice uplift and presentation playback volume
- Exit - turn off the AV system
Presentation
- Off (No image) - show nothing on the display system
- Computer - show the PC
- Zoom Presentation - select a media source to share in a zoom meeting
- Zoom Participants -show zoom meeting participants - the Owl camera is used for zoom meetings
- Kramer Via - show the instructions for how to connect a BYOD (wireless laptop, tablet, smart phone) to the AV system
Take note of the Room Name (IP address) and Code shown. Peruse this guide for further instructions on how to connect - Laptop - show laptop connected by cable
- Document camera - show an object or document
- Camera - show PTZ camera ( camera used for lecture capture recordings)
- Touch and slide the Microphone 1 button to adjust the room voice uplift for the wireless handheld microphone
- Touch and slide the Microphone 2 button to adjust the room voice uplift for the wireless lapel microphone
- Touch and slide the Program Audio button to adjust the playback volume of the PC and laptop.
Ensure sound (program audio) is routed to the same display (follow) where the presentation is shown - Touch the Ceiling Mic Mute button to turn off the ceiling mounted audience microphones
Mic VU Meter - the meter moves to show the microphone is active and at what level.
- The ceiling mounted Owl camera is used for Zoom meetings
- Zoom meetings are automatically connected provided the host has invited the Outlook Calendar resource TSV-027-004@jcu.edu.au to the event.
- The Zoom interface is a Logitech Tap, which is used for connecting manually to a Zoom meeting.
Zoom Presentation from room
- Touch the Displays L tab
- Touch the Zoom Participants button
- Touch the Displays R tab
- Touch the Zoom Presentation button on the touch panel
- Touch the media to be shared on the touch panel (Computer, Document Camera, Kramer Via or Laptop)
- Touch the Share Presentation button on the Logitech Tap
Zoom Presentation from far end
- Touch the Displays L tab
- Touch the Zoom Participants tab
- Touch the Off (No Image) button on the touch panel
- Touch the Stop Share Presentation button on the Logitech Tap
Touch the Camera button to access the pan, tilt, zoom and preset buttons for the ceiling mounted PTZ camera which is used for lecture capture recordings.
Touch panel operation
Equipment
- AIO desktop PC
- Cameras
- Document
- PTZ Presenter HD
- Control
- Touch panel for AV
- Logitech tap for Zoom
- Flat panel displays
- Hearing assist infrared
- Lecture capture recorder
- Microphones
- Audience (ceiling mounted hanging)
- Fixed desk
- Wireless (handheld and lapel)
- Touch panel for AV control
- Video conference Zoom Room
- Wireless BYOD presenter
Operation
- Display L - show presentation on left hand side flat panels (front and wall mounted)
- Display R - show presentation on right hand side flat panels (front and wall mounted)
- Audio - adjust the wireless microphone voice uplift and presentation playback volume
- Exit - turn off the AV system
Presentation
- Off (No image) - show nothing on the display system
- Computer - show the PC
- Zoom Presentation - select a media source to share in a zoom meeting
- Zoom Participants -show zoom meeting participants - the Owl camera is used for zoom meetings
- Kramer Via - show the instructions for how to connect a BYOD (wireless laptop, tablet, smart phone) to the AV system
Take note of the Room Name (IP address) and Code shown. Peruse this guide for further instructions on how to connect - Laptop - show laptop connected by cable
- Document camera - show an object or document
- Camera - show PTZ camera ( camera used for lecture capture recordings)
- Touch and slide the Microphone 1 button to adjust the room voice uplift for the wireless handheld microphone
- Touch and slide the Microphone 2 button to adjust the room voice uplift for the wireless lapel microphone
- Touch and slide the Program Audio button to adjust the playback volume of the PC and laptop.
Ensure sound (program audio) is routed to the same display (follow) where the presentation is shown - Touch the Ceiling Mic Mute button to turn off the ceiling mounted audience microphones
Mic VU Meter - the meter moves to show the microphone is active and at what level.
- The ceiling mounted Owl camera is used for Zoom meetings
- Zoom meetings are automatically connected provided the host has invited the Outlook Calendar resource TSV-027-002@jcu.edu.au to the event.
- The Zoom interface is a Logitech Tap, which is used for connecting manually to a Zoom meeting.
Zoom Presentation from room
- Touch the Displays L tab
- Touch the Zoom Participants button
- Touch the Displays R tab
- Touch the Zoom Presentation button on the touch panel
- Touch the media to be shared on the touch panel (Computer, Document Camera, Kramer Via or Laptop)
- Touch the Share Presentation button on the Logitech Tap
Zoom Presentation from far end
- Touch the Displays L tab
- Touch the Zoom Participants tab
- Touch the Off (No Image) button on the touch panel
- Touch the Stop Share Presentation button on the Logitech Tap
Touch the Camera button to access the pan, tilt, zoom and preset buttons for the ceiling mounted PTZ camera which is used for lecture capture recordings.
Equipment
- 1x Projector
- 1x wall mounted large flat panel displays
- Touch panel for all AV control
- AIO Desktop PC
- Wireless presenter (Kramer VIA) for connecting a BYOD (laptop, tablet, smart phone) to the AV system
- Microphone - (wireless lapel and hand held) must be used for lecture capture recordings
- Presenter camera (for lecture capture)
- Ceiling mounted speakers
- Lecture capture recording device (Panopto)
Touch the screen to activate for connecting a laptop to the AV system.
Touch Panel Operation

Presentation
- Computer - show the desktop PC.
- Laptop - connect laptop by the provided cable
- Document camera - place document or object on lectern below the camera
- Wireless Collaborator - show the instructions for how to connect a BYOD (wireless laptop, tablet, smart phone) to the AV system..
Take note of the Room Name (IP address) and Code shown. Peruse this guide for instructions on how to connect.
- The ceiling mounted camera is exclusively used for recording a lecture and not available for any other purposes.
- A wireless microphone (lapel or handheld) must be used for lecture recordings.
- Projector starting - The icon next to it rotates while the projector is starting up
- Mic VU meter - a moving bar indicates the microphone in use is live

- Program Volume - touch and slide the round button to adjust the playback volume of the PC and laptop.
Touch panel operation
Equipment
- AV presenter mini PC
- Flat panel displays
- Hearing assist infrared
- Logitech Tap Zoom user interface
- Microphone ceiling mounted
- Presenter camera HD
- Touch panel for AV control
- Wireless BYOD presenter
Operation
Camera - touch the Camera button to select and adjust (camera control) the camera or pick on of the presets
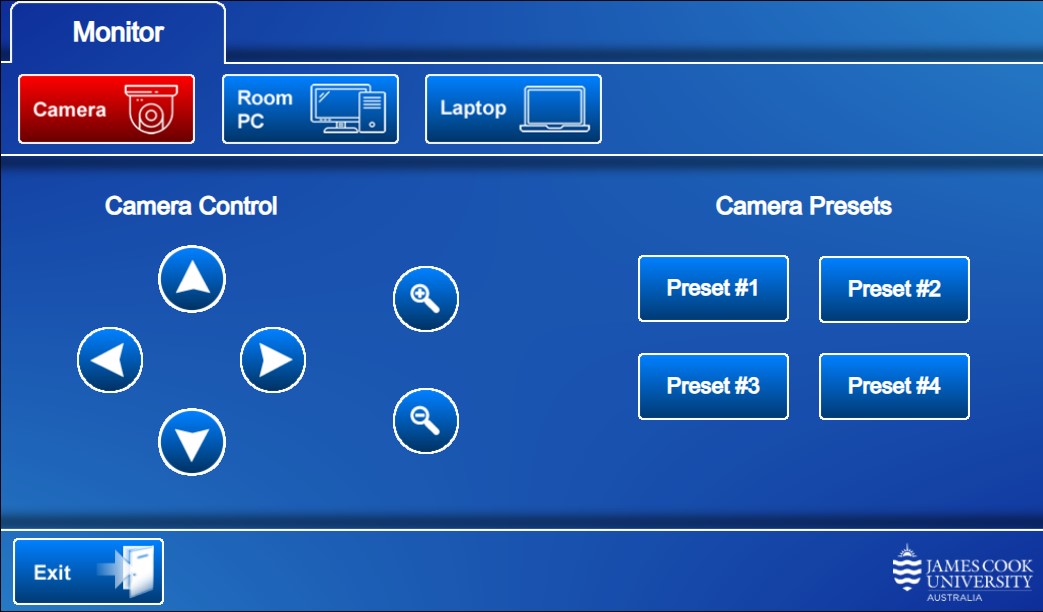
Presentation
- Room PC - show the PC
- Laptop - show laptop connected by the provided cable
- Select and adjust the camera and ensure you are visible to the far end regardless of your movements
- Zoom meetings are automatically connected provided the host has invited the Outlook Calendar resource CNS-A002-001@jcu.edu.au to the event.
- The Zoom User interface is a Logitech Tap, which is used for connecting manually to a Zoom meeting
To share content locally
- Touch the Room PC or Laptop button on the touch panel
- Touch the Share content button on the Tap
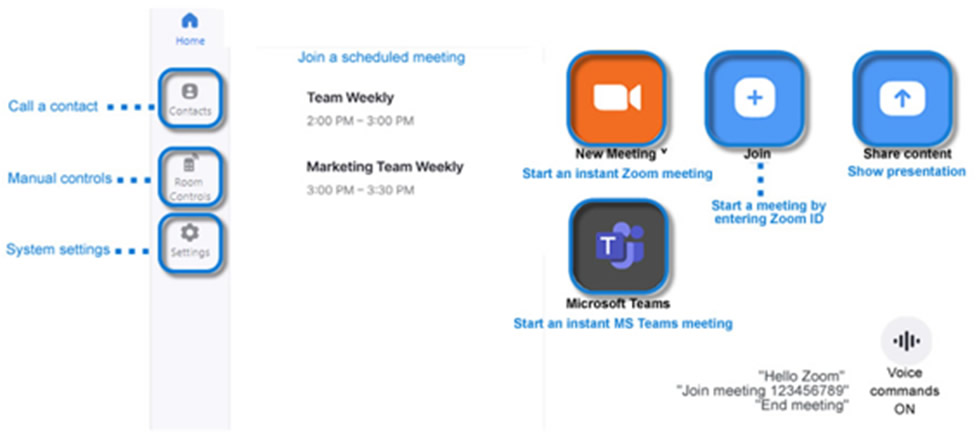
To share content in a meeting
- Touch the Room PC or Laptop button on the touch panel
- Touch the Share content button on the Tap

Touch panel operation
Equipment
- AIO presenter PC
- Flat panel displays
- Hearing assist infrared
- Logitech Tap Zoom user interface
- Microphone ceiling mounted
- Presenter camera HD
- Touch panel for AV control
- Wireless BYOD presenter
Operation
Camera - touch the Camera button to select and adjust (camera control) the camera or pick on of the presets
Presentation
- Room PC - show the PC
- Laptop - show laptop connected by the provided cable
- Select and adjust the camera and ensure you are visible to the far end regardless of your movements
- Zoom meetings are automatically connected provided the host has invited the Outlook Calendar resource CNS-A002-001E@jcu.edu.au to the event.
- The Zoom User interface is a Logitech Tap, which is used for connecting manually to a Zoom meeting
To share content locally
- Touch the Room PC or Laptop button on the touch panel
- Touch the Share content button on the Tap
To share content in a meeting
- Touch the Room PC or Laptop button on the touch panel
- Touch the Share content button on the Tap
Touch panel operation
Equipment
- AIO presenter PC
- Flat panel displays
- Hearing assist infrared
- Logitech Tap Zoom user interface
- Microphone ceiling mounted
- Presenter camera HD
- Touch panel for AV control
- Wireless BYOD presenter
Operation
Camera - touch the Camera button to select and adjust (camera control) the camera or pick on of the presets
Presentation
- Room PC - show the PC
- Laptop - show laptop connected by the provided cable
- Select and adjust the camera and ensure you are visible to the far end regardless of your movements
- Zoom meetings are automatically connected provided the host has invited the Outlook Calendar resource CNS-A002-001D@jcu.edu.au to the event.
- The Zoom User interface is a Logitech Tap, which is used for connecting manually to a Zoom meeting
To share content locally
- Touch the Room PC or Laptop button on the touch panel
- Touch the Share content button on the Tap
To share content in a meeting
- Touch the Room PC or Laptop button on the touch panel
- Touch the Share content button on the Tap
Touch panel operation
Equipment
- AIO presenter PC
- Flat panel displays
- Hearing assist infrared
- Logitech Tap Zoom user interface
- Microphone ceiling mounted
- Presenter camera HD
- Touch panel for AV control
- Wireless BYOD presenter
Operation
Camera - touch the Camera button to select and adjust (camera control) the camera or pick on of the presets
Presentation
- Room PC - show the PC
- Laptop - show laptop connected by the provided cable
- Select and adjust the camera and ensure you are visible to the far end regardless of your movements
- Zoom meetings are automatically connected provided the host has invited the Outlook Calendar resource CNS-A002-001C@jcu.edu.au to the event.
- The Zoom User interface is a Logitech Tap, which is used for connecting manually to a Zoom meeting
To share content locally
- Touch the Room PC or Laptop button on the touch panel
- Touch the Share content button on the Tap
To share content in a meeting
- Touch the Room PC or Laptop button on the touch panel
- Touch the Share content button on the Tap
Touch panel operation
Equipment
- AIO presenter PC
- Flat panel displays
- Hearing assist infrared
- Logitech Tap Zoom user interface
- Microphone ceiling mounted
- Presenter camera HD
- Touch panel for AV control
- Wireless BYOD presenter
Operation
Camera - touch the Camera button to select and adjust (camera control) the camera or pick on of the presets
Presentation
- Room PC - show the PC
- Laptop - show laptop connected by the provided cable
- Select and adjust the camera and ensure you are visible to the far end regardless of your movements
- Zoom meetings are automatically connected provided the host has invited the Outlook Calendar resource CNS-A002-001A@jcu.edu.au to the event.
- The Zoom User interface is a Logitech Tap, which is used for connecting manually to a Zoom meeting
To share content locally
- Touch the Room PC or Laptop button on the touch panel
- Touch the Share content button on the Tap
To share content in a meeting
- Touch the Room PC or Laptop button on the touch panel
- Touch the Share content button on the Tap