CEE TEL Design Collaboration Collaborate FAQs
Collaborate FAQs
- Future Students
- JCU Global Experience
- International Students
- Open Day
- How to apply
- Pathways to university
- Virtual Open Day
- Living on Campus
- Courses
- Publications
- Scholarships
- Parents and Partners
- JCU Heroes Programs
- Aboriginal and Torres Strait Islander in Marine Science
- Elite Athletes
- Defence
- Current Students
- New students
- JCU Orientation
- LearnJCU
- Placements
-
CEE
- Search
- About CEE
- Education Strategy
- Teaching@JCU Support
- Assessment@JCU
-
TEL Design
- About LearnJCU
-
Assessment & Feedback
- Artificial Intelligence
- Assessment Tools
- Assessing Group Work
- Assessment Case Studies
- Assessment Methods
- Enable or Disable Submission View
- Inline Marking
- Grade Centre Setup
- Group Assessment Tools
- Marking and Feedback
- Multiple Choice Questions
- One Question at a Time
- Peer Review
- Release Conditions
- Respondus Secure Online Exams
- Respondus FAQs
- Safe Assign
- Save Grade Centre Filtering
- Submission Receipts
- Test Response Download
- Test Settings
- Timezones
- Video Assessment
- Collaboration
- Communication
-
Content & Learning Resources
- Accessibility in LearnJCU
- Banners for Subjects
- Computations
- Content Management
- Create Studio
- DIY Engaging Videos
- Emojis in Ultra Docs
- Exemplars in LearnJCU
- H5P in LearnJCU
- Hypothesis
- Intro Videos
- Learning Sequence (PDF)
- LearnJCU Layouts (PDF)
- Digital Media Support
- LinkedIn Learning
- Mayer's 12 Principles of Multimedia (PDF)
- Media Resources
- Open and Licensed Resources
- Padlet in LearnJCU
- Panopto Video Capture
- PebblePad ePortfolios
- Progress Tracking
- Release Conditions
- Subject Site Setup
- Organisation & Structure
- Participation & Engagement
- The Learn Lowdown
- Teach with Tech Ebook
- Data & Evaluation
- Student Success
-
Development & Recognition
- Professional Development
- PD Webinar Recordings
-
Grants & Awards
- JCU Learning & Teaching Innovation Grants
- JCU Sessional Teaching Awards
- JCU Inclusive Practice Awards
- JCU Inclusive and Accessible LearnJCU Site Awards
- JCU Citations for Sustained Commitment to Enhancing Diversity, Equity and Inclusion
- JCU Citations for Outstanding Contributions to Student Learning
- National Citations for Outstanding Contributions to Student Learning
- JCU DVC Education's Student Experience Award
- Showcasing Excellence
- Communities of Practice
- SoLT @JCU
- Unicare Centre and Unicampus Kids
- Graduation
- Off-Campus Students
- JCU Job Ready
- Safety and Wellbeing
- JCU Prizes
- Professional Experience Placement
- Employability Edge
- Art of Academic Writing
- Art of Academic Editing
- Careers and Employability
- Student Equity and Wellbeing
- Career Ready Plan
- Careers at JCU
- Partners and Community
- JCU-CSIRO Partnership
- Alumni
- About JCU
- Reputation and Experience
- Chancellery
- Governance
- Celebrating 50 Years
- Academy
- Indigenous Engagement
- Education Division
- Graduate Research School
- Research and Teaching
- Research Division
- Research and Innovation Services
- CASE
- College of Business, Law and Governance
- College of Healthcare Sciences
- College of Medicine and Dentistry
- College of Science and Engineering
- CPHMVS
- Anthropological Laboratory for Tropical Audiovisual Research (ALTAR)
- Anton Breinl Research Centre
- Agriculture Technology and Adoption Centre (AgTAC)
- Advanced Analytical Centre
- AMHHEC
- Aquaculture Solutions
- AusAsian Mental Health Research Group
- ARCSTA
- Area 61
- Lions Marine Research Trust
- Australian Tropical Herbarium
- Australian Quantum & Classical Transport Physics Group
- Boating and Diving
- Clinical Psychedelic Research Lab
- Centre for Tropical Biosecurity
- Centre for Tropical Bioinformatics and Molecular Biology
- CITBA
- CMT
- Centre for Disaster Solutions
- CSTFA
- Cyclone Testing Station
- The Centre for Disaster Studies
- Daintree Rainforest Observatory
- Fletcherview
- JCU Eduquarium
- JCU Turtle Health Research
- Language and Culture Research Centre
- MARF
- Orpheus
- TESS
- JCU Ideas Lab
- TARL
- eResearch
- Indigenous Education and Research Centre
- Estate
- Work Health and Safety
- Staff
- Discover Nature at JCU
- Cyber Security Hub
- Association of Australian University Secretaries
- Services and Resources Division
- Environmental Research Complex [ERC]
- Foundation for Australian Literary Studies
- Gender Equity Action and Research
- Give to JCU
- Indigenous Legal Needs Project
- Inherent Requirements
- IsoTropics Geochemistry Lab
- IT Services
- JCU Webinars
- JCU Events
- JCU Motorsports
- JCU Sport
- Library
- Mabo Decision: 30 years on
- Marine Geophysics Laboratory
- Office of the Vice Chancellor and President
- Outstanding Alumni
- Pharmacy Full Scope
- Planning for your future
- Policy
- PAHL
- Queensland Research Centre for Peripheral Vascular Disease
- Rapid Assessment Unit
- RDIM
- Researcher Development Portal
- Roderick Centre for Australian Literature and Creative Writing
- Contextual Science for Tropical Coastal Ecosystems
- State of the Tropics
- Strategic Procurement
- Student profiles
- SWIRLnet
- TREAD
- TropEco for Staff and Students
- TQ Maths Hub
- TUDLab
- VAVS Home
- WHOCC for Vector-borne & NTDs
- Media
- Copyright and Terms of Use
- Australian Institute of Tropical Health & Medicine
- Pay review
Frequently Asked Questions
From our recent webinar and online open hours we have collated the most frequently asked questions relating to using Collaborate Subject Rooms.
General
Students can join sessions without a Moderator, however, to share content a Moderator must give them Presenter access. Lecturers can do this when setting up a session by using a guest link and allowing all guests to join as a Presenter or during a session Moderators can promote an attendee to Presenter.
Recording
Yes, you can if you are the Moderator. Ensure you inform students that you will be recording the session.
Yes, however, rather than pre-recording in Collaborate, use video capture with the Panopto. You can record slides and audio and share the video in your subject site.
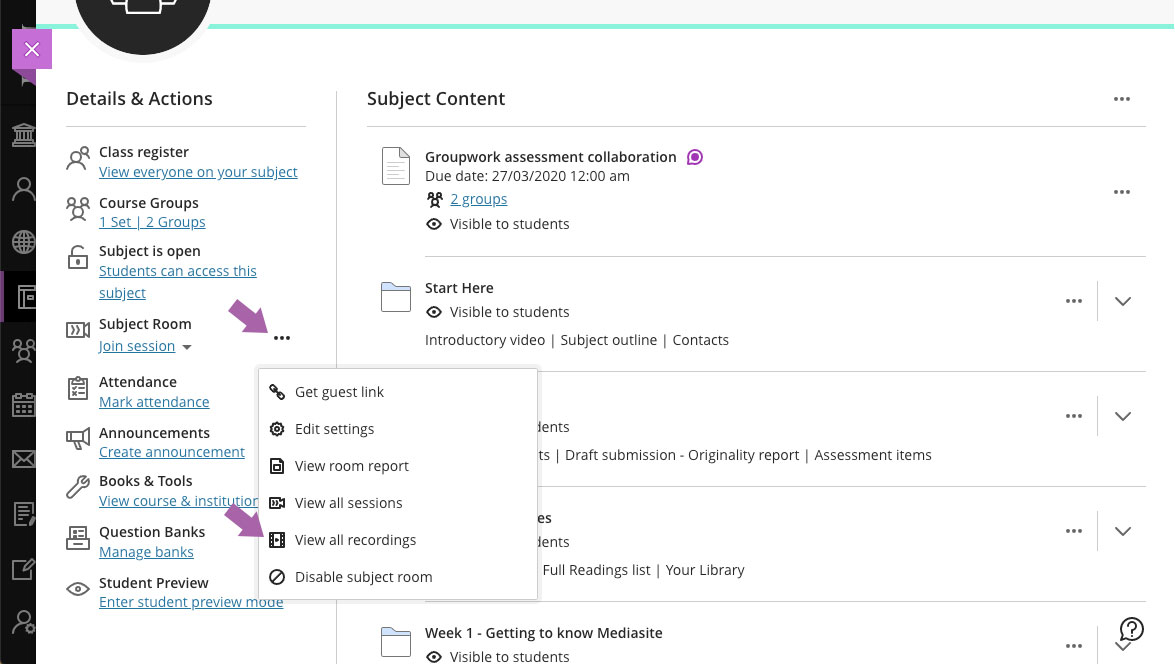
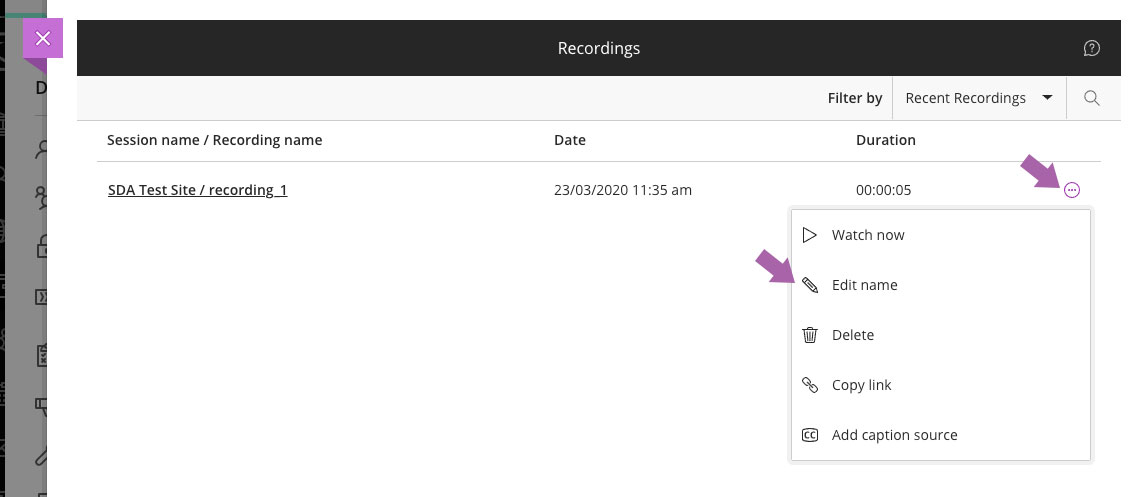
To rename recordings, click the three-dots-icon (…) next to 'Subject room' in your subject site. Choose view all recordings.
Filter to the recording required and click the more options three-dots-icon (…) to the far right of the recording. Select edit name.
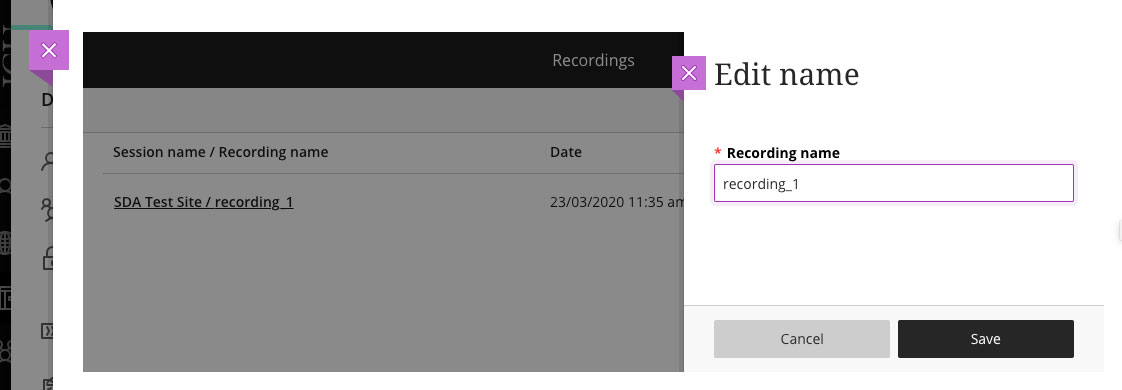
Enter new name, scroll down and click the Save button.
Sharing
As a Moderator you can go to the attendee panel and click on attendee options to promote the attendee to presenter which will give them share screen/application permissions.
You could link to a video or share an application. It depends on the complexity of the maths equation as to what program/tool you use. You could also use a stylus and whiteboard tools. NB. This would need to be tested in each individual application by the Moderator to confirm.
Annotation while sharing files/whiteboard is automatically on. You can turn off the annotation tool for students in case they don't want them to use the feature. This setting can be changed during a session.
When sharing a file or whiteboard, the pointer, pencil, shape, text and eraser tools are available to annotate.
No, Collaborate does not currently have a highlighter.
We do not recommend sharing videos via Collaborate application share but it is possible. You can use Chrome to share audio and video however the frame-rate may become distorted due to bandwidth. Video links can be provided in the chat for students to watch. You also need to be mindful of copyright implications.
Audio/Video
You must give the browser permission to use audio and video to participate in a session. This step is necessary so that you are seen and heard.
Browser specific help on allowing your microphone to be used:
Operating system specific help for microphone and webcam permissions:
Headsets are still preferred as they do the best job of making sure the microphone is optimally placed for you to be heard, as well as blocking out background noises.
Yes, participants are able to unmute themselves.
No, the student will need to be asked to turn off their video.
Both moderators and participants can use the telephony feature to communicate with other users.
No, apps such as WhatsApp are not compatible.
No, participants cannot join via Zoom.
iOS users may use Safari 11+. Android users can use Google Chrome.
Setup
The number of sessions within a subject site is unlimited and the system is presently quite stable.
Participants have access to the chat so there is no need to change the tutor’s status to allow them to moderate the chat. However, if the tutor is required to monitor private chats, their status will need to be promoted to ‘Moderator’.
You can advise students to raise their hand and nominate who goes first. Ensure you advise students of how the session will run before you get started.
The students from one site would need to be provided with the guest link to the session in the other site.
Yes there are a couple to choose from.
Yes you can. Also, if you have switched the Attendance Roll on in your subject site this report will automatically populate through.
Polling
Use polls to give your attendees opportunities to participate and provide feedback.
We recommend preparing poll information on a slide prior to the session and then using a number or letter to represent the choices. This will make it quicker to create the poll.
No, polls can only be saved in screen recordings or by taking a screenshot on your PC at the time.
Chat
No, chats cannot be run by thread.
Yes you will lose chat history as it only shows you the chat messages from the time you join.
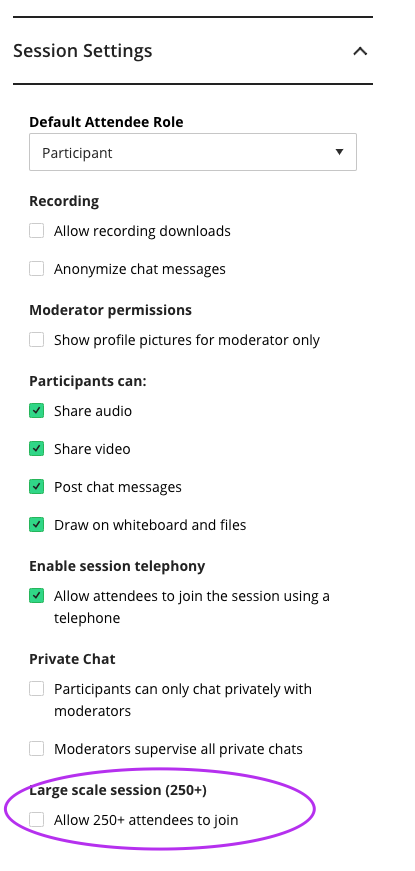
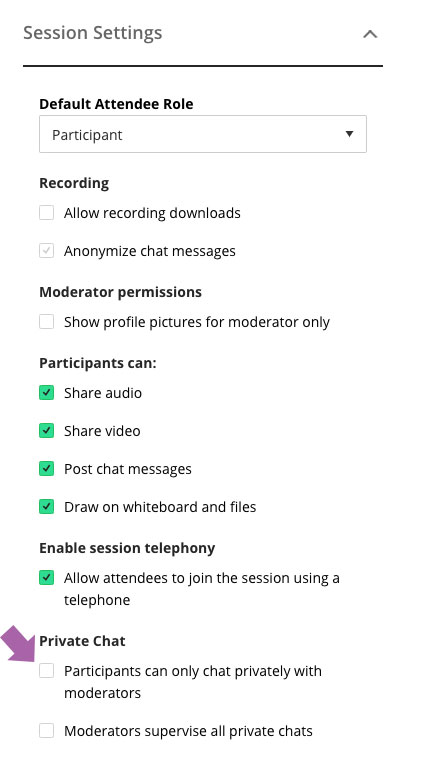
By default yes, however you can adjust the settings when you create a session. When you create a session, open Session Settings and under Private Chat check 'Participants can only chat privately with moderators'.
Technical
If students are having trouble with Collaborate during your session you can direct them to Collaborate Troubleshooting and announce recording of the session so they do not miss out. Remember to let everyone know before recording, go over the Collaborate Protocols for advice on what to say when recording.
You can also 'Report an Issue' while in your Collaborate session.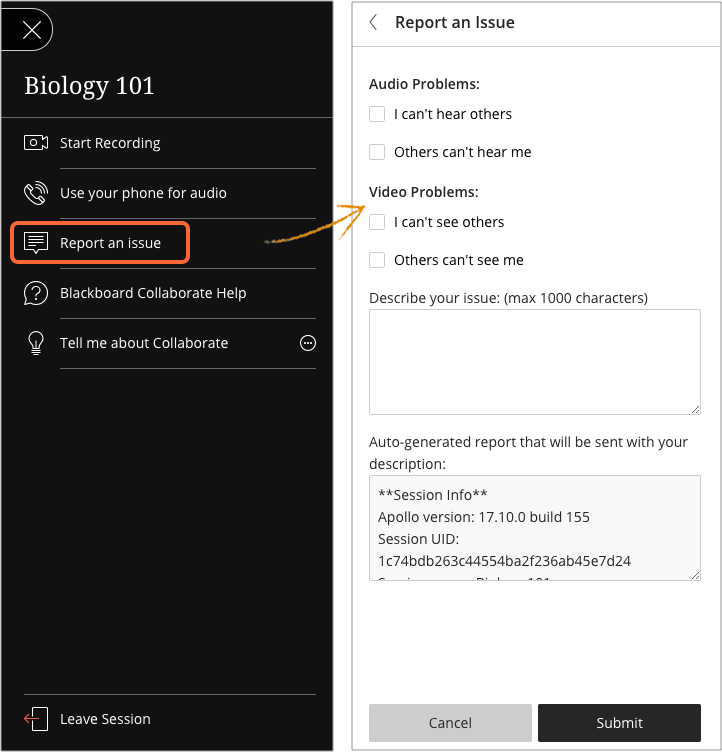
Yes, as long as you set it up in the session settings before it has been recorded.
In settings, recorded Collaborate sessions can be shared to the public or subject/course members only.
Breakout Groups
To facilitate small group collaboration, you can create breakout groups that are separate from the main room and assign attendees to the groups.
After breakout groups are started you can move between groups to monitor the students. If you assign yourself to a group, you see and hear what they are doing in their group. This includes any shared content, audio, video, and chat.
Yes all members of the group can see who the other group participants are while in the group.
No they can't. What is said or viewed in a breakout room isn't captured in recordings. Also, Collaborate recordings stop in the main session if all attendees leave the main room to join breakout groups.
Yes, you can share files with one or more breakout group.
No, the main screen is not visible in a breakout group.
Not currently, as the timer feature has been removed.
Yes, breakout groups are designed for group collaboration. Every attendee in the group is a Presenter. This means that all attendees can share the whiteboard, files, and applications with the rest of their group.
You can create up to 20 groups. Breakout groups are only available in sessions with 250 or fewer attendees. There is no limit to the number of attendees you can put in each group. However, we recommend spreading attendees evenly over your groups.
Creating Sessions
Click the three-dots-icon (…) next to Subject Room and go to View all sessions, select Create sessions to create new sessions and set up accordingly.

There are different ways you can set up group sessions, including breakout groups, multiple sessions and with the course group tool.
You can place the guest link into content area in LearnJCU for students to access. Please note that in this case the name of the participant is not passed through from the subject, therefore compromising attendance reporting.
Maximum participants is usually 250, however, there is a setting that can be ticked to allow for a large scale session over 250.