CEE TEL Design Content & Learning Resources Content Management Release Conditions
Release Conditions
- Future Students
- JCU Global Experience
- International Students
- Open Day
- How to apply
- Pathways to university
- Virtual Open Day
- Living on Campus
- Courses
- Publications
- Scholarships
- Parents and Partners
- JCU Heroes Programs
- Aboriginal and Torres Strait Islander in Marine Science
- Elite Athletes
- Defence
- Current Students
- New students
- JCU Orientation
- LearnJCU
- Placements
-
CEE
- Search
- About CEE
- Education Strategy
- Teaching@JCU Support
- Assessment@JCU
-
TEL Design
- About LearnJCU
-
Assessment & Feedback
- Artificial Intelligence
- Assessment Tools
- Assessing Group Work
- Assessment Case Studies
- Assessment Methods
- Enable or Disable Submission View
- Inline Marking
- Grade Centre Setup
- Group Assessment Tools
- Marking and Feedback
- Multiple Choice Questions
- One Question at a Time
- Peer Review
- Release Conditions
- Respondus Secure Online Exams
- Respondus FAQs
- Safe Assign
- Save Grade Centre Filtering
- Submission Receipts
- Test Response Download
- Test Settings
- Timezones
- Video Assessment
- Collaboration
- Communication
-
Content & Learning Resources
- Accessibility in LearnJCU
- Banners for Subjects
- Computations
- Content Management
- Create Studio
- DIY Engaging Videos
- Emojis in Ultra Docs
- Exemplars in LearnJCU
- H5P in LearnJCU
- Hypothesis
- Intro Videos
- Learning Sequence (PDF)
- LearnJCU Layouts (PDF)
- Digital Media Support
- LinkedIn Learning
- Mayer's 12 Principles of Multimedia (PDF)
- Media Resources
- Open and Licensed Resources
- Padlet in LearnJCU
- Panopto Video Capture
- PebblePad ePortfolios
- Progress Tracking
- Release Conditions
- Subject Site Setup
- Organisation & Structure
- Participation & Engagement
- The Learn Lowdown
- Teach with Tech Ebook
- Data & Evaluation
- Student Success
-
Development & Recognition
- Professional Development
- PD Webinar Recordings
-
Grants & Awards
- JCU Learning & Teaching Innovation Grants
- JCU Sessional Teaching Awards
- JCU Inclusive Practice Awards
- JCU Inclusive and Accessible LearnJCU Site Awards
- JCU Citations for Sustained Commitment to Enhancing Diversity, Equity and Inclusion
- JCU Citations for Outstanding Contributions to Student Learning
- National Citations for Outstanding Contributions to Student Learning
- JCU DVC Education's Student Experience Award
- Showcasing Excellence
- Communities of Practice
- SoLT @JCU
- Unicare Centre and Unicampus Kids
- Graduation
- Off-Campus Students
- JCU Job Ready
- Safety and Wellbeing
- JCU Prizes
- Professional Experience Placement
- Employability Edge
- Art of Academic Writing
- Art of Academic Editing
- Careers and Employability
- Student Equity and Wellbeing
- Career Ready Plan
- Careers at JCU
- Partners and Community
- JCU-CSIRO Partnership
- Alumni
- About JCU
- Reputation and Experience
- Chancellery
- Governance
- Celebrating 50 Years
- Academy
- Indigenous Engagement
- Education Division
- Graduate Research School
- Research and Teaching
- Research Division
- Research and Innovation Services
- CASE
- College of Business, Law and Governance
- College of Healthcare Sciences
- College of Medicine and Dentistry
- College of Science and Engineering
- CPHMVS
- Anthropological Laboratory for Tropical Audiovisual Research (ALTAR)
- Anton Breinl Research Centre
- Agriculture Technology and Adoption Centre (AgTAC)
- Advanced Analytical Centre
- AMHHEC
- Aquaculture Solutions
- AusAsian Mental Health Research Group
- ARCSTA
- Area 61
- Lions Marine Research Trust
- Australian Tropical Herbarium
- Australian Quantum & Classical Transport Physics Group
- Boating and Diving
- Clinical Psychedelic Research Lab
- Centre for Tropical Biosecurity
- Centre for Tropical Bioinformatics and Molecular Biology
- CITBA
- CMT
- Centre for Disaster Solutions
- CSTFA
- Cyclone Testing Station
- The Centre for Disaster Studies
- Daintree Rainforest Observatory
- Fletcherview
- JCU Eduquarium
- JCU Turtle Health Research
- Language and Culture Research Centre
- MARF
- Orpheus
- TESS
- JCU Ideas Lab
- TARL
- eResearch
- Indigenous Education and Research Centre
- Estate
- Work Health and Safety
- Staff
- Discover Nature at JCU
- Cyber Security Hub
- Association of Australian University Secretaries
- Services and Resources Division
- Environmental Research Complex [ERC]
- Foundation for Australian Literary Studies
- Gender Equity Action and Research
- Give to JCU
- Indigenous Legal Needs Project
- Inherent Requirements
- IsoTropics Geochemistry Lab
- IT Services
- JCU Webinars
- JCU Events
- JCU Motorsports
- JCU Sport
- Library
- Mabo Decision: 30 years on
- Marine Geophysics Laboratory
- Office of the Vice Chancellor and President
- Outstanding Alumni
- Pharmacy Full Scope
- Planning for your future
- Policy
- PAHL
- Queensland Research Centre for Peripheral Vascular Disease
- Rapid Assessment Unit
- RDIM
- Researcher Development Portal
- Roderick Centre for Australian Literature and Creative Writing
- Contextual Science for Tropical Coastal Ecosystems
- State of the Tropics
- Strategic Procurement
- Student profiles
- SWIRLnet
- TREAD
- TropEco for Staff and Students
- TQ Maths Hub
- TUDLab
- VAVS Home
- WHOCC for Vector-borne & NTDs
- Media
- Copyright and Terms of Use
- Australian Institute of Tropical Health & Medicine
- Pay review
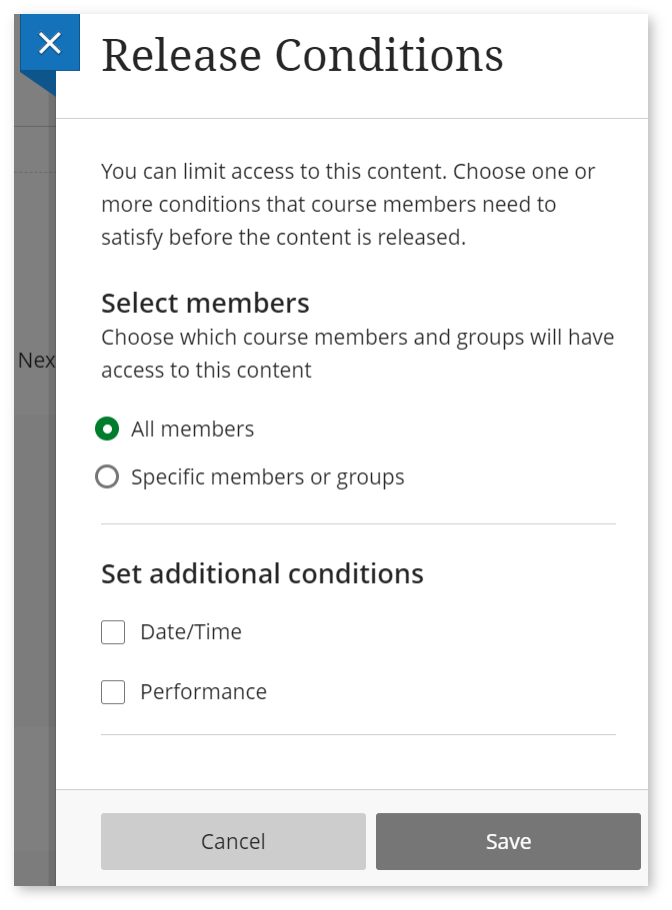
You can customise the release of content in LearnJCU by using release conditions.
Content items can be released to students using a variety of conditional availability rules.
Release conditions include:
- Releasing content based on date
- Releasing content based on performance
- Releasing content by student or groups
- Releasing content in sequence (available in learning modules)
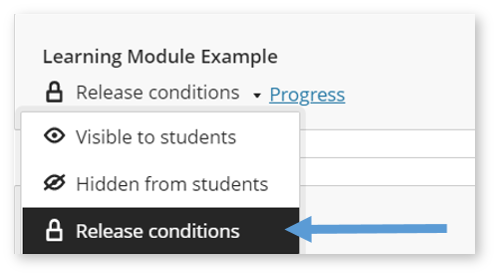
To access the first three release conditions, listed above, open the item and select the ‘release conditions’ option from the visibility settings dropdown. Either access this dropdown under the content item in the Subject Content view, or via the item's settings panel.
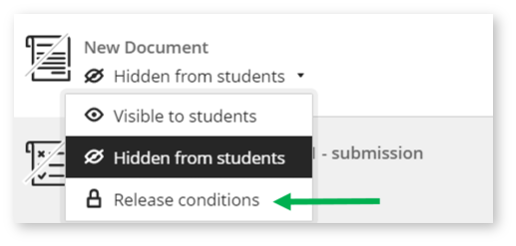
Next, select the release conditions you would like to apply to the item.
Release conditions can be applied to any of the following items:
- Ultra Documents (pages created within your subject site)
- Word Documents, PowerPoints, Spreadsheets, PDFs
- Video or Audio
- Assignments or Tests
- Discussion Boards
- Journals
- Learning Modules
- Folders
- Or other types of learning objects.
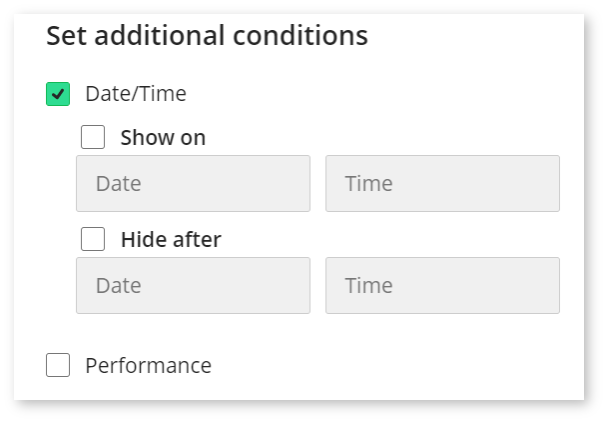
There are three choices with releasing content based on date:
- Release an item on a certain date
- Release an item until a certain date
- Release an item for a period of time.
Why you might use it
Example: Content is covered in a specific order. You want students to access content only after you've discussed it in class. You don't want students to work ahead.
Example: Release an assessment item during a specified period.
How to set the condition
Identify the piece of content you want to release to students on a specified date/time or range and select release conditions in the visibility menu.
On the release conditions panel, select Date/Time to release the content based on a specified date/time or range. Select the date/time you would like students to access the item. You can also choose a date/time to hide the item again if you wish.
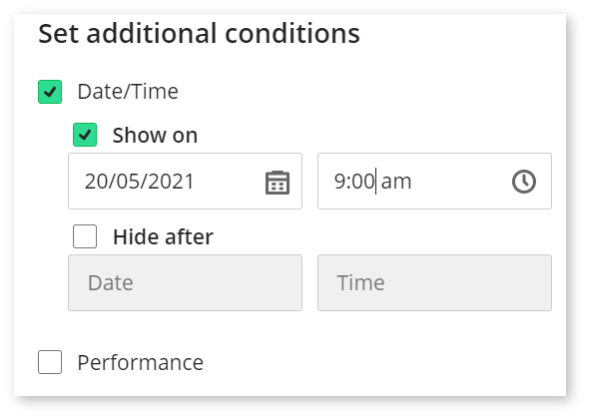
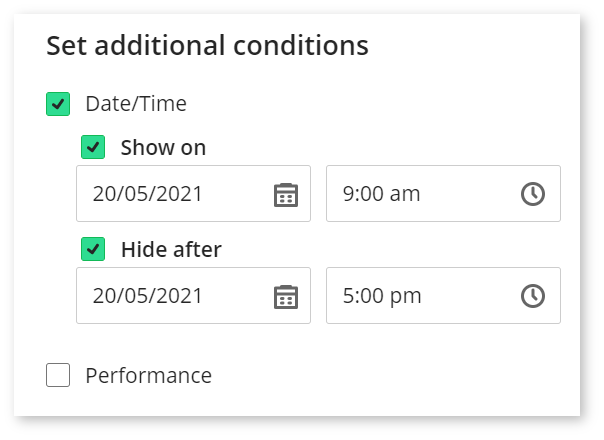
After you choose the dates and times, scroll down to the ‘when will content appear’ section. Here you can show or hide the item for students in their content list before they have access.
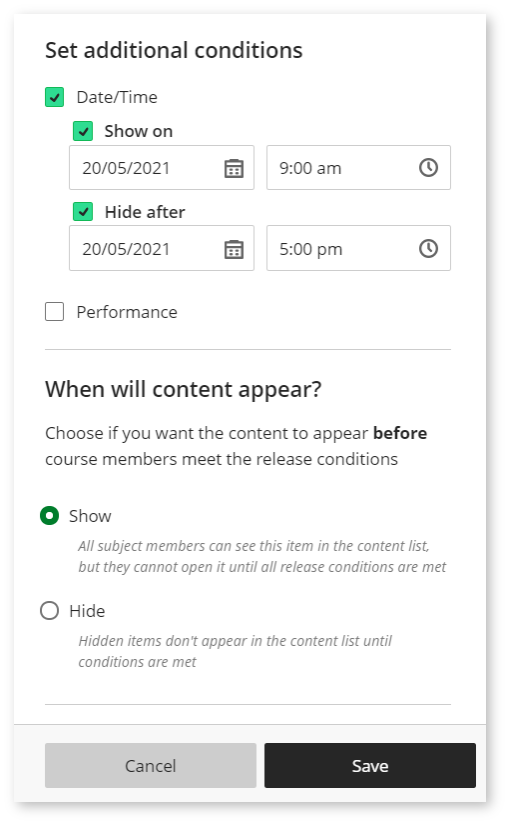
What it will look like for the students
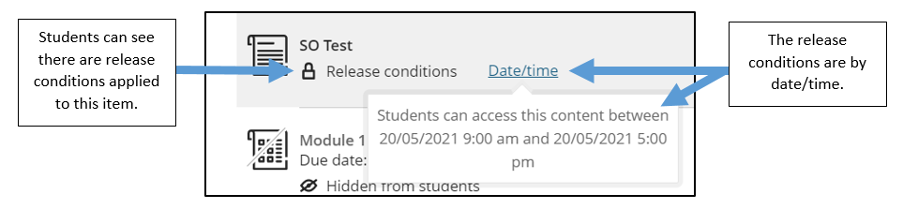
Visible to students. If you choose to show the content to students before they can access it, your date and time choices are shown with the item on the Course Content page. Students see the date and time the content will be released and when they can no longer access it. After students' access ends, the content is still visible but they can't access it.
Hidden from students. If you choose to hide the content from students before they can access it, the content is only visible to students when they're able to access it. Students don't see the dates and times when they can no longer access the content. After students' access ends, the content is hidden from their view.
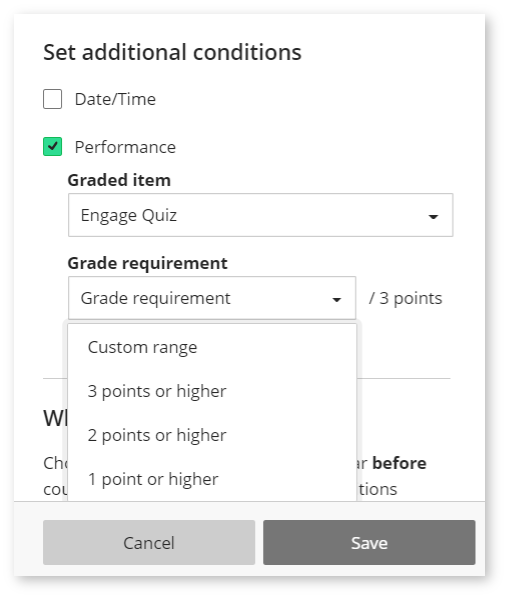
You can release an item based on when a student achieves a certain score on a graded item (e.g. test, assignment, discussion board, journal) in the subject. A graded item is an assignment or test (formative or summative) to which you have applied a grade in the settings of that assessment item.
Why you might use it
Example: Students need to complete coursework in a specific order and after they've demonstrated a specified level of understanding. You want students to progress to the next item only after they score 75% or above.
How to set the condition
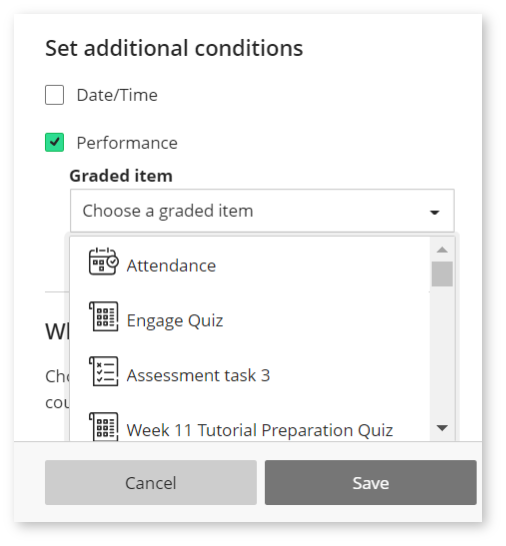
Identify the piece of content you want to release to students based on performance in a graded item and select release conditions in the visibility menu.
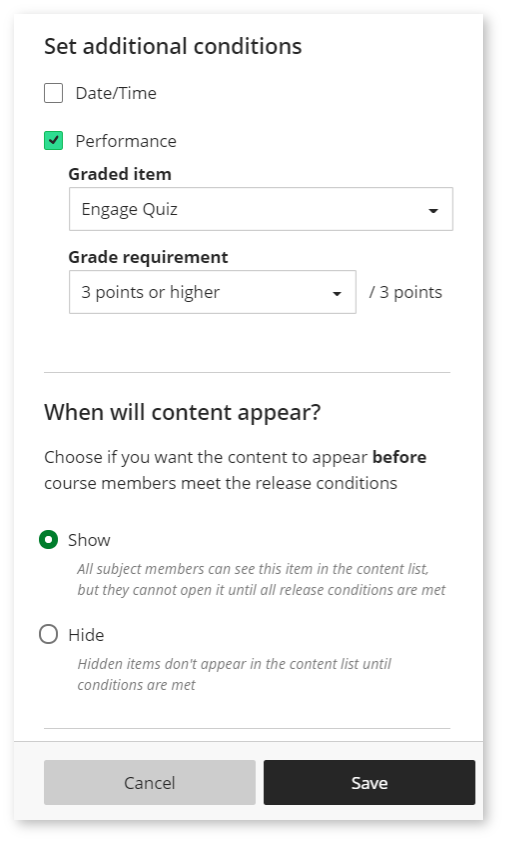
On the release conditions panel, select Performance to release the content based on their performance in a graded item. From the ‘graded item’ drop down menu, select the assessment item. Then select the grade requirement from the dropdown menu. The grade requirement is the level of achievement students require in that graded item in order for the next content item to be released.
After you choose the graded item performance parameters, scroll down to the ‘when will content appear’ section. Here you can show or hide the item for students in their content list before they have access.
What it will look like for the students
Visible to students. If you choose to show the content to students before they can access it, the performance conditions are shown with the item on the Course Content page. Students see the performance conditions they need to satisfy before they can access the content.

Hidden from students. If you choose to hide the content from students before they can access it, the content is only visible to students when they're able to access it. Students don't see the performance conditions.
You can grant access to a specified student/s by selecting one or both existing rules mentioned above (i.e. releasing content based on date/time or performance). You are able to release content to all members of the subject, or specific members or groups.
Why you might use it
Example: Student/s that missed a test due to special circumstances can be given an opportunity to sit it at another time. However, you do not want to give all students access to this test.
How to set the condition
Identify the piece of content you want to release to students based on date/time or performance in a graded item and select release conditions in the visibility menu.
On the release conditions panel, choose the subject members you want to access the content from the select members section. If you would like to release the content item to specific members or groups, you can add the specified members or groups, or create new group sets. After you have selected the members, you can leave it as is, or you can select to release the content item based on date/time or performance.
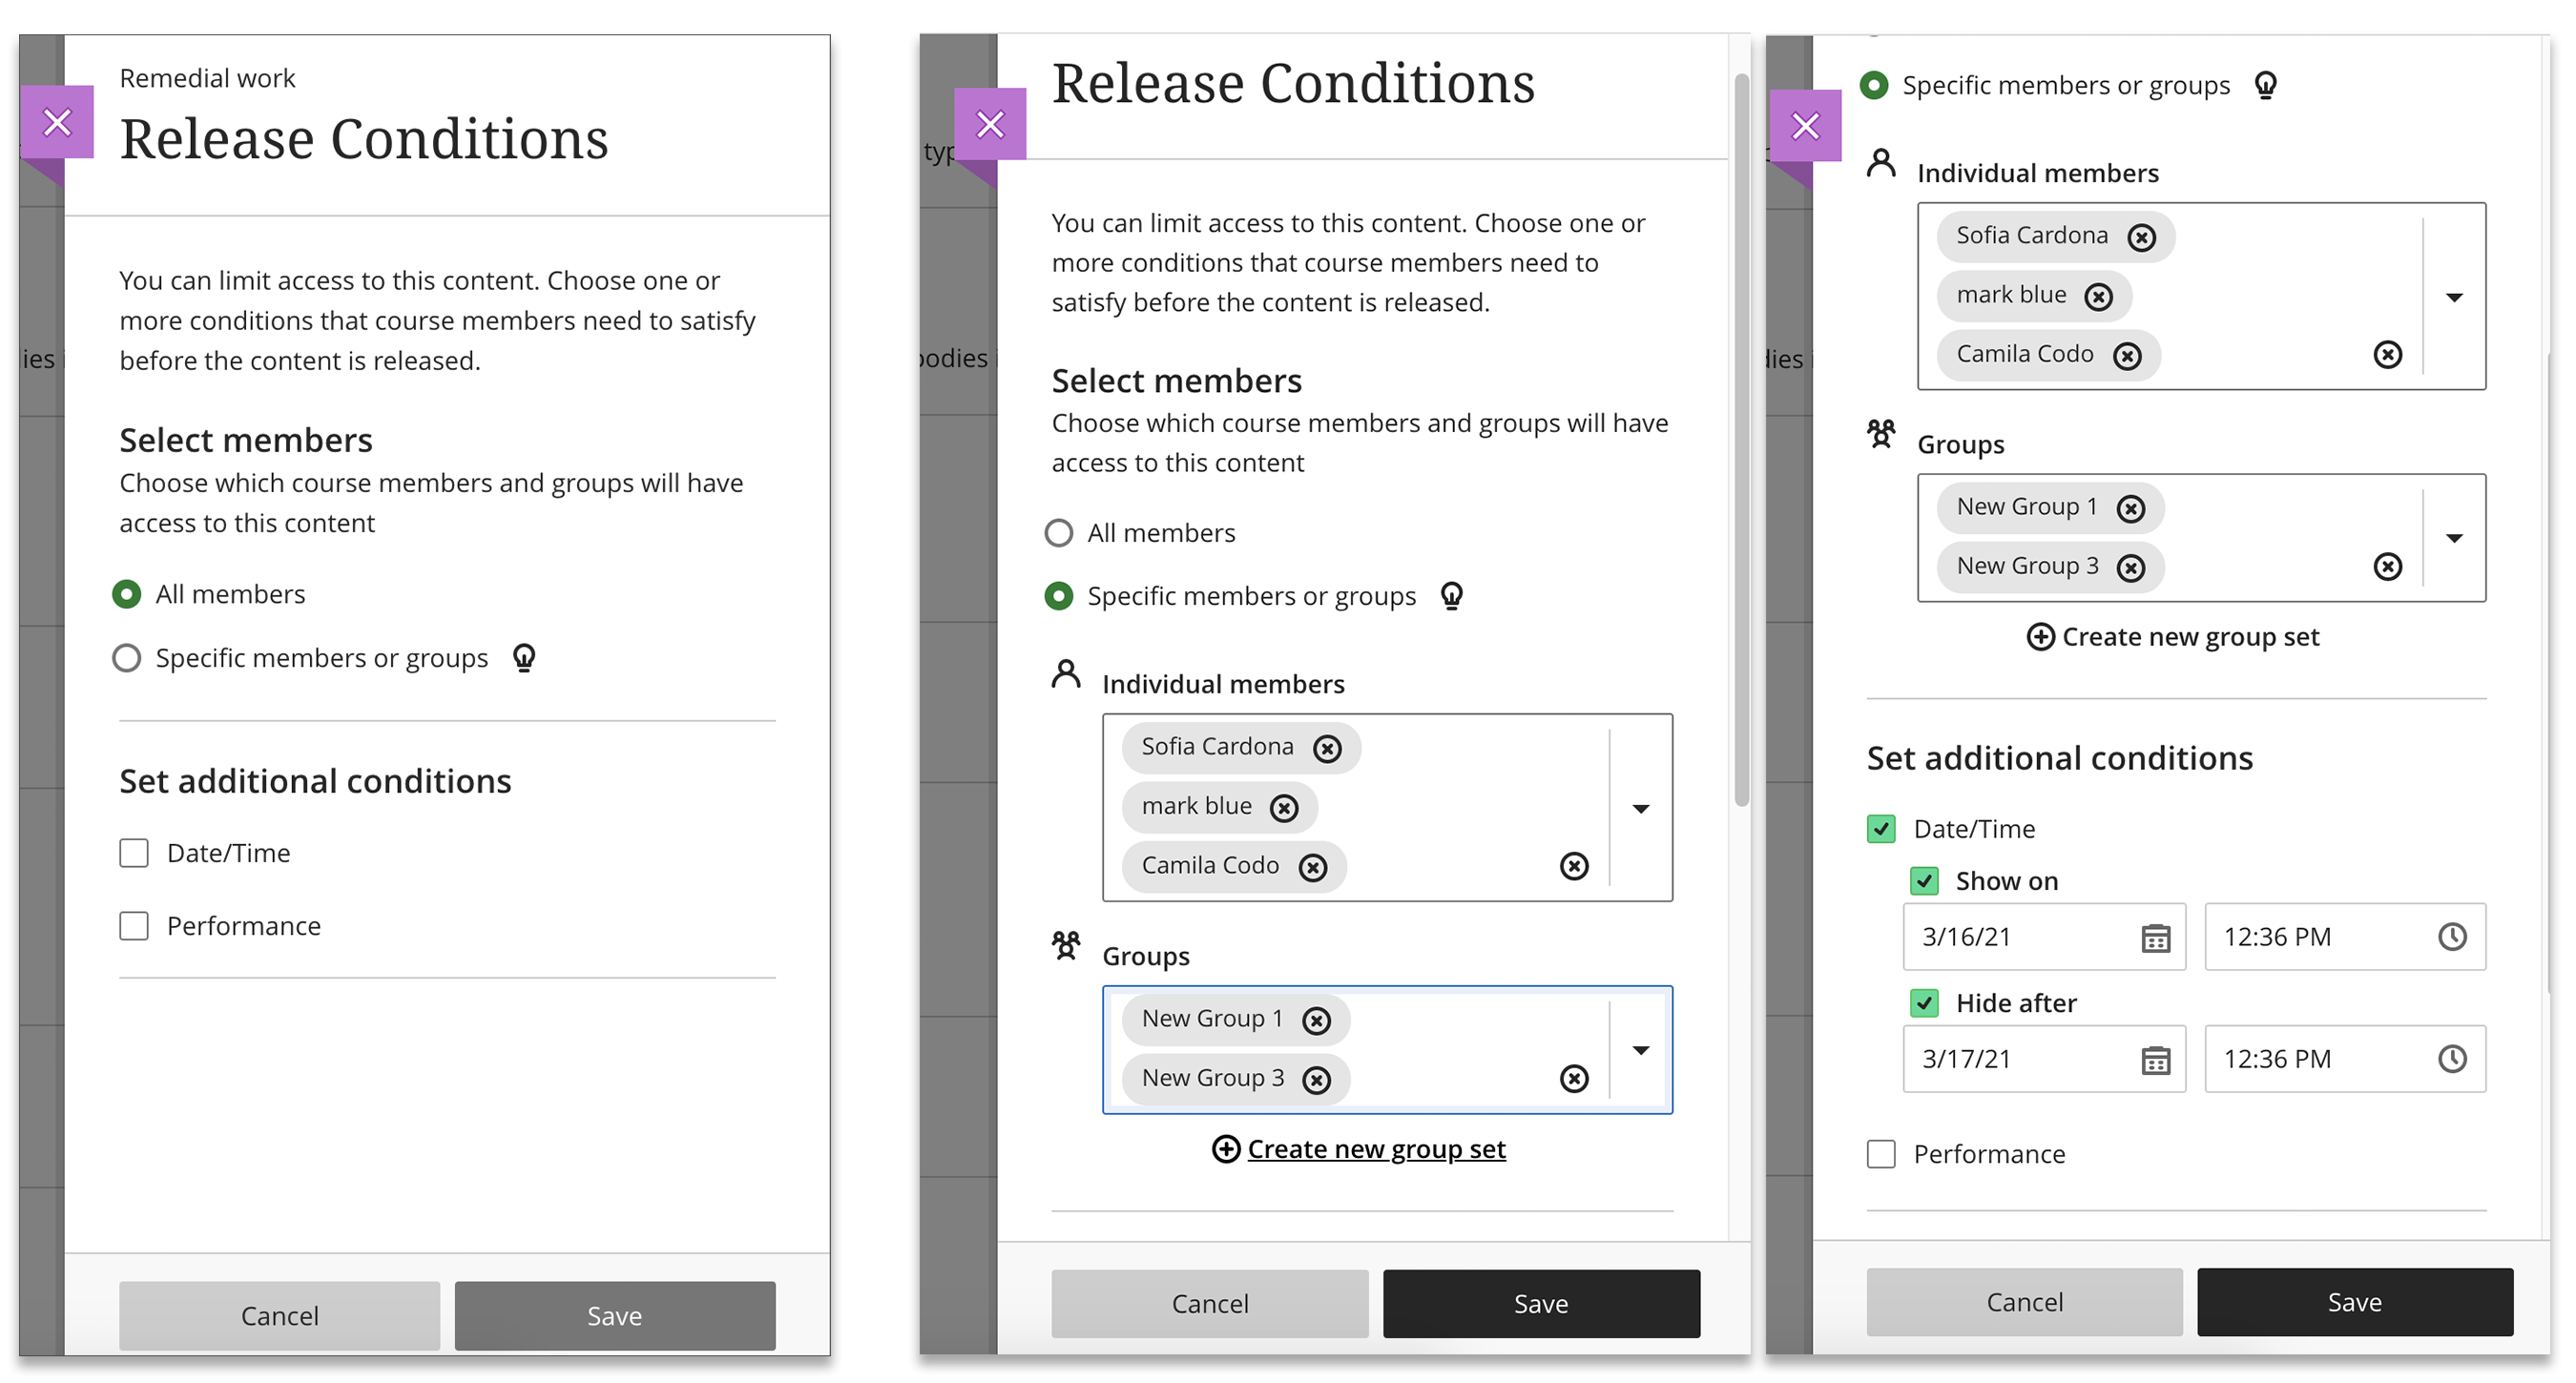
Note: If you are wanting to set an item with different date/time or performance releases, for different users and groups, you will need to create multiple instances of that item. For example: a test item with different date/time releases, depending on user/group, requires a new item for each release date/time.
On assessments: Individual students and groups can have different release date/time using the exceptions options. Go to the Blackboard guide for more information.
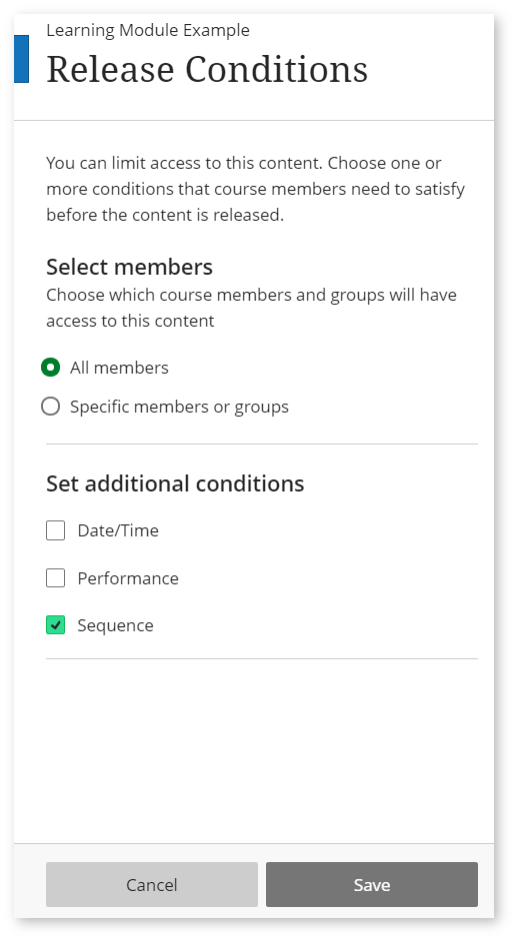
Note: you are only able to release content in sequence when using a learning module content item. A learning module enables you to organise collections of content and sequence content in a logical manner. Modules let students navigate from one content item to the next without extra clicks.
You can only set the Sequence condition if students haven't started working in the module. You can remove the condition after students start working, but you can't reapply it.
Why you might use it
Example: Students need to complete coursework in a specific order and you would like to prevent them from skipping ahead.
How to set the condition
Identify the learning module that you want to release its content to students in a specified sequence and select release conditions in the visibility menu.
On the release conditions panel, select Sequence to release the content based on the sequence (from top to bottom) that you have added the content in the module. You can also make modules available for students based on date or performance. You can show or hide content within the module and the visibility setting is preserved even when the module is visible.
What it will look like for the students
When a module is visible, students can also view all visible content within the module, including due dates. A message appears to show students that they need to open and complete the content in order, along with other conditions you set.

Resources
Conditional Availability (Blackboard YouTube, 1.58 mins)
Note: Conditional Availability in Blackboard is now known as 'Release Conditions'