CEE TEL Design Content & Learning Resources Content Management PebblePad ePortfolios PebblePad and Assessment
PebblePad and Assessment
- Aboriginal and Torres Strait Islander in Marine Science
- Courses
- Future Students
- Current Students
- Research and Teaching
- Partners and Community
- About JCU
- Reputation and Experience
- Celebrating 50 Years
- Academy
- Anthropological Laboratory for Tropical Audiovisual Research (ALTAR)
- Anton Breinl Research Centre
- Agriculture Technology and Adoption Centre (AgTAC)
- Living on Campus
- How to apply
- Advanced Analytical Centre
- Alumni
- AMHHEC
- Aquaculture Solutions
- AusAsian Mental Health Research Group
- ARCSTA
- Area 61
- Association of Australian University Secretaries
- Lions Marine Research Trust
- Australian Tropical Herbarium
- Australian Quantum & Classical Transport Physics Group
- Boating and Diving
- JCU-CSIRO Partnership
- Employability Edge
- Clinical Psychedelic Research Lab
- Centre for Tropical Biosecurity
- Career Ready Plan
- Careers at JCU
- Careers and Employability
- Chancellery
- Centre for Tropical Bioinformatics and Molecular Biology
- CITBA
- CMT
- CASE
- College of Business, Law and Governance
- College of Healthcare Sciences
- College of Medicine and Dentistry
- College of Science and Engineering
- CPHMVS
- Centre for Disaster Solutions
- CSTFA
- Cyber Security Hub
- Cyclone Testing Station
- The Centre for Disaster Studies
- Daintree Rainforest Observatory
- Defence
- Discover Nature at JCU
- Research Division
- Services and Resources Division
- Education Division
- Elite Athletes
- eResearch
- Environmental Research Complex [ERC]
- Estate
- Fletcherview
- Foundation for Australian Literary Studies
- Gender Equity Action and Research
- General Practice and Rural Medicine
- JCU Orientation
- Give to JCU
- Governance
- Art of Academic Writing
- Art of Academic Editing
- Graduate Research School
- Graduation
- Indigenous Education and Research Centre
- Indigenous Engagement
- Indigenous Legal Needs Project
- Inherent Requirements
- IsoTropics Geochemistry Lab
- IT Services
- International Students
- Research and Innovation Services
- JCU Eduquarium
- JCU Heroes Programs
- JCU Webinars
- JCU Events
- JCU Global Experience
- JCU Ideas Lab
- JCU Job Ready
- JCU Motorsports
- JCU Prizes
- JCU Sport
- JCU Turtle Health Research
- Language and Culture Research Centre
-
CEE
- Search
- About CEE
- Education Strategy
- Teaching@JCU Support
- Assessment@JCU
-
TEL Design
- About LearnJCU
-
Assessment & Feedback
- Artificial Intelligence
- Assessment Tools
- Assessing Group Work
- Assessment Case Studies
- Assessment Methods
- Enable or Disable Submission View
- Inline Marking
- Grade Centre Setup
- Group Assessment Tools
- Marking and Feedback
- Multiple Choice Questions
- One Question at a Time
- Peer Review
- Release Conditions
- Respondus Secure Online Exams
- Respondus FAQs
- Safe Assign
- Save Grade Centre Filtering
- Submission Receipts
- Test Response Download
- Test Settings
- Timezones
- Video Assessment
- Collaboration
- Communication
-
Content & Learning Resources
- Accessibility in LearnJCU
- Banners for Subjects
- Computations
- Content Management
- Create Studio
- DIY Engaging Videos
- Emojis in Ultra Docs
- Exemplars in LearnJCU
- H5P in LearnJCU
- Hypothesis
- Intro Videos
- Learning Sequence (PDF)
- LearnJCU Layouts (PDF)
- Digital Media Support
- LinkedIn Learning
- Mayer's 12 Principles of Multimedia (PDF)
- Media Resources
- Open and Licensed Resources
- Padlet in LearnJCU
- Panopto Video Capture
- PebblePad ePortfolios
- Progress Tracking
- Release Conditions
- Subject Site Setup
- Organisation & Structure
- Participation & Engagement
- The Learn Lowdown
- Teach with Tech Ebook
- Data & Evaluation
- Student Success
-
Development & Recognition
- Professional Development
- PD Webinar Recordings
-
Grants & Awards
- JCU Learning & Teaching Innovation Grants
- JCU Sessional Teaching Awards
- JCU Inclusive Practice Awards
- JCU Inclusive and Accessible LearnJCU Site Awards
- JCU Citations for Sustained Commitment to Enhancing Diversity, Equity and Inclusion
- JCU Citations for Outstanding Contributions to Student Learning
- National Citations for Outstanding Contributions to Student Learning
- JCU DVC Education's Student Experience Award
- Showcasing Excellence
- Communities of Practice
- SoLT @JCU
- LearnJCU
- Library
- Mabo Decision: 30 years on
- MARF
- Marine Geophysics Laboratory
- New students
- Off-Campus Students
- Office of the Vice Chancellor and President
- Virtual Open Day
- Orpheus
- Open Day
- Outstanding Alumni
- Parents and Partners
- Pathways to university
- Pharmacy Full Scope
- Planning for your future
- Placements
- Policy
- PAHL
- Publications
- Professional Experience Placement
- Queensland Research Centre for Peripheral Vascular Disease
- Rapid Assessment Unit
- RDIM
- Researcher Development Portal
- Roderick Centre for Australian Literature and Creative Writing
- Safety and Wellbeing
- Scholarships
- Contextual Science for Tropical Coastal Ecosystems
- Staff
- State of the Tropics
- Strategic Procurement
- Student Equity and Wellbeing
- Student profiles
- SWIRLnet
- TARL
- TESS
- TREAD
- TropEco for Staff and Students
- TQ Maths Hub
- TUDLab
- Unicare Centre and Unicampus Kids
- UAV
- VAVS Home
- Work Health and Safety
- WHOCC for Vector-borne & NTDs
- Media
- Copyright and Terms of Use
- Australian Institute of Tropical Health & Medicine
- Pay review
Integrate PebblePad as a teaching and learning tool into your subject
The most efficient way to integrate PebblePad as a teaching and learning tool in your subject is to create a PebblePad workspace and link it to your LearnJCU subject site.
Additional help resources can be found in the PebblePad and ATLAS Help.
Creating a PebblePad Workspace
Each LearnJCU subject site can effectively have its own PebblePad workspace. By default, the name of a workspace linked to a subject site will be the same as your LearnJCU subject code for easy identification.
Linking your LearnJCU site to a workspace ensures that:
- Enrolled students in your subject automatically become members of your workspace
- Students can access PebblePad directly through your LearnJCU subject site with a single sign on
- You can automatically send grades from a PebblePad assignment to the LearnJCU Grade Centre.
What you will need to do:
To create a link to a PebblePad workspace in your LearnJCU subject site, you need to be assigned the Workspace Creator role in PebblePad. Once you are a listed as a Workspace Creator you can create a PebblePad workspace for any subject you are teaching.
To request access as a PebblePad Workspace Creator please use the following web form.
PebblePad Workspace Creator Request (ServiceNow form)
Creating a link to a PebblePad workspace is initiated by adding an ATLAS tool link to your LearnJCU subject site.
- Log into your LearnJCU subject site and navigate to the folder in your Subject Content area where the ATLAS tool link is to be placed
Hover over the line just below the folder until a X displays then select Content Market.

- Locate the PebblePad ATLAS tile and click the small + in the bottom right

- Click the newly created PebblePad ATLAS link in your subject site to launch the Create a Workspace wizard.
In most cases, you will want to select the option to Create a brand new workspace. Click Continue to begin the process of configuring and synchronising your workspace.
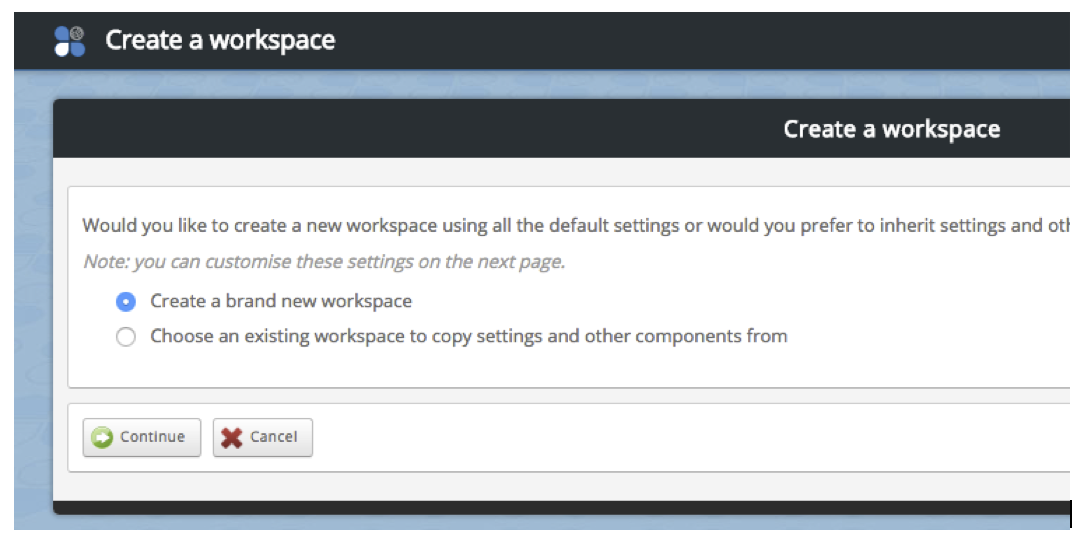
Configuring your workspace allows you to specify what students can do in your workspace.
Synchronising your LearnJCU site with your PebblePad workspace ensures that all students who are enrolled in your subject automatically become members of your workspace. This avoids the need to manually manage student membership of the workspace. Synchronisation only needs to be performed once as part of the workspace creation process.
When you opt to create a brand new workspace the Create a workspace wizard will display four tabs: Basic Settings, Advanced Settings, Managers, Members (circled).
In the Basic Settings tab, choose your College from the Select a Region pulldown, choose Active mode to ensure students can submit assessment to the workspace. Click through the other tabs you wish to configure or move through them sequentially by clicking the Continue button.
Click the Finish button to save your settings and start synchronising your students as members of the workspace and teaching staff and managers of the workspace.
Note: Synchronisation can take a few minutes if you have a large class but you will see a progress indicator to let you know how the process is going.
Tab | What you can configure |
|---|---|
Basic Settings | Title – same as your subject name by default Description – brief overview of purpose Mode – Setup mode (Students can’t see it) | Active mode (Students can access the workspace) |
Advanced Settings | Select page visible to students – About, Submissions, Resources, Community, Conversations Select entry page |
Managers | Lists the Workspace Managers – this will be anyone listed in your LearnJCU subject site as a Lecturer, Tutor or Site Administrator |
Members | Lists the Workspace Members – this will be anyone listed in your LearnJCU subject site as a Student. Click the Finish button to confirm your workspace settings and begin the synchronisation process |
After the workspace has synchronised you will have the option to:
- Manage your workspace further (recommended).
- Activate the workspace, if no further configuration required. This will make the workspace immediately visible to students.
- Close PebblePad and return to manage or activate at a later date.
Manage
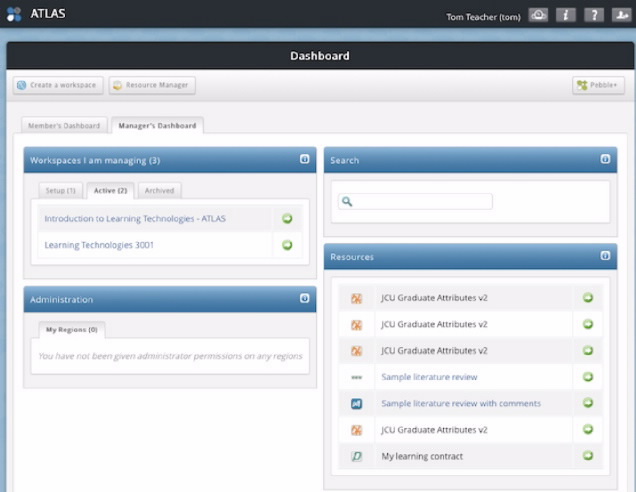
If you have created a workspace or have been added as a manager of a workspace you will have a Manager’s Dashboard that will be available in ATLAS.
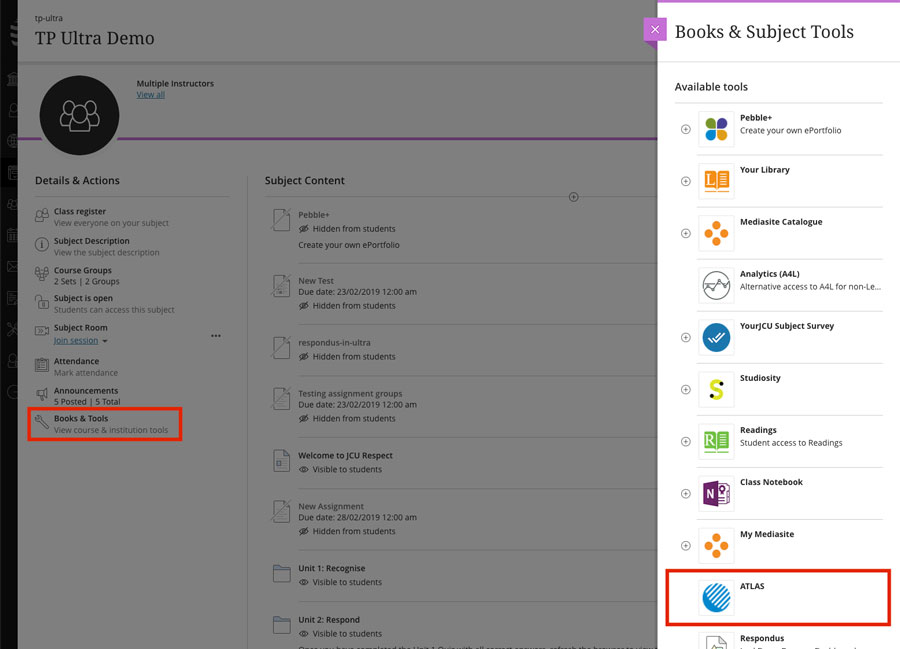
PebblePad Workspace Creators can access ATLAS from their LearnJCU subject sites, go to 'Books & Tools' in the left-hand menu under 'Details & Actions'.
Note...
In subject sites using 'Original' view, you will find it available under 'Tools' in the left-hand menu.
In the Workspaces I am managing panel you can go to any of the workspaces you are managing by clicking the workspace title or the green arrow next to the title. It will open showing the five main page tabs in blue and the grey Management tab. Click on the Management tab to open the management tools.

MANAGEMENT TOOL | WHAT YOU CAN CONFIGURE |
|---|---|
Settings | Workspace title and description | Add a Usage Statement | Choose the workspace pages (About, Submissions, Resources, Community, Conversations) that are displayed to members | Manage group subscriptions (Self enrol or manual). |
About | Add a ‘Welcome’ message and/or explain the structure of the workspace | Add hyperlinks to other pages | Display an existing Asset |
Assignments | Set deadlines for an assignment | Set the number of submissions per users | Set the type of submissions (e.g. Word docs only) | Grant extensions | Pause and assignment | Stop an assignment |
Members | Add or remove members or a batch or members (usually students) if they were not synchronised from your LearnJCU site | Create a member group | Modify permissions of members |
Managers | Add a manger or batch of managers (usually lecturers, tutors or supervisors) if they were not synchronised from your LearnJCU site | Modify or personalise their permissions |
Externals | Create an External Examiner | Modify their permissions (Note: Reserved for external moderators or assessors; does not grant full PebblePad access) |
Sets | Create smaller groupings of students (e.g. by location) | Assign roles and permissions for tutors and students |
Feedback | Edit Feedback Settings (e.g. when to release feedback; enabling grades; enabling comments) | Set up Feedback Statements, Approval Statements, Capability Settings, or Feedback Templates to facilitate the provision of comments and feedback by assessors. |
Logs | Contains a complete time and date stamped history of workspace transactions |
Reports | Generate a variety of reports about the work and activity on the workspace. Reports can include an overview of answers and evidence given on templates, workbooks or feedback templates, grade exports, and members who have not yet submitted. |
If you have created a workspace and left it in Setup mode, it must be activated before students can see and use the workspace.
To activate a workspace:
- Click the ATLAS link in your LearnJCU subject site to display your PebblePad dashboard
- In the Workspaces I am managing panel select the Setup tab to display all the workspaces in Setup mode
- Click on the green Activate button that appears in the top right corner when you are in workspace Management.
The workspace will then appear in the dashboard of all members and managers.

Add Resources
The Resources page of the workspace is where you can make resources available to your students.
Resources can include templates and workbooks for students to complete, assets that you want them to view and/or copy, uploaded files, or links to websites.
Different resources are accessed in different ways by students:
- Templates and Workbooks are accessed via the Resource Store in PebblePad
- Assets, uploaded files, and links are accessed via the Resource Page in the ATLAS Workspace
- Go to your ATLAS workspace by clicking the ATLAS link in the Tools area of your LearnJCU subject site
- Click the Resources tab to display the General Resources panel (You can add additional Resource panels if desired by clicking the Create a Panel button).
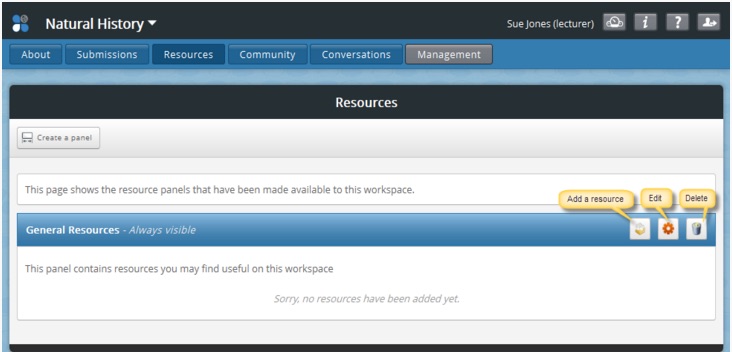
- Click the Add a Resource icon on the panel title bar then click the My Templates or My Workbooks tab to locate the template or workbook you want to add
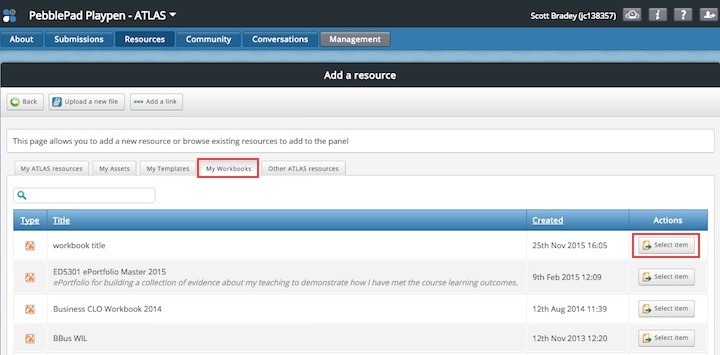
- Click the Select Item button to the right of the resource you want to add. The Manage the Selected Template page will be displayed.
- On the Manage the Selected Template page you can configure a number of options for how the resource can be used. In most cases, you can leave the settings at their default values. Click the 'I have read this information and wish to continue' checkbox then click the Continue button. The Edit General Resources page will be displayed.
- On the Edit General Resources page you can click the Edit icon next to the selected asset to modify any of the previous settings or descriptions.
Note: the Permissions column shows the assets as View/Use only. This means that this type of resource (Template or Workbook) can by found by students in their Resources > For Me area in Pebble+. Once located, students can choose to View or Use the resource and save their own copy of it. After saving it will become an Asset > By Me.
- Go to your ATLAS workspace by clicking the ATLAS link in the Tools area of your LearnJCU subject site
- Click the Resources tab to display the General Resources panel (You can add additional Resource panels if desired by clicking the Create a Panel button).

- Click the Add a Resource icon on the panel title bar then click the My Assets tab to locate the asset you want to add. You could upload a new file that is not currently in your assets store by clicking the Upload a new file button, or add a website by clicking
the Add a link button.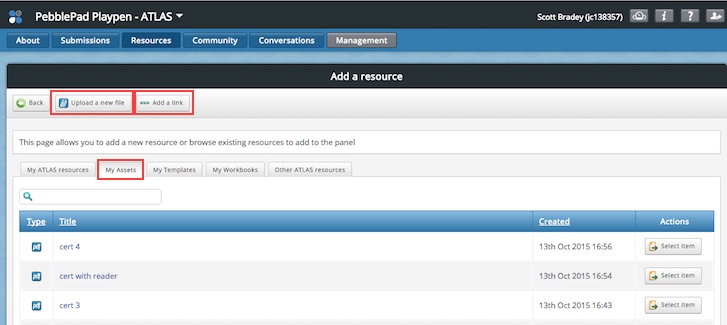
- On the Manage the Selected Asset page you can configure a number of options for how the resource can be used. In most cases, you can leave the settings at their default values or title="Assets as resources" target="_blank">review this page for a more detailed explanation. Click the 'I have read this information and wish to continue' checkbox then click the Continue button. The Edit General Resources page will be displayed.
- On the Edit General Resources page you can click the Edit icon next to the selected asset to modify any of the previous settings or descriptions. If you have multiple resources you can also adjust their position in the list of resources.
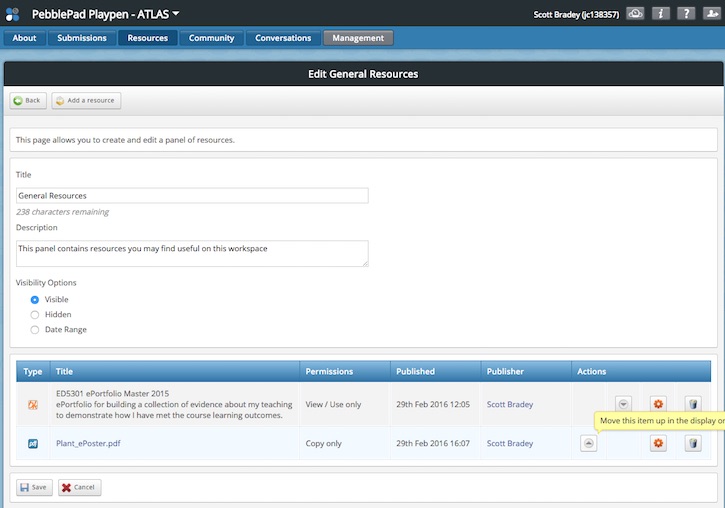
In this example the Permissions column shows the asset as Copy only (it could also show View/Use only or Copy & Submit only depending on your selected settings).
This means that this type of resource (document, file or weblink) must by copied by students in order to be viewed or used. to use the asset would need to visit the workspace by clicking the ATLAS, visit the Resources area, then click the Copy button that will be displayed next to the asset to copy the asset their their own asset store.